Organisation / Service Provider Guide
Complete guide for organisations joining the CRANE Data Marketplace.
1. Overview
This guide helps organisations (both Data Sources and Data Using Services) to onboard to the CRANE dHDSI Data Marketplace. It explains what the marketplace is, how trust works, and what an organisation needs to do in order to publish or consume data services.
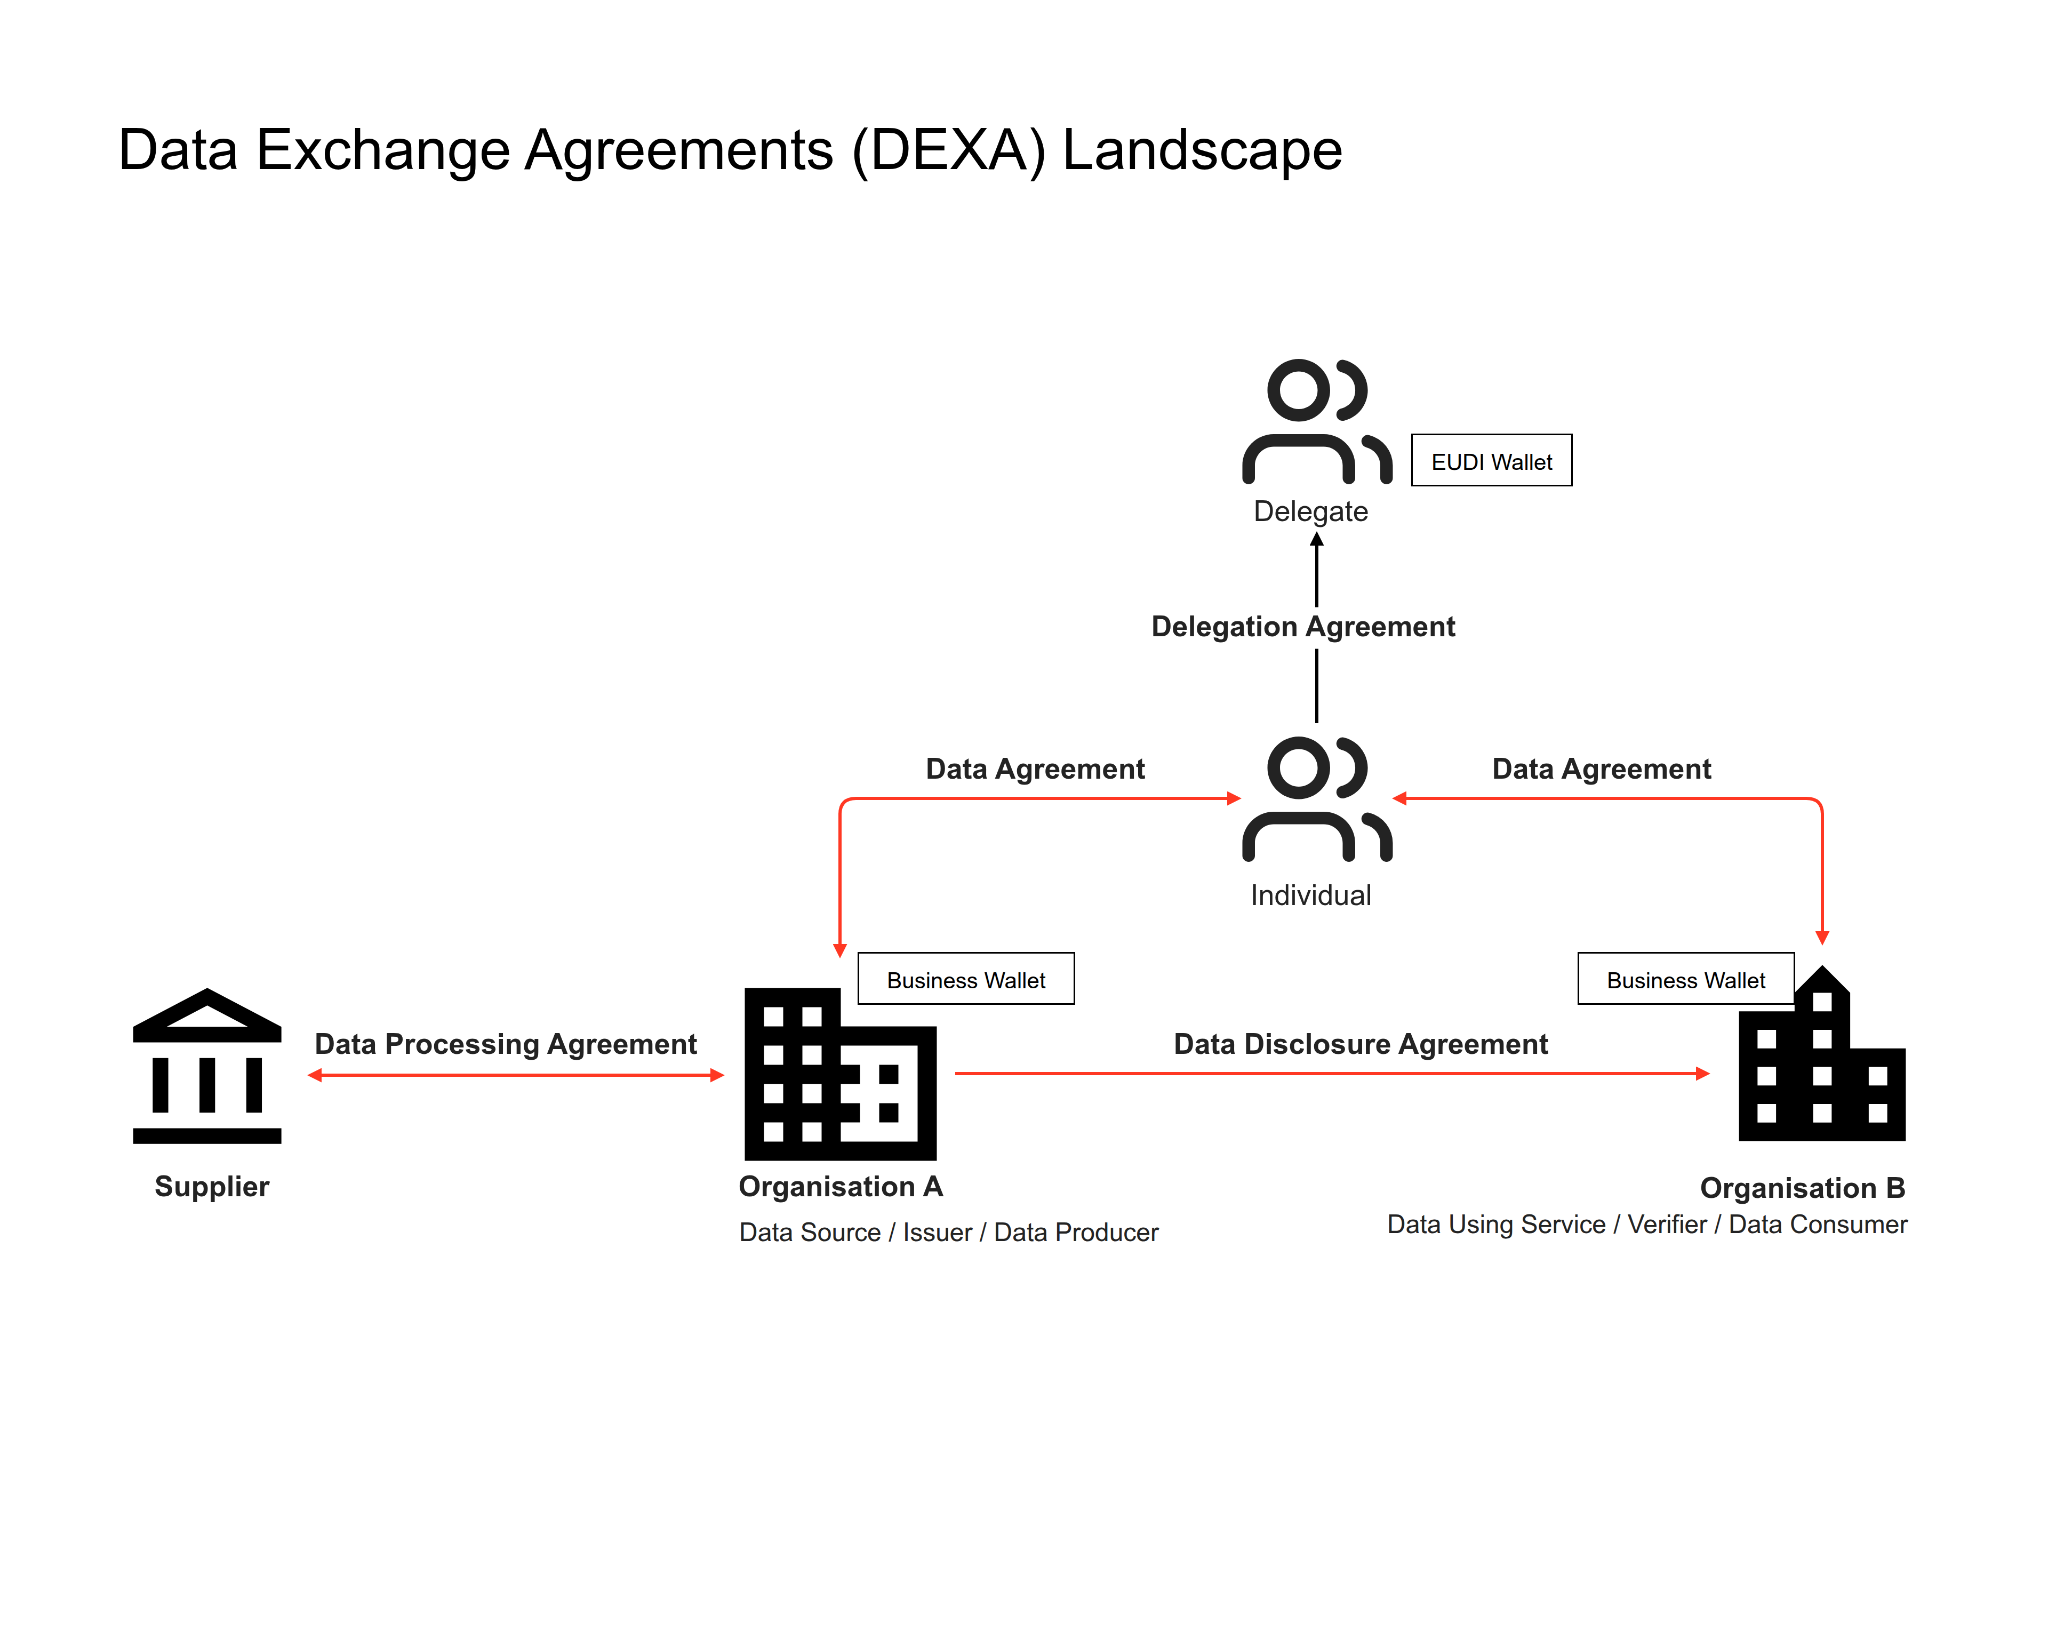
Figure 1: Data Exchange Framework adopted in CRANE
CRANE dHDSI provides a trusted framework for data exchange between verified organisations and individuals. Verified organisations and individuals exchange data by setting Data Agreements, issuing Data Disclosure Agreements, and using EUDI Wallets (for businesses and individuals) to authorise, delegate, and audit sharing under marketplace governance.
Key Roles
Marketplace Administrator: Oversees the entire ecosystem, managing data service listings, enforcing governance policies, and ensuring regulatory compliance across all marketplace activities.
Organisation Administrator: Represents individual participating organisations, publishes data services to the marketplace, and negotiates agreements with other verified organisations to enable data exchange.
2. Prerequisites
Before you can join the Data Marketplace, your organisation must meet one of these conditions:
- You are already onboarded with a Data Intermediation Service Provider (DISP). The DISP provides consent management and digital wallet services.
- You have implemented equivalent functions (of adopting consent management and digital wallets) that meet the governance requirements.
This guide assumes your organisation is onboarded with a DISP. To begin, send an email to
[email protected] to request the creation of your business wallet account. Once provisioned, your account will include Legal Person Identification Data (Legal PID) and Wallet Unit Attestation (WUA) credentials.
3. Create an Account
Visit the Data Marketplace onboarding page to register your organisation.
Step 1: Enter the organisation administrator's details.
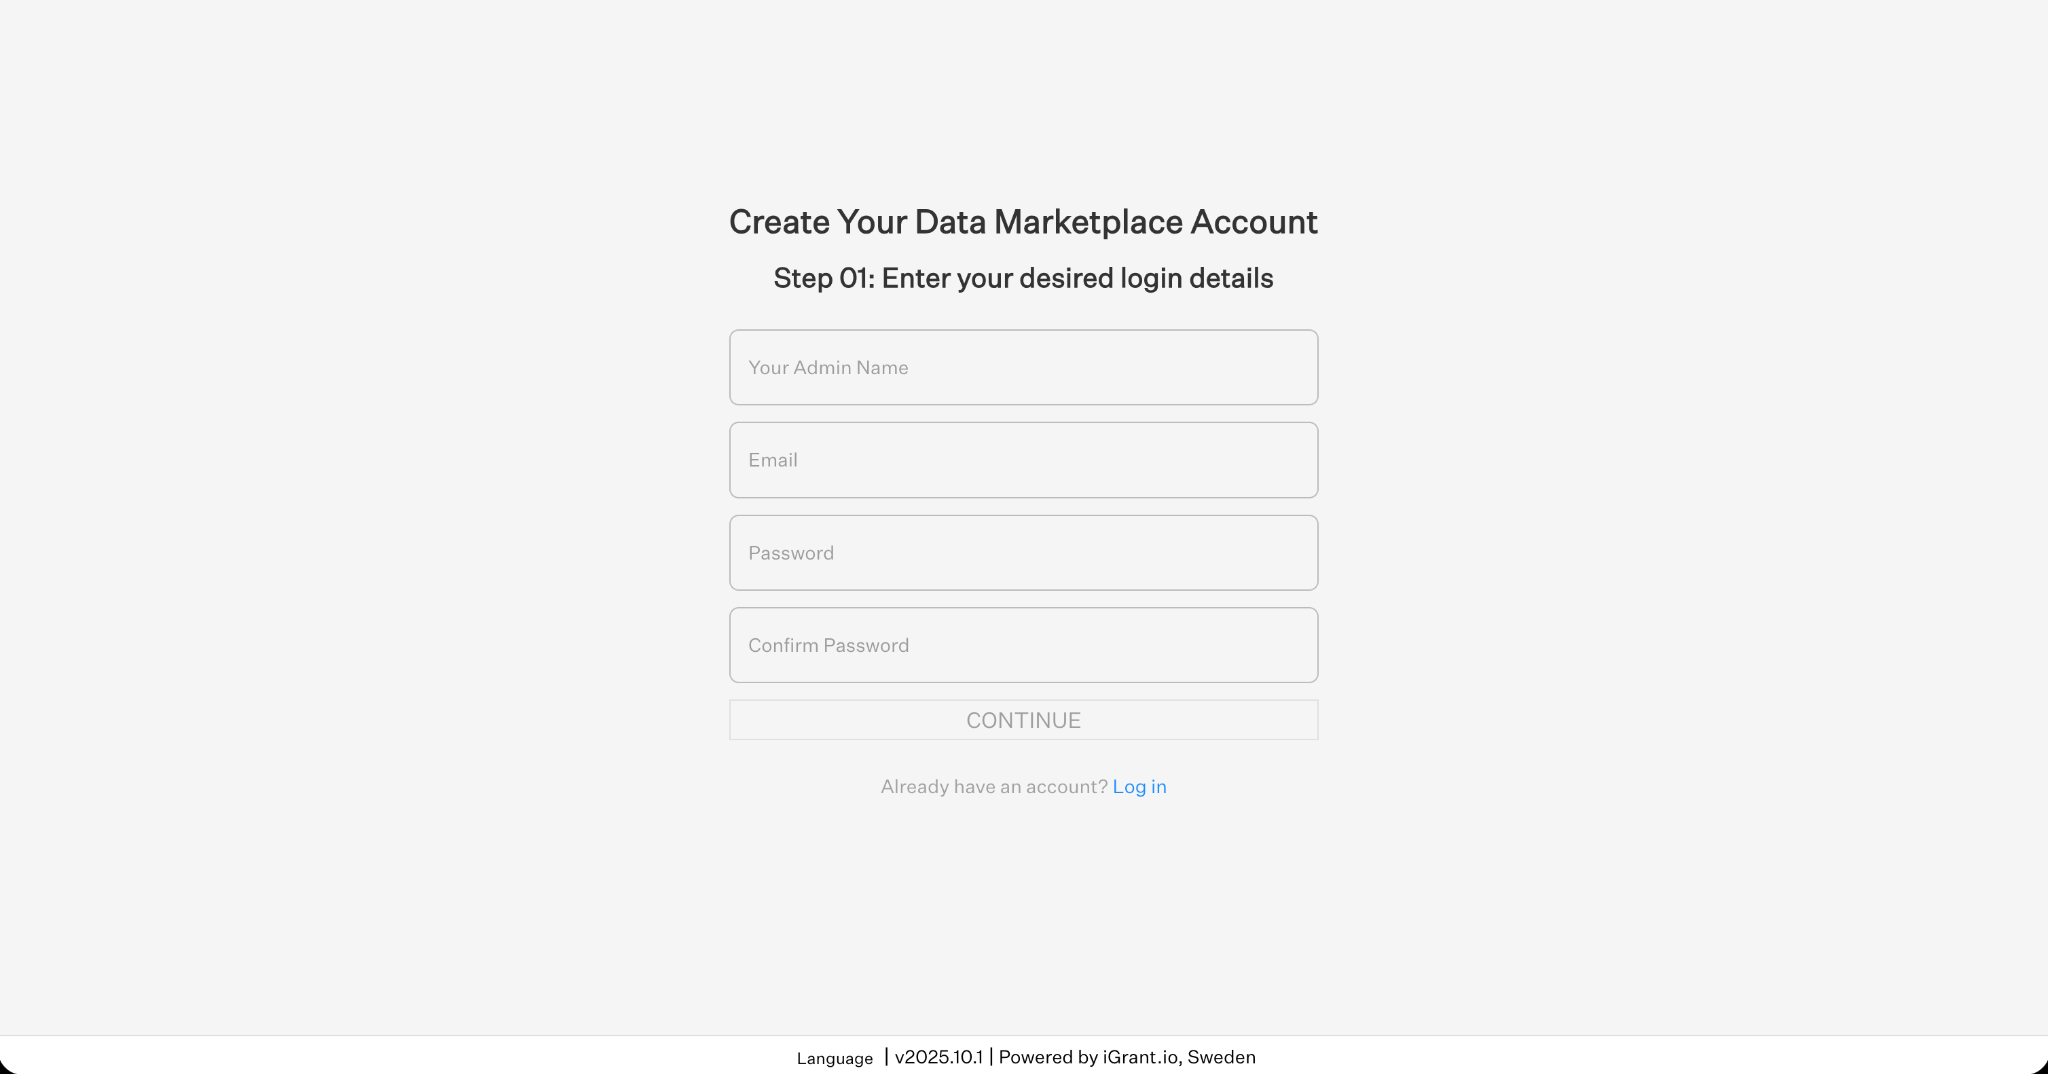
Fig 1: Provide organisation administrator details
Step 2: Enter your organisation's details.
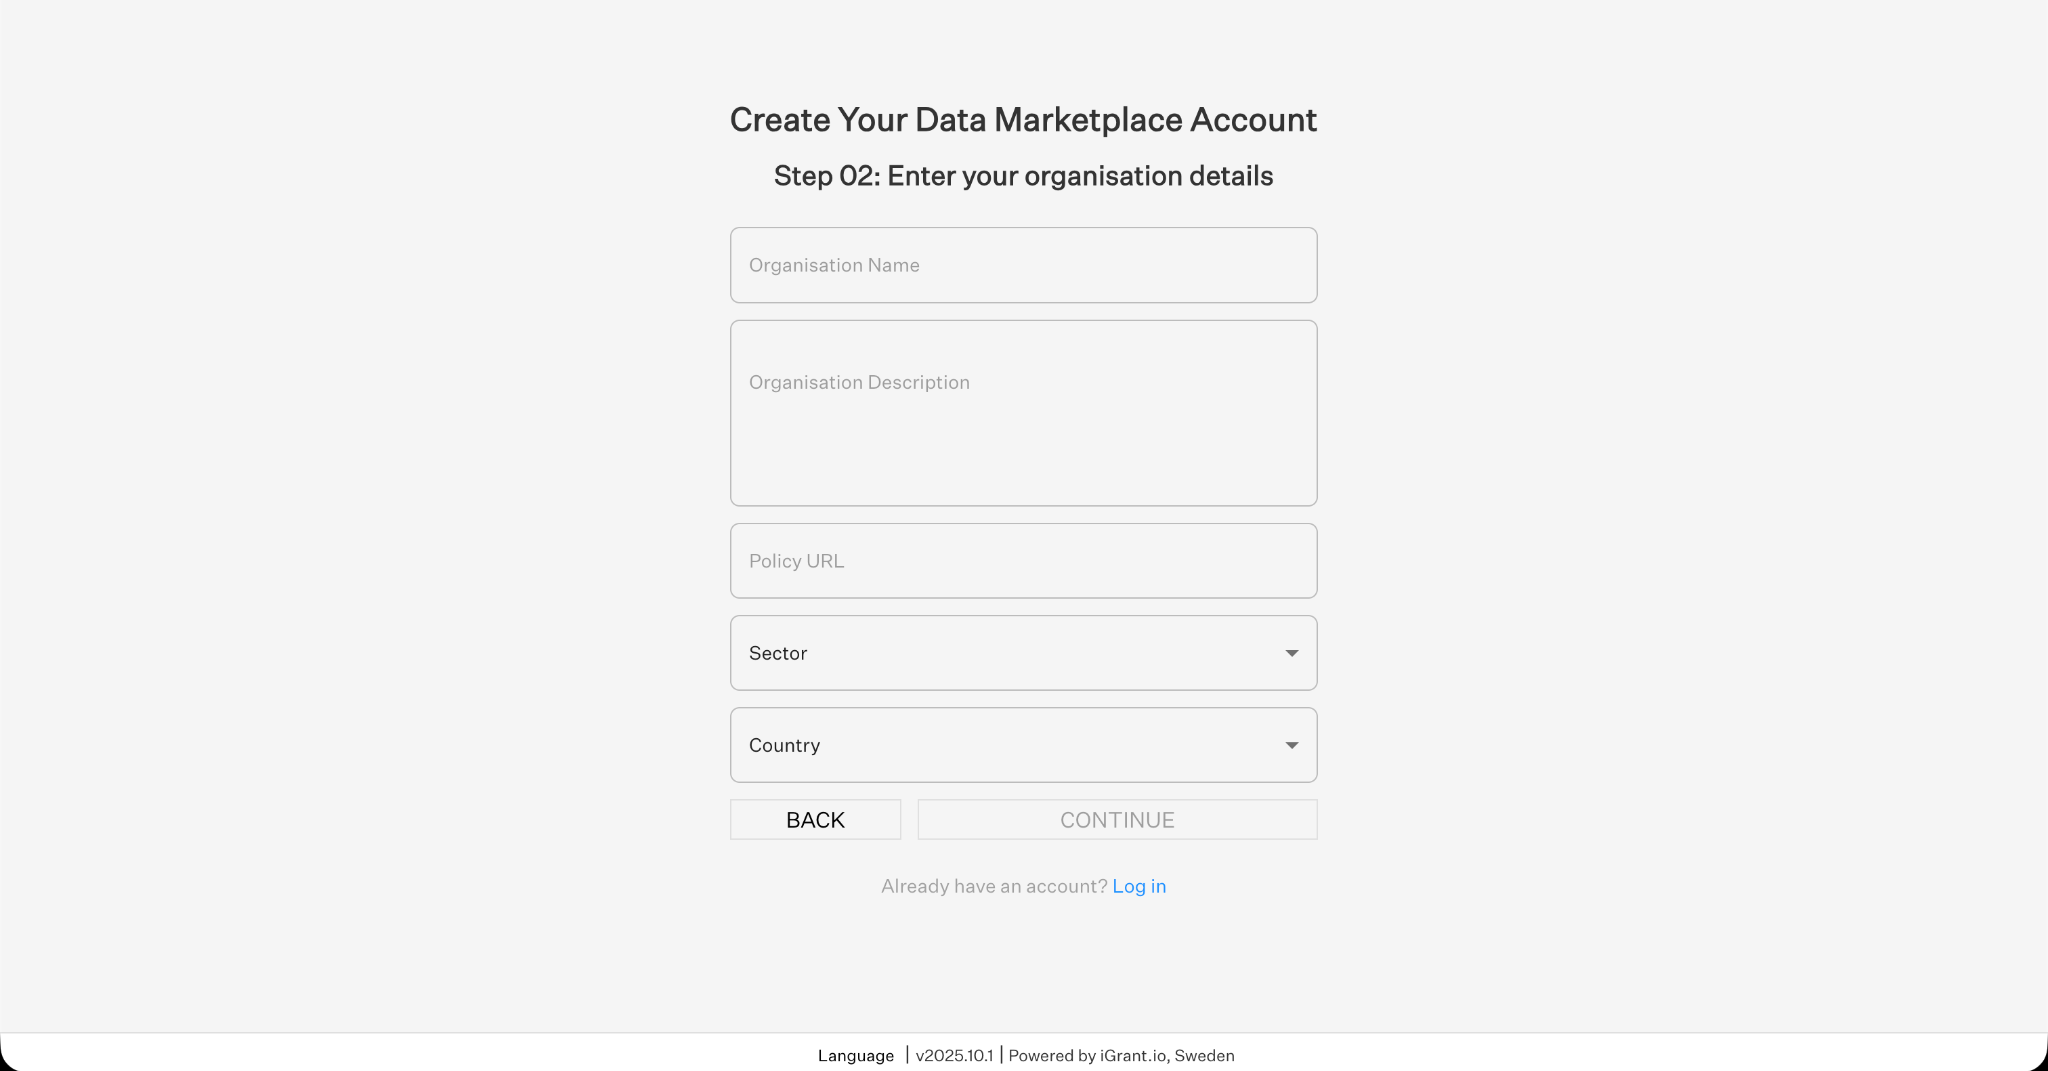
Fig 2: Provide organisation details
Once both steps are completed, your Data Marketplace account will be created.
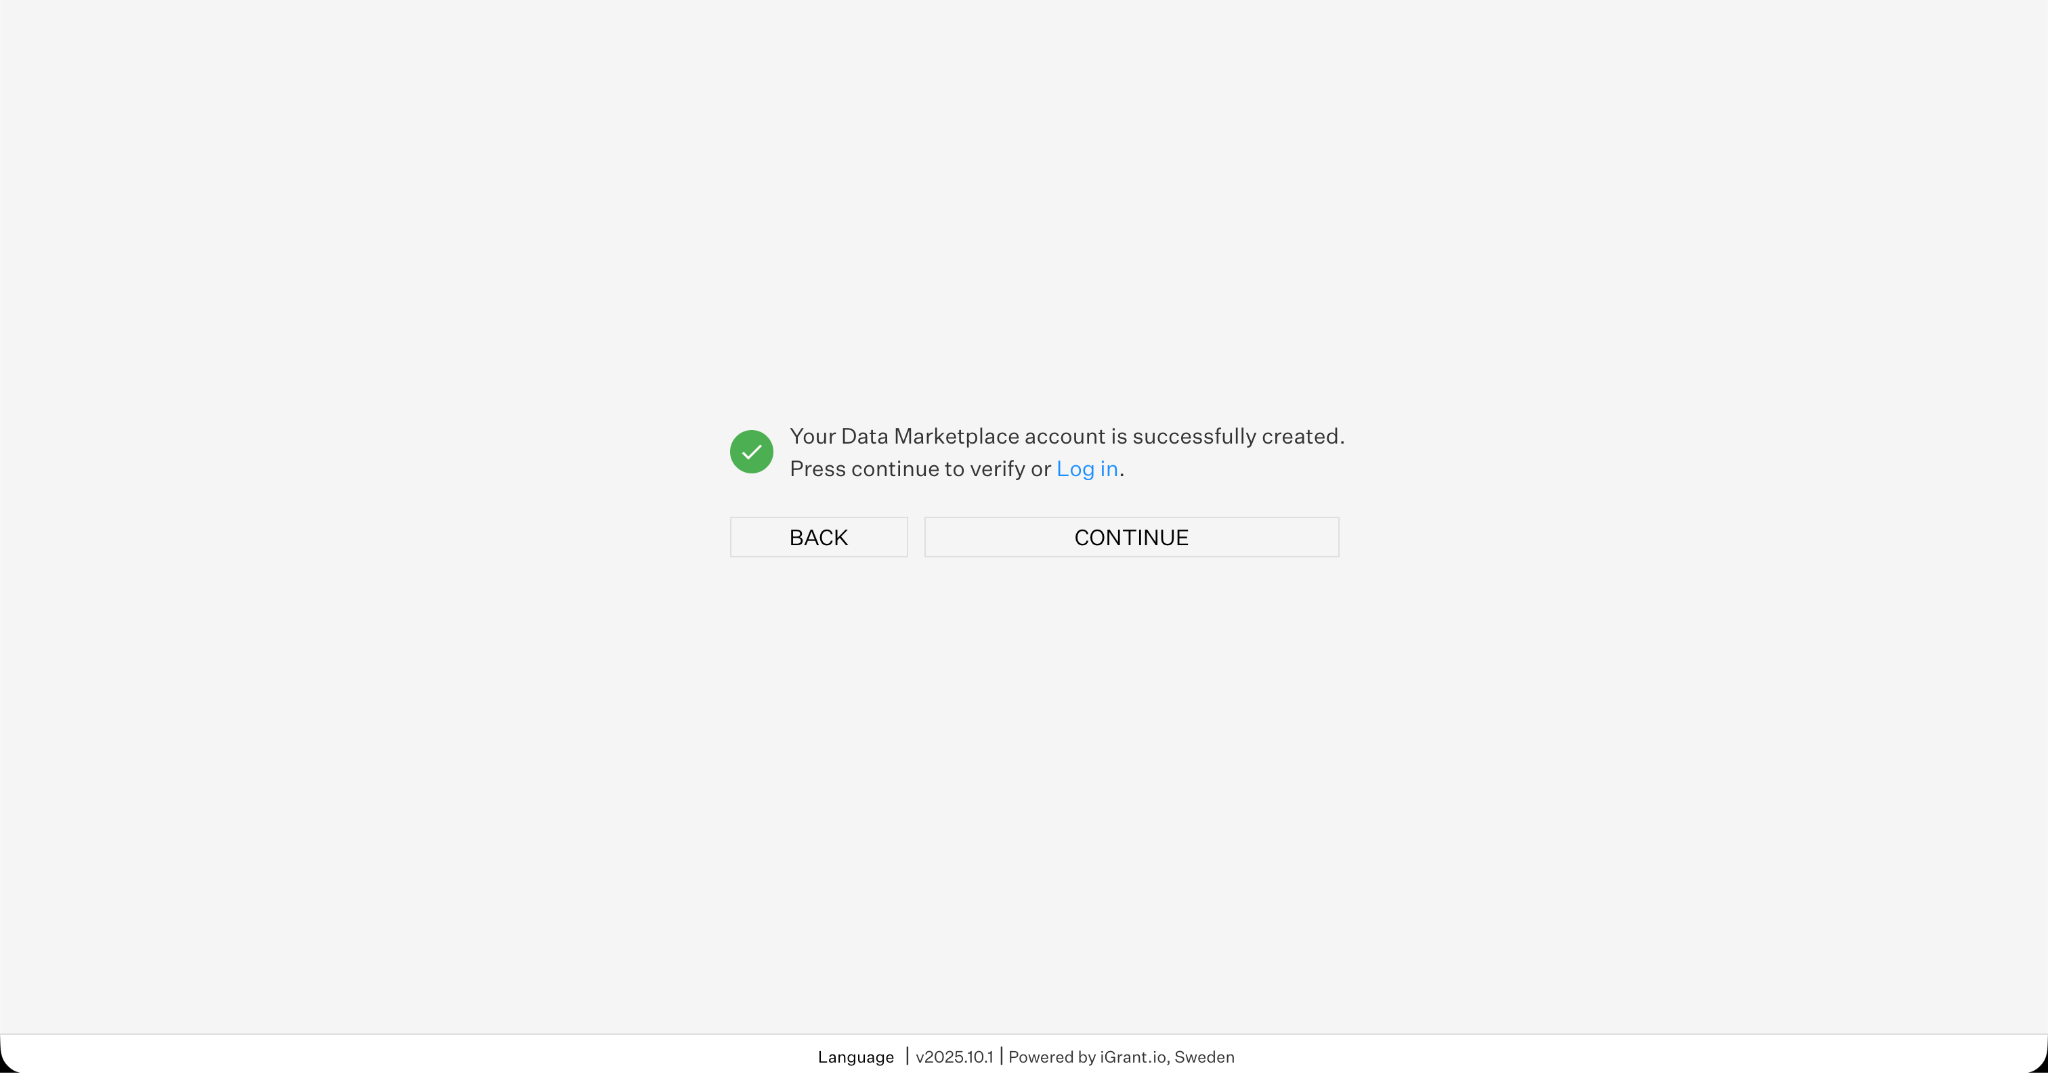
Fig 3: Successful account creation
After account creation, you can either click CONTINUE to proceed with onboarding or log in later to continue.
4. Connect the Business Wallet
In the next step, provide the Business Wallet Address obtained from your DISP account.
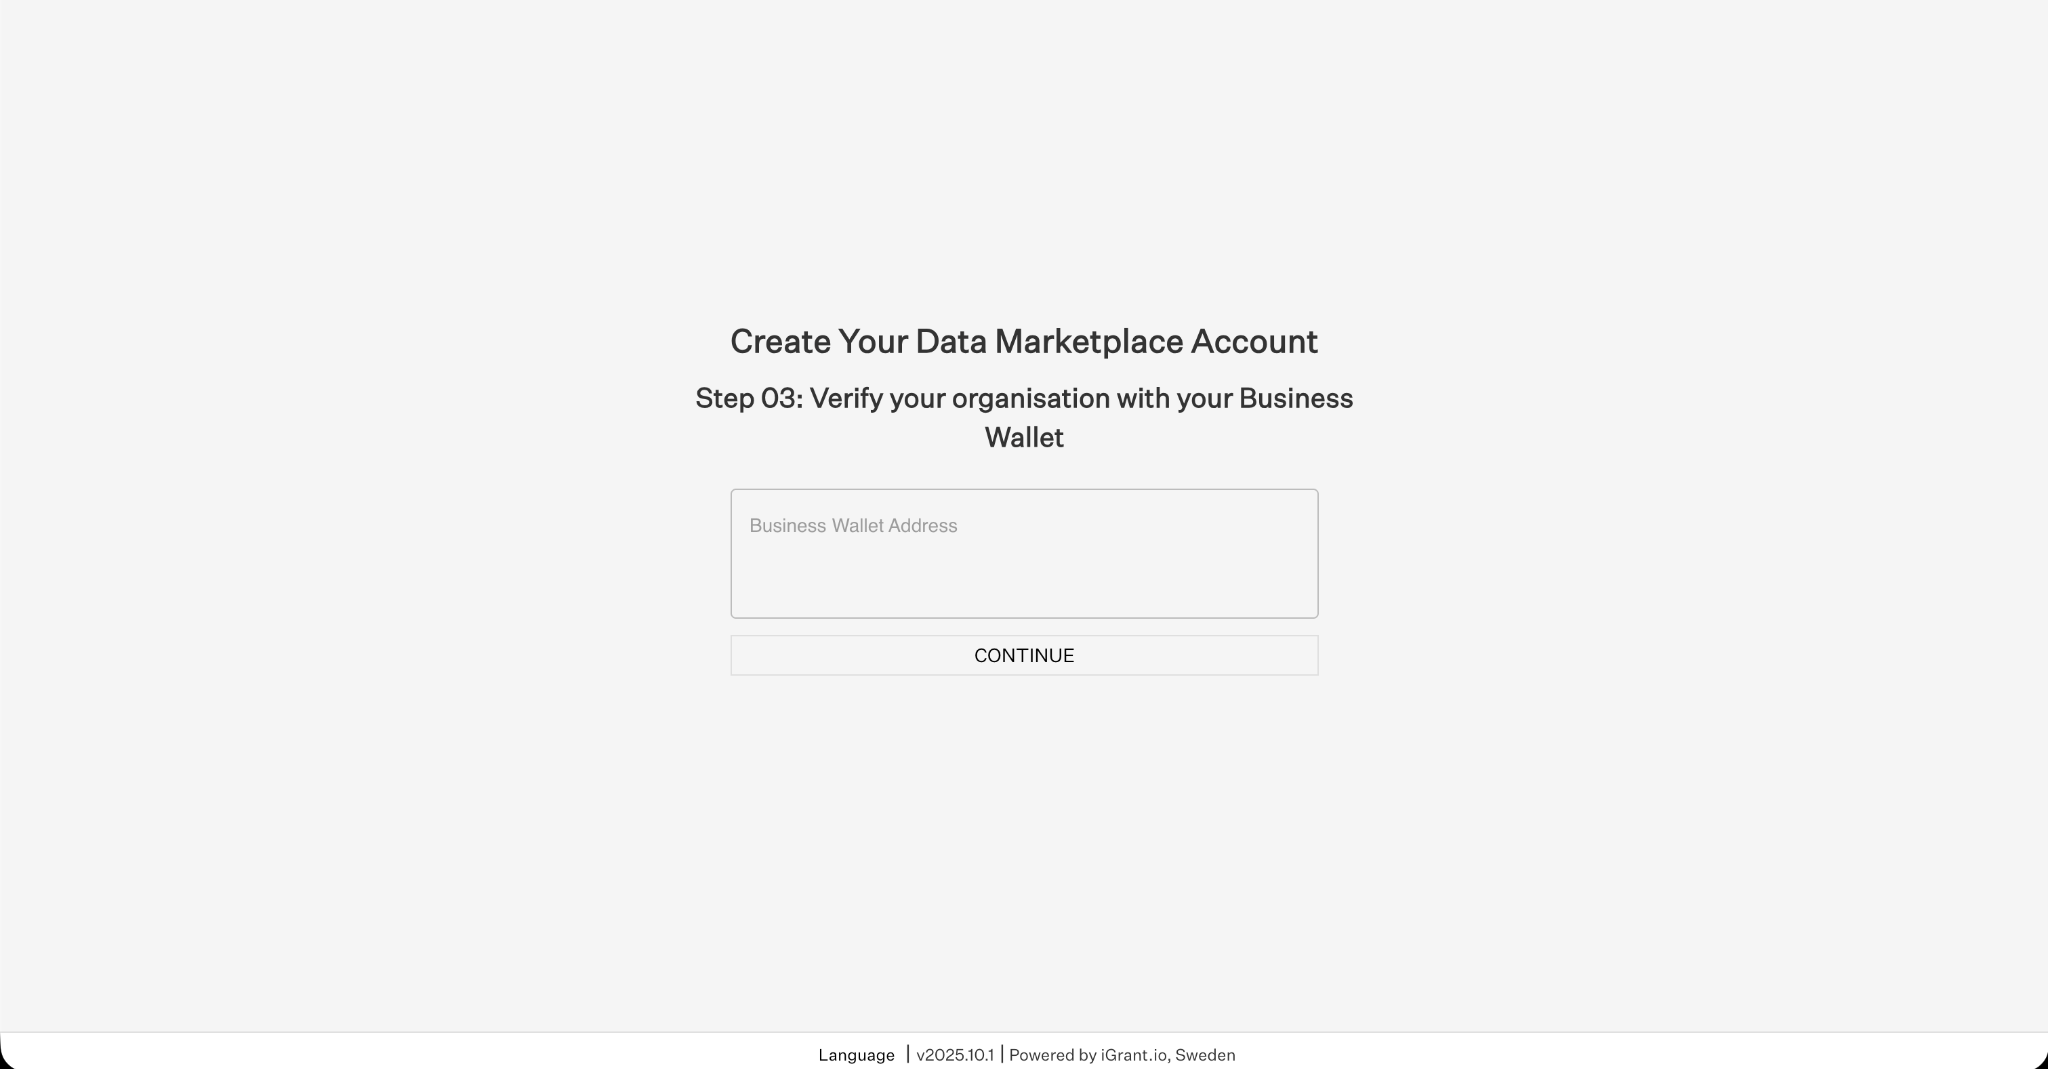
Fig 4: Provide business wallet address
The Business Wallet Address can be copied from the Base Configurations page under Digital Wallet (OpenID4VC) in the DISP portal.
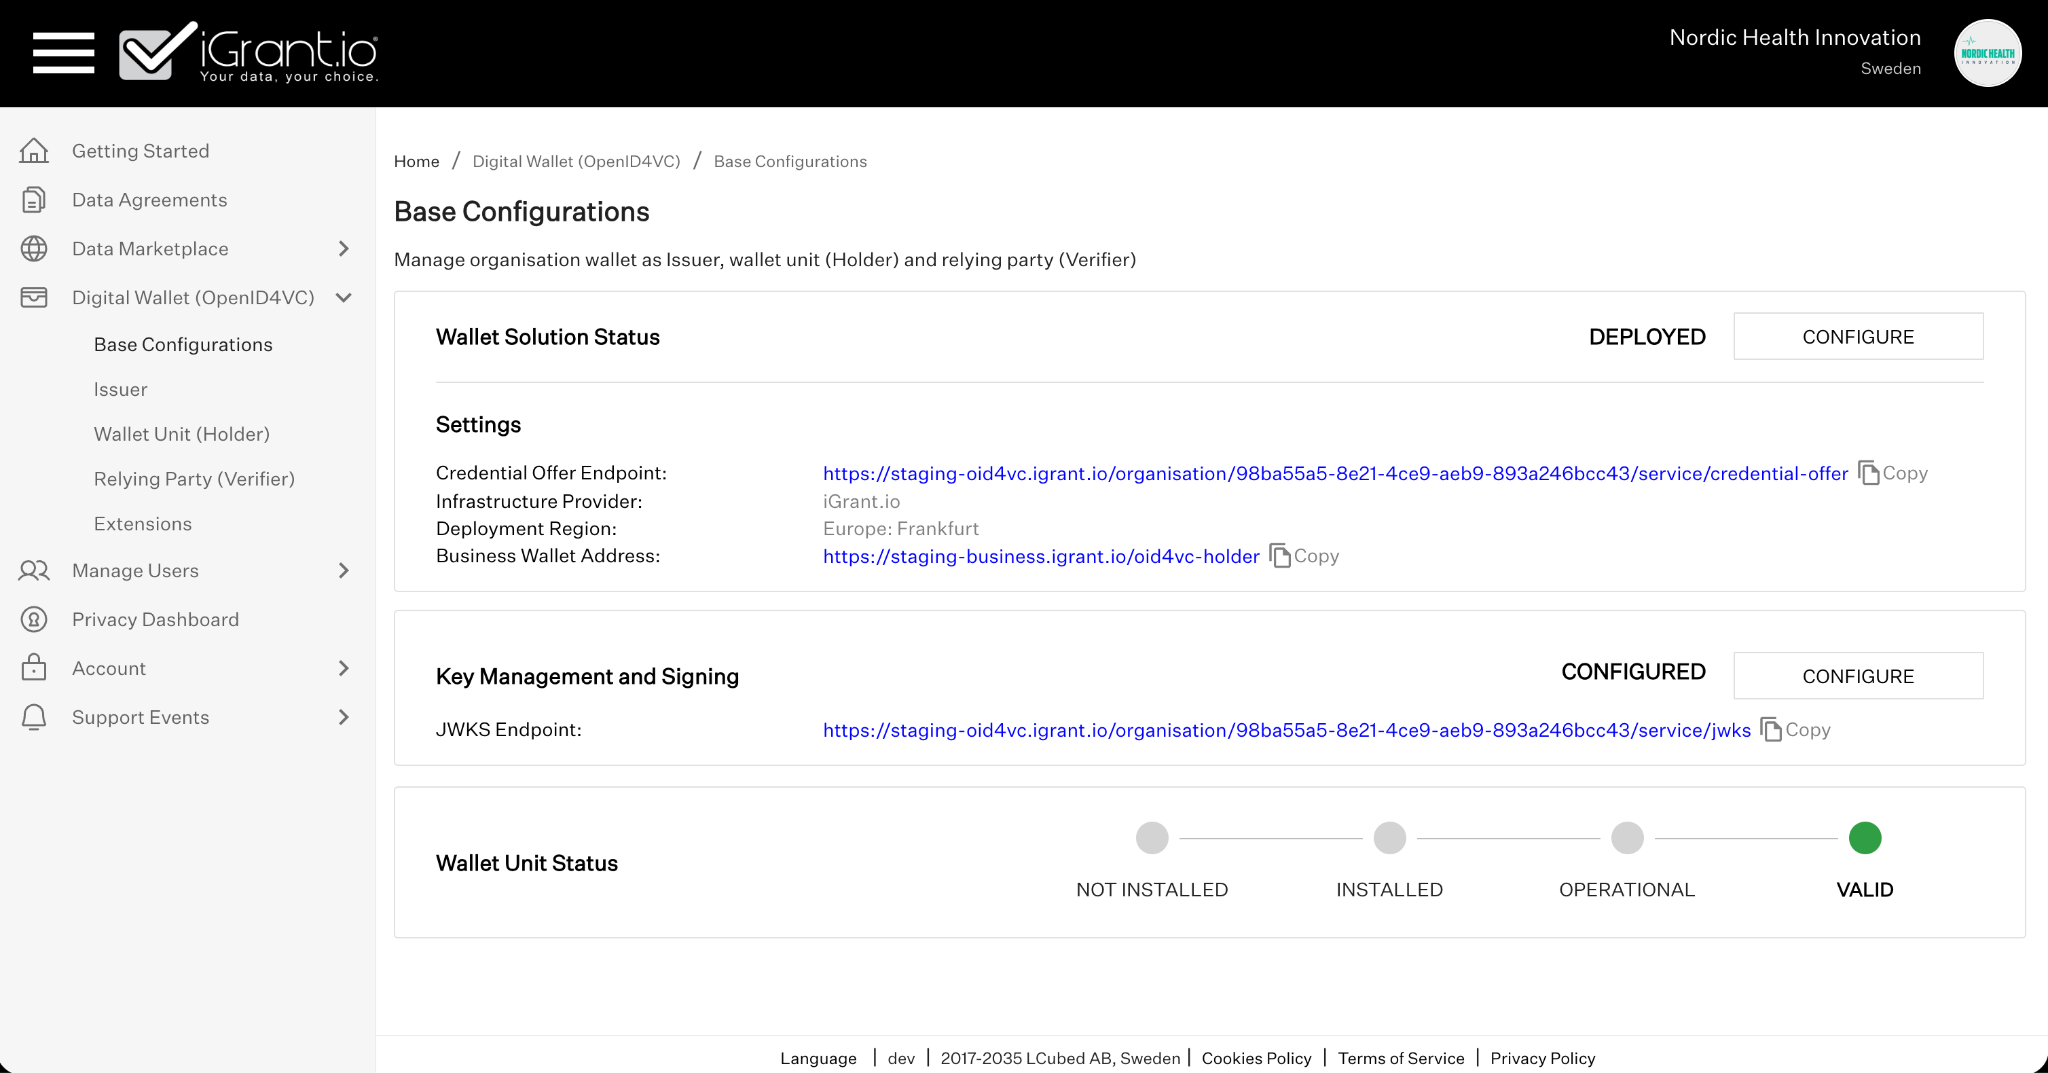
Fig 5: Base configurations page
5. Verify Organisational Legitimacy
Once the organisation wallet is connected, the Data Marketplace will redirect to the wallet and request access to your Legal PID to verify the organisation's legitimacy. Click Confirm to approve.
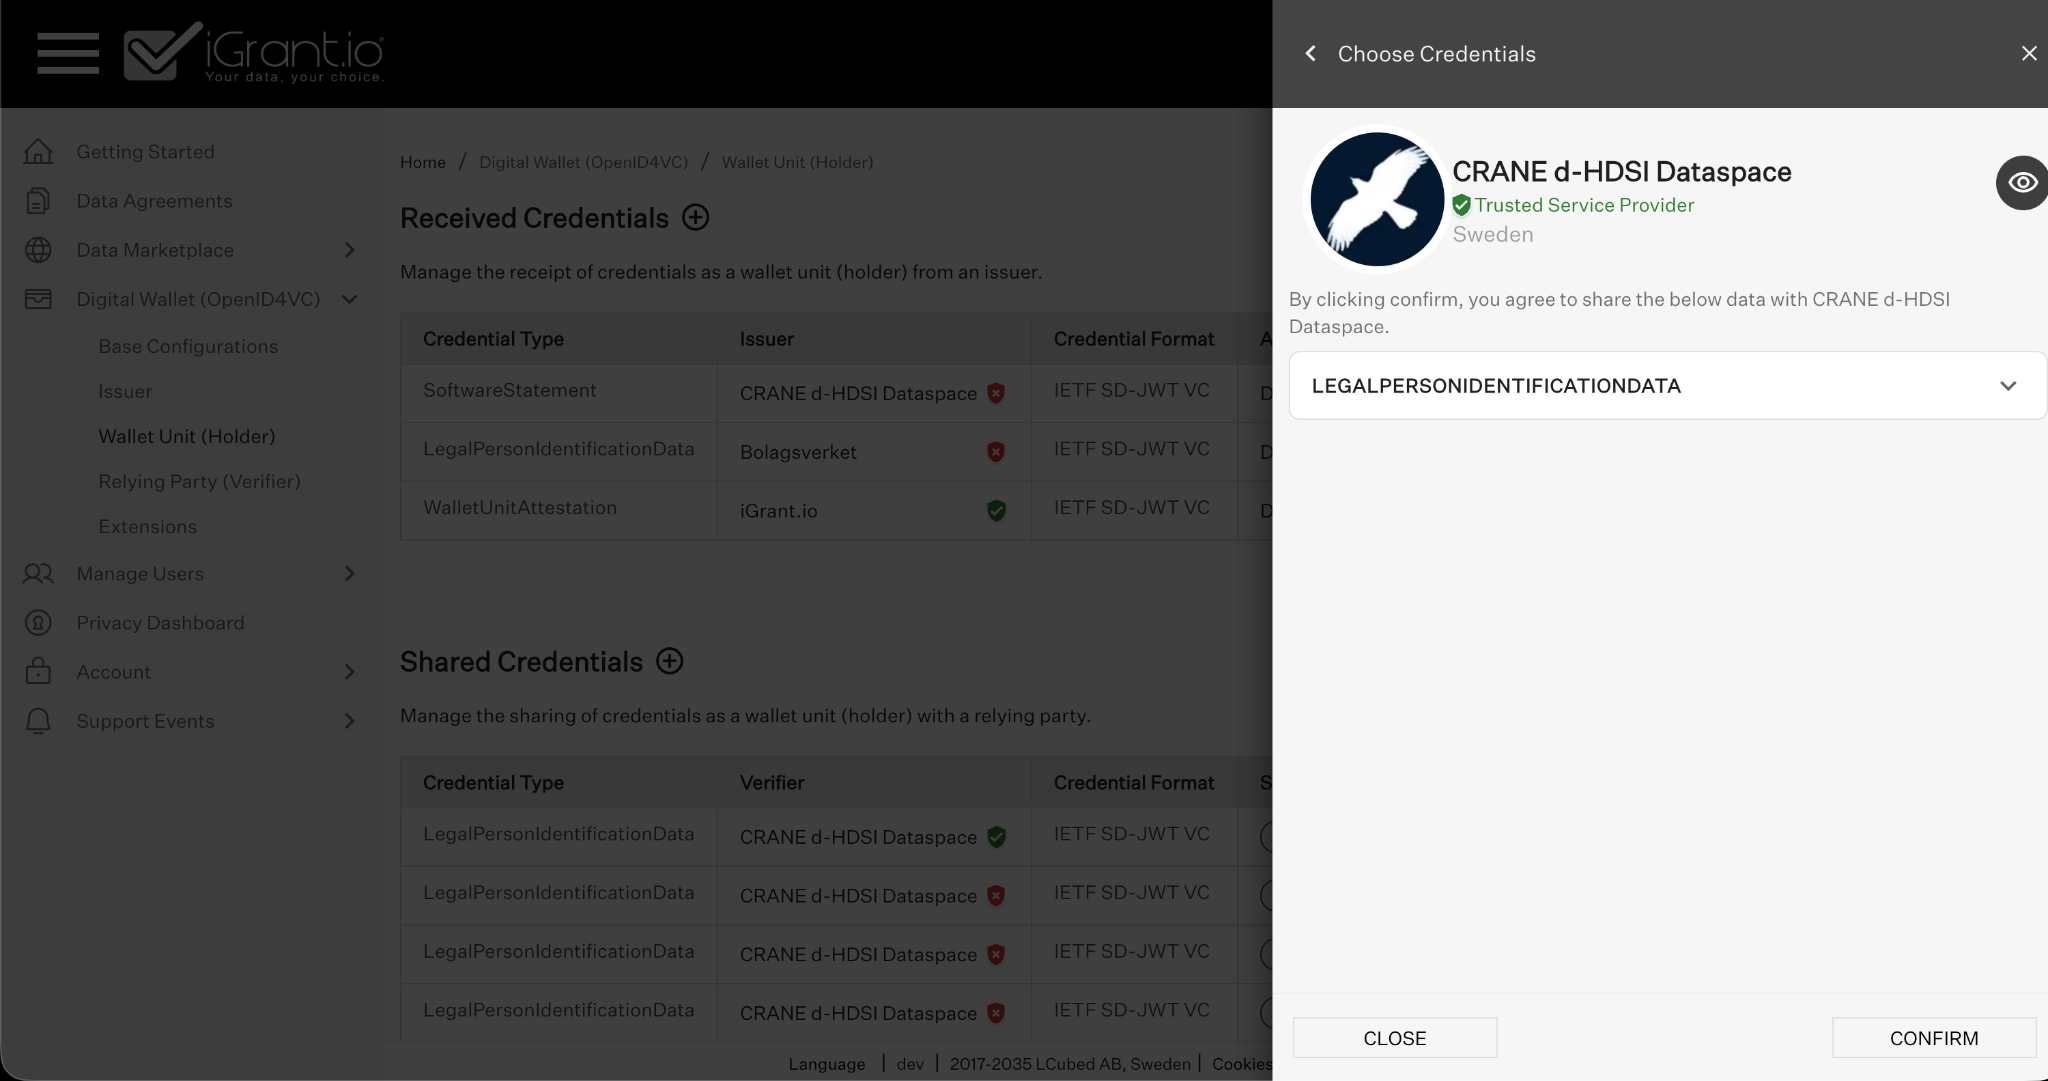
Fig 6: Verify Legal PID
The administrator will then be redirected back to the Data Marketplace and shown a preview of the Legal PID.
6. Accept the Code of Conduct
The organisation administrator is presented with the Data Marketplace Code of Conduct. Review the document carefully, then click SIGN AND CONTINUE to proceed.
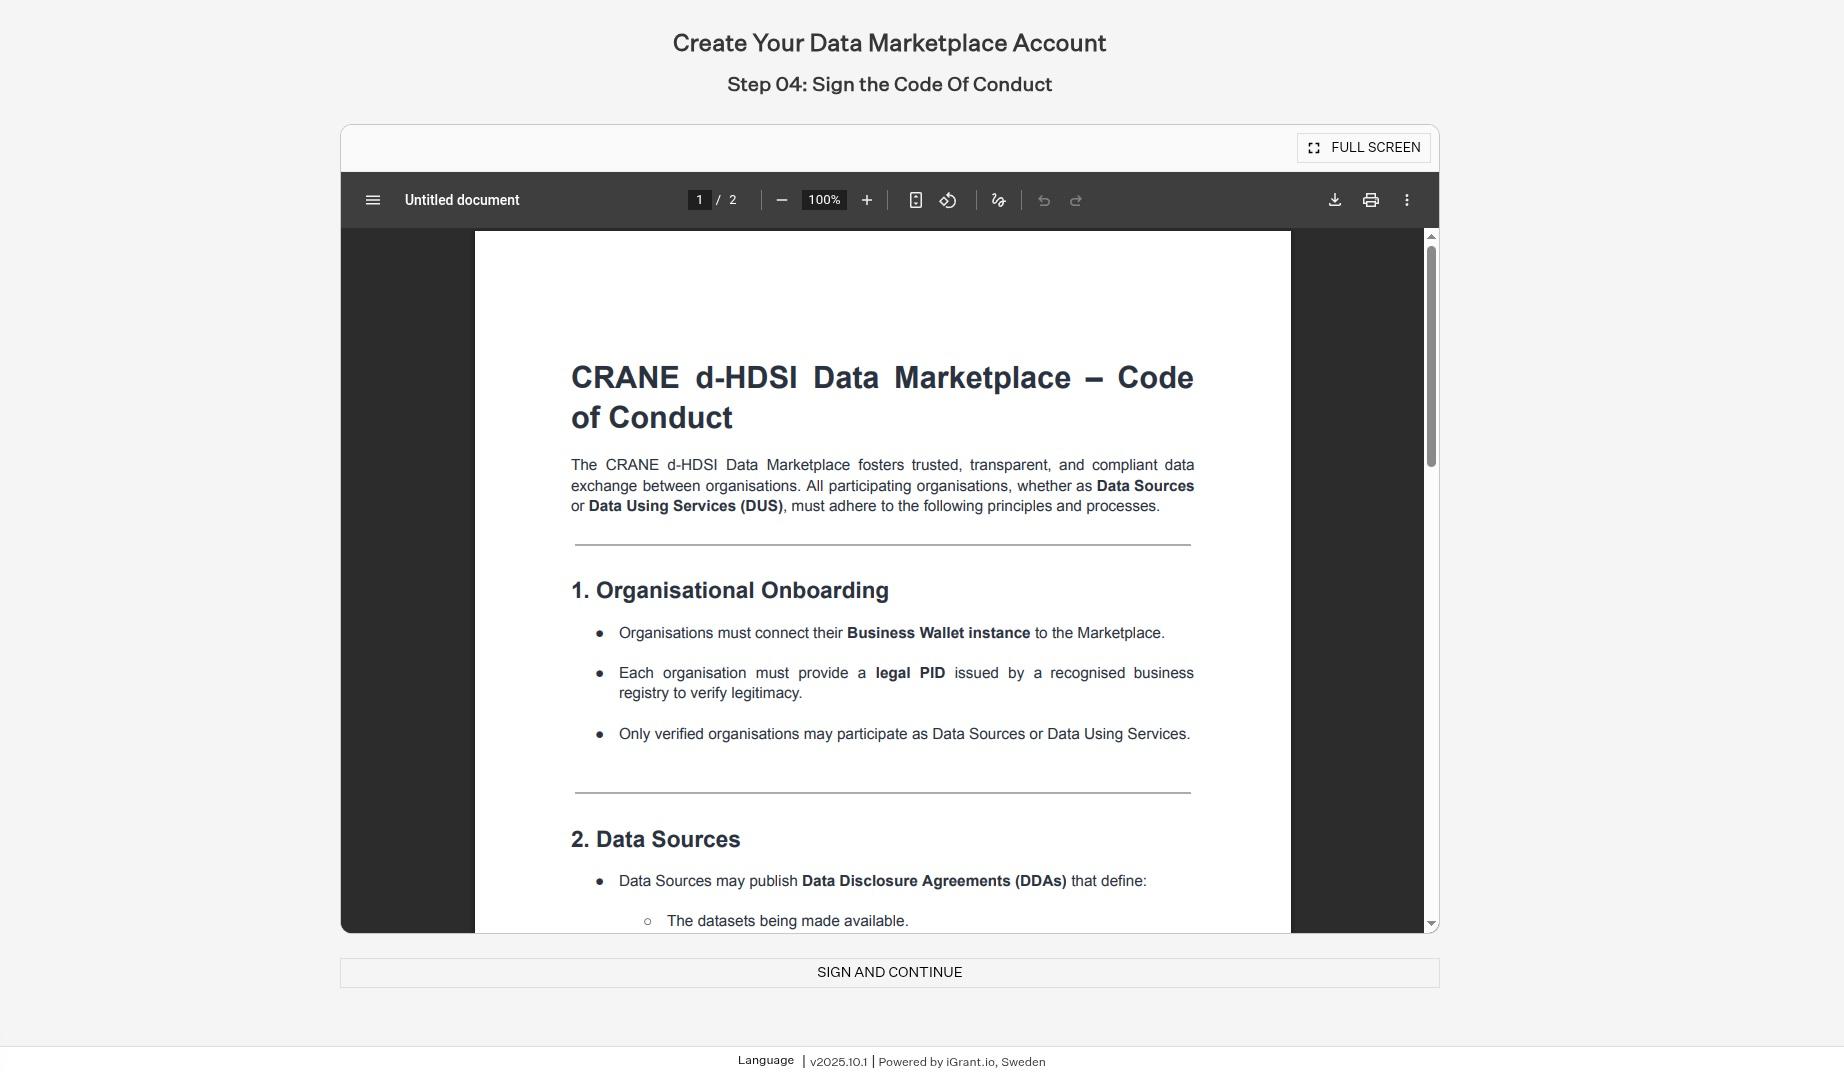
Fig 7: Review and sign code of conduct
Once signed, the organisation is successfully onboarded. The administrator will be redirected to the Getting Started page.
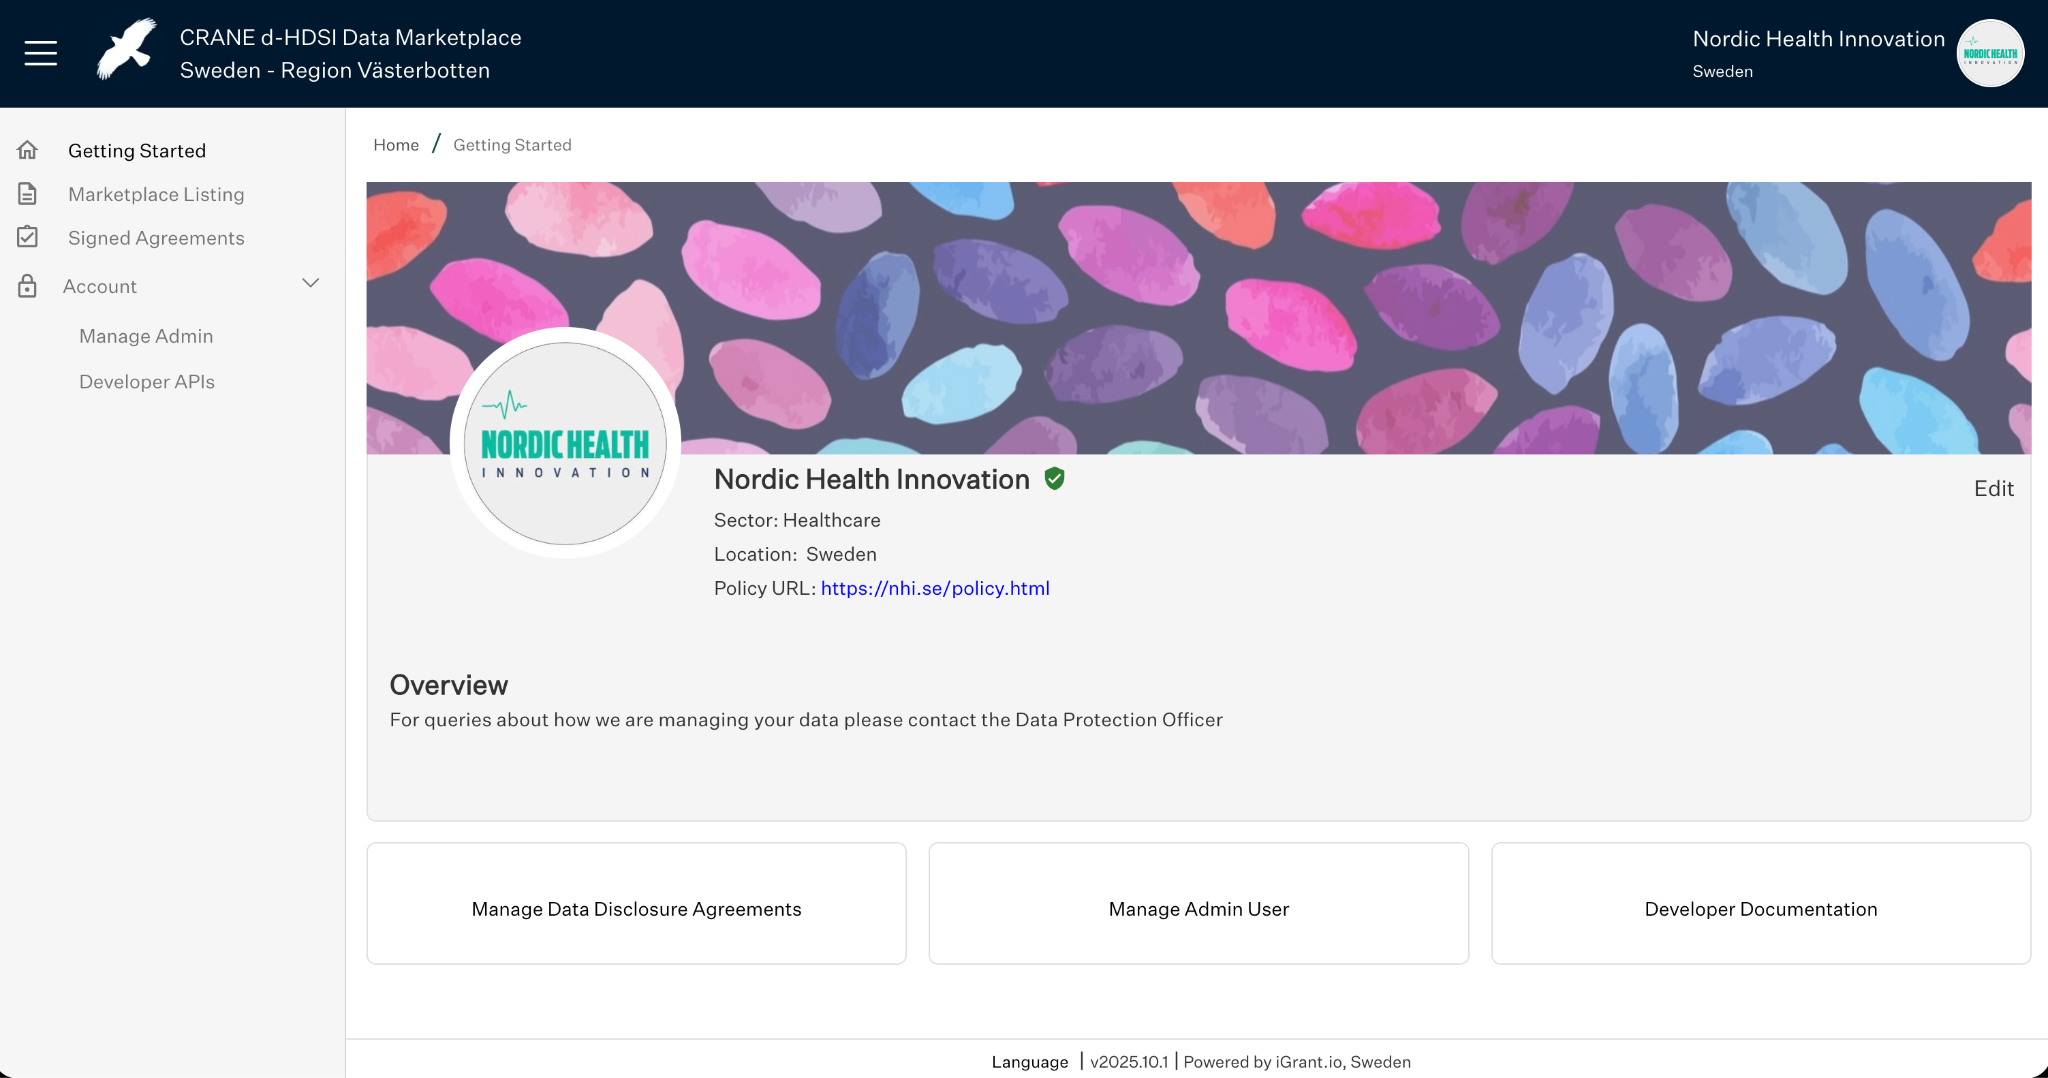
Fig 8: Getting started page
7. Configure Wallet & OAuth 2.0 Clients
To enable secure, bi-directional communication between the DISP and the Data Marketplace, the organisation administrator must configure the organisation wallet and OAuth 2.0 clients.
7.1 Access Developer APIs
Navigate to the Developer APIs page in the Data Marketplace.
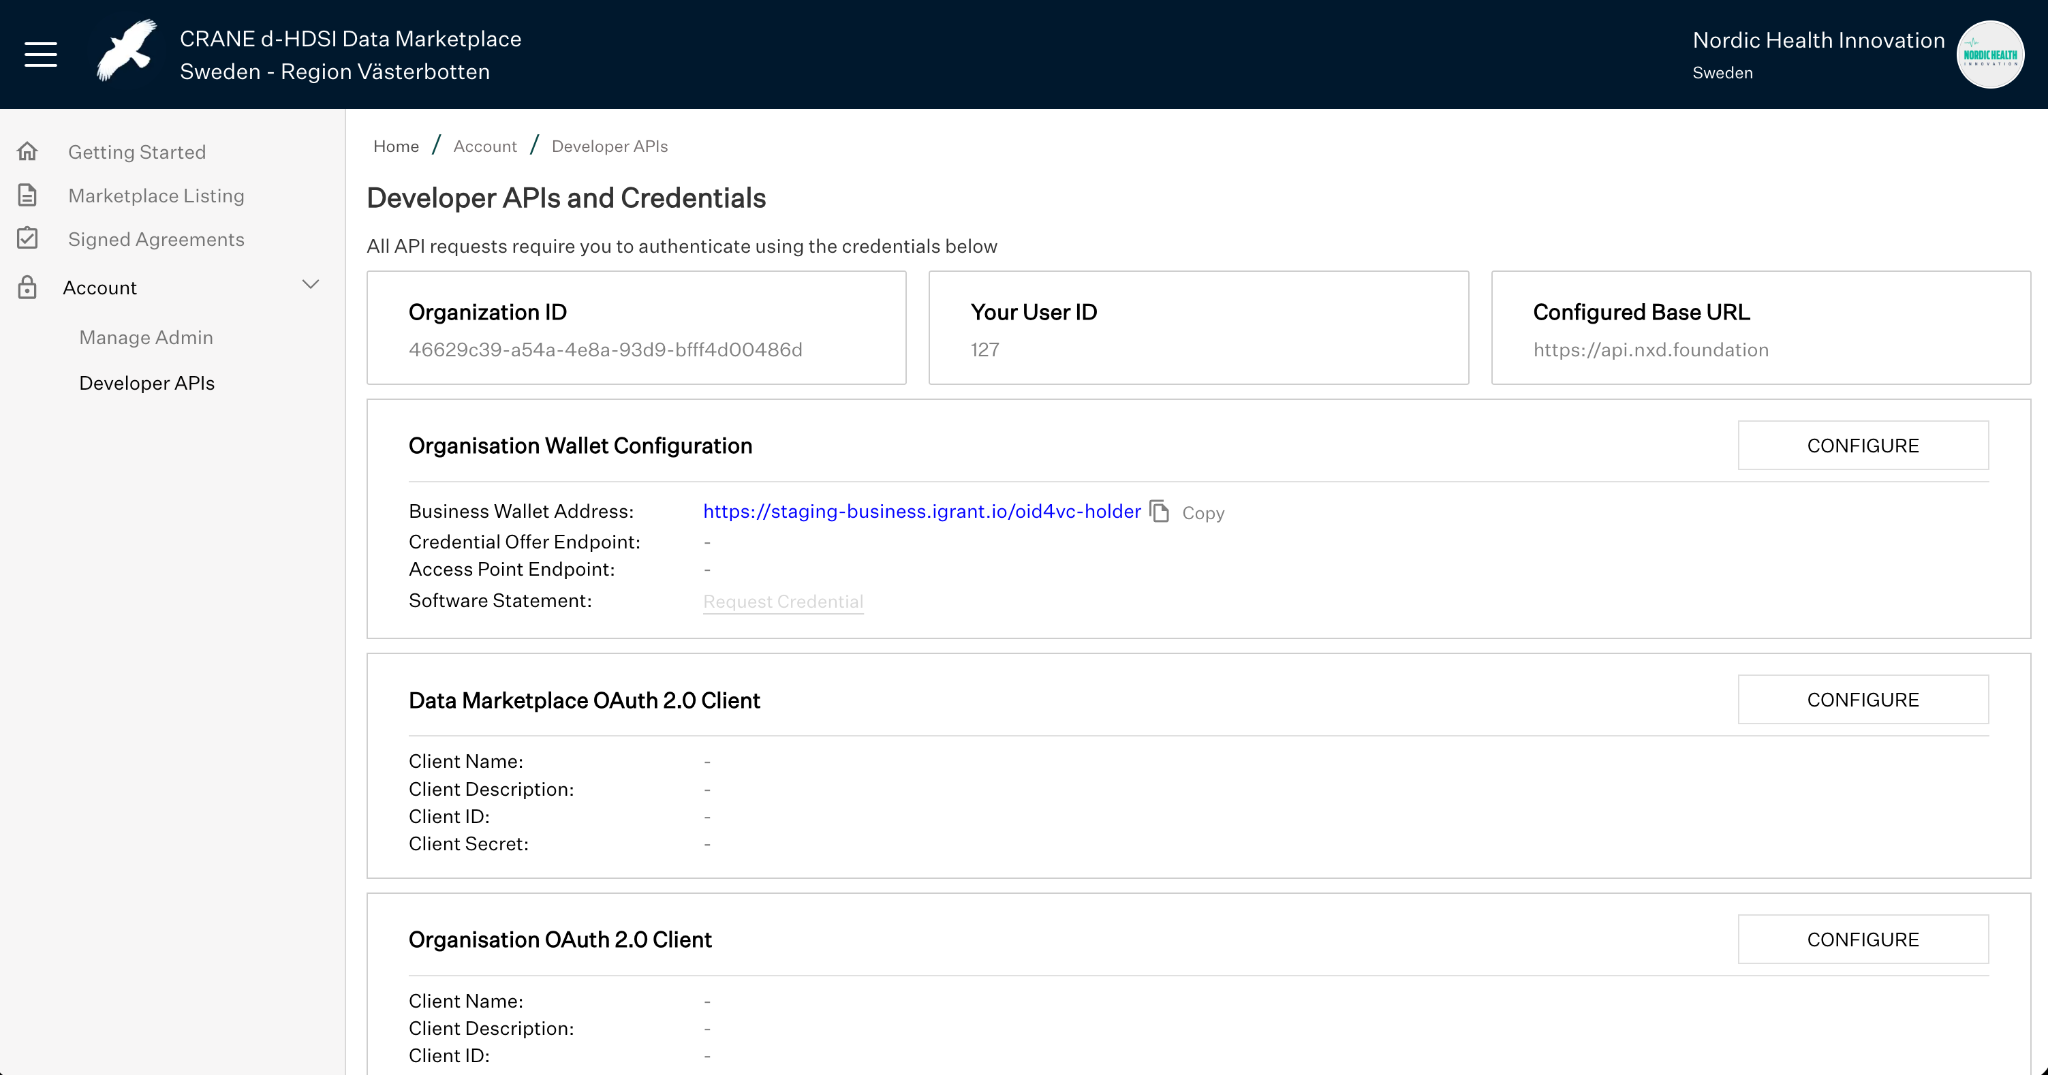
Fig 9: Developer APIs page
7.2 Configure Organisation Wallet
Click CONFIGURE next to Organisation Wallet Configuration.
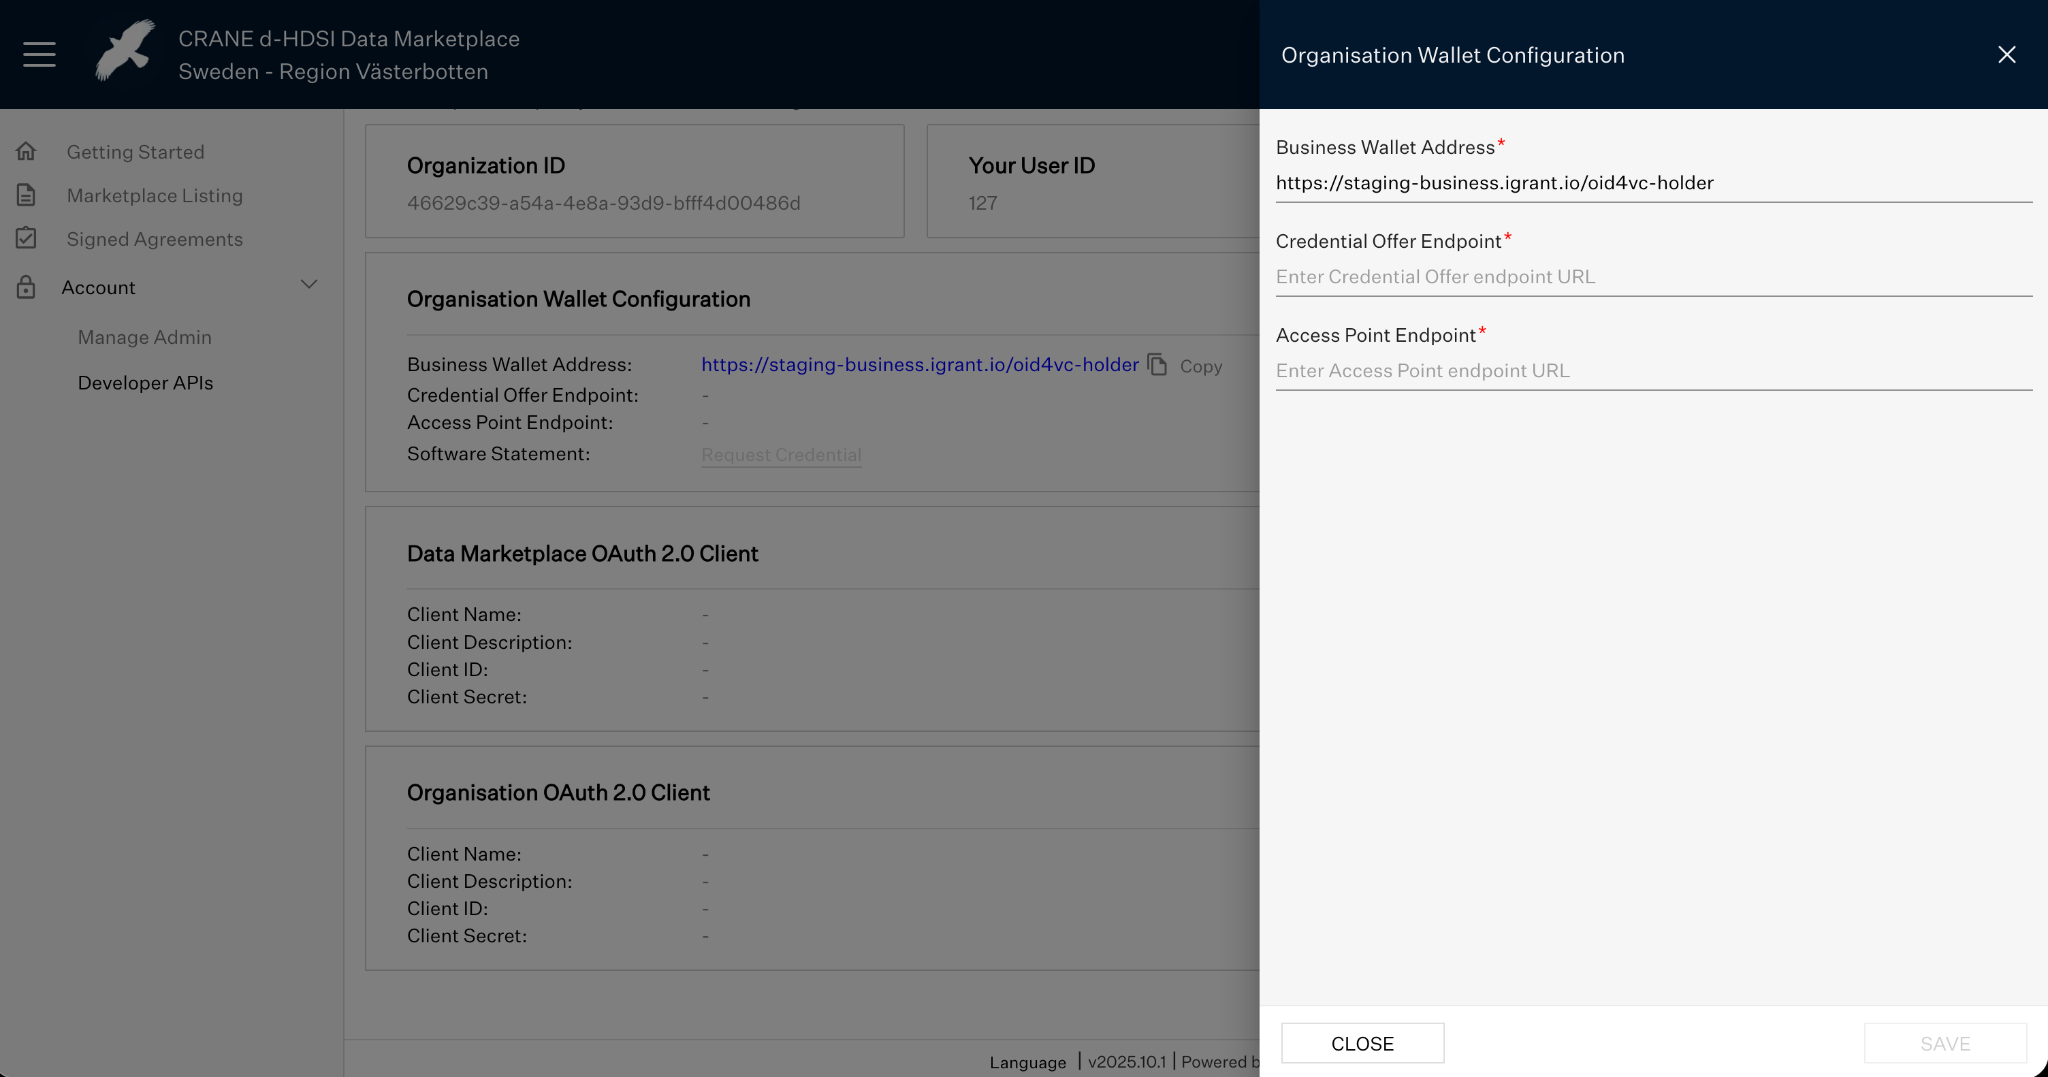
Fig 10: Organisation wallet configuration
Credential Offer Endpoint - found under Digital Wallet (OpenID4VC) → Base Configuration in the DISP portal.
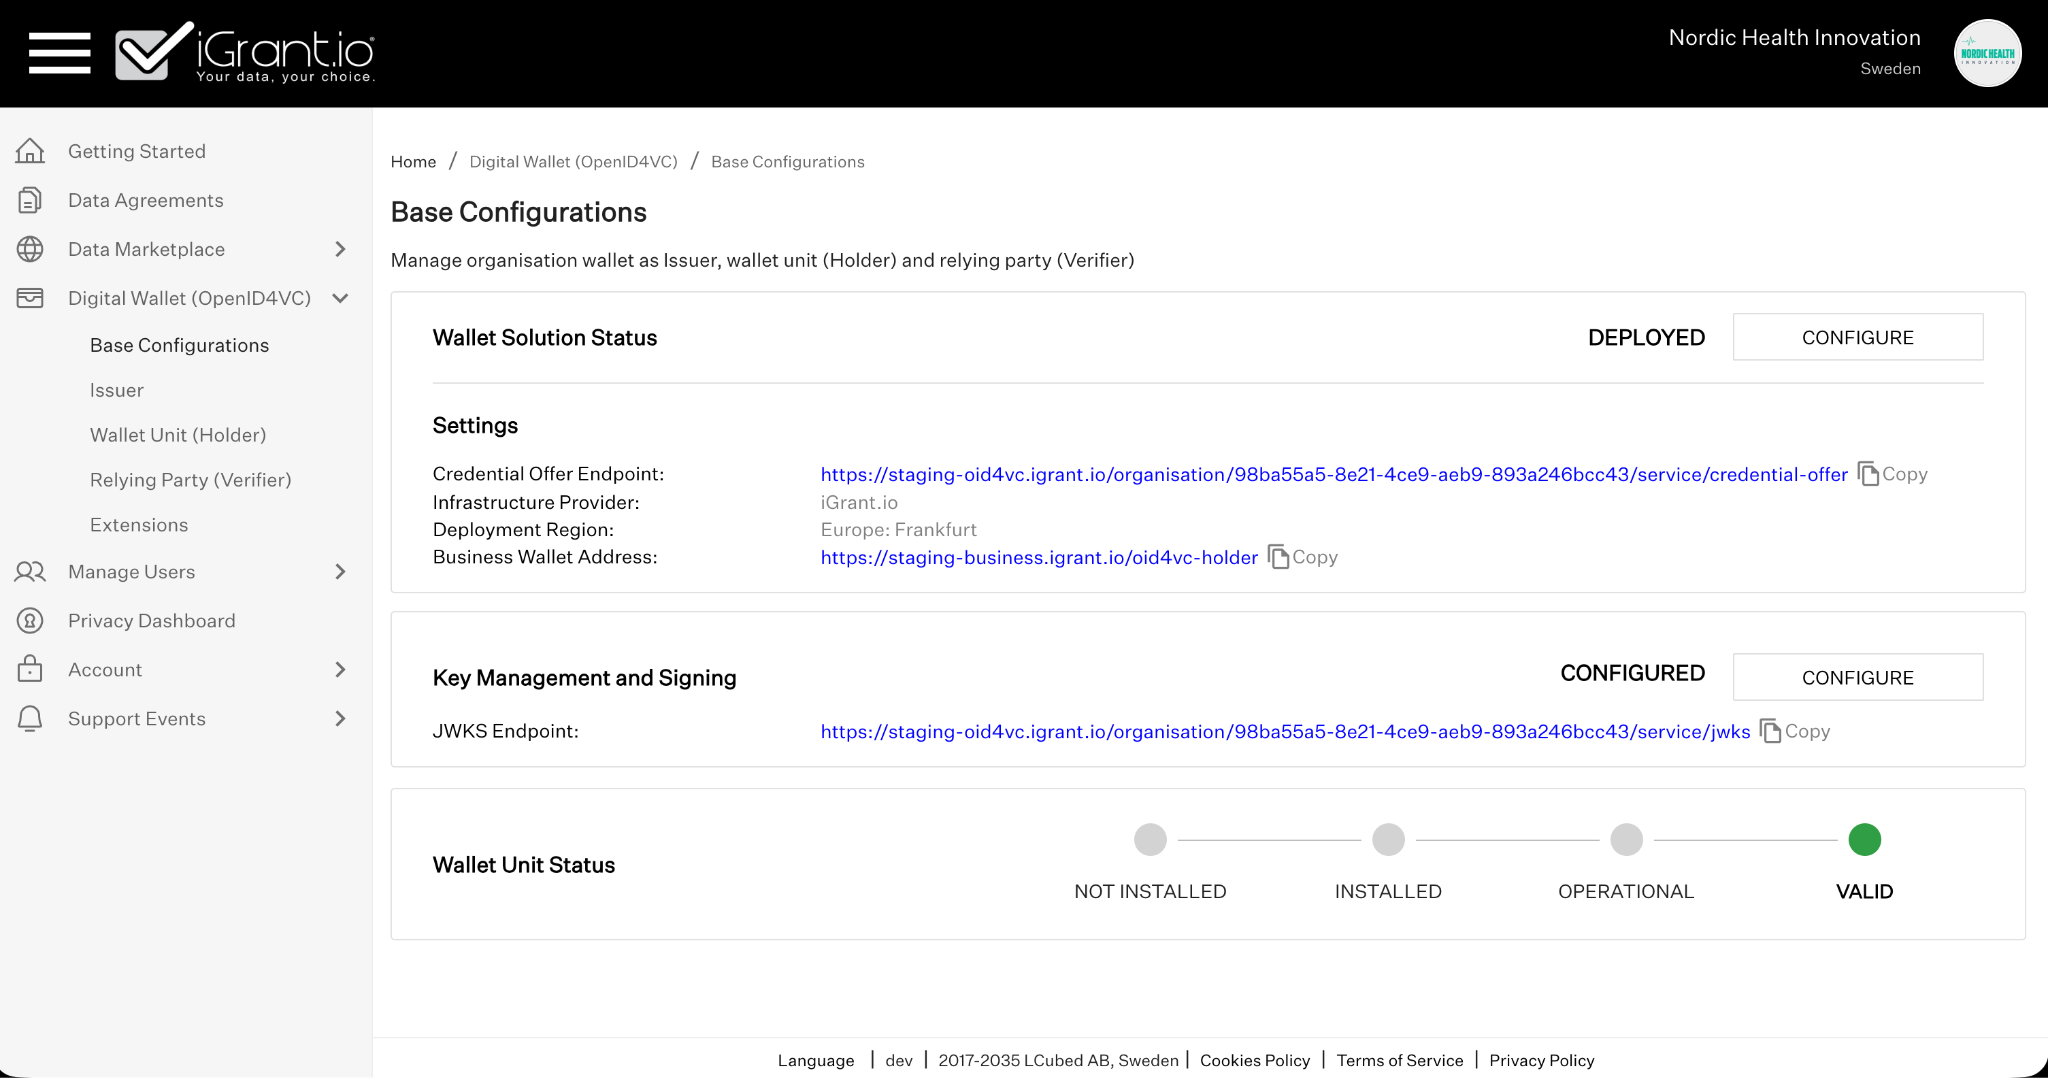
Fig 11: Credential Offer Endpoint
Access Point Endpoint - found under Data Marketplace → Base Configuration in the DISP portal.
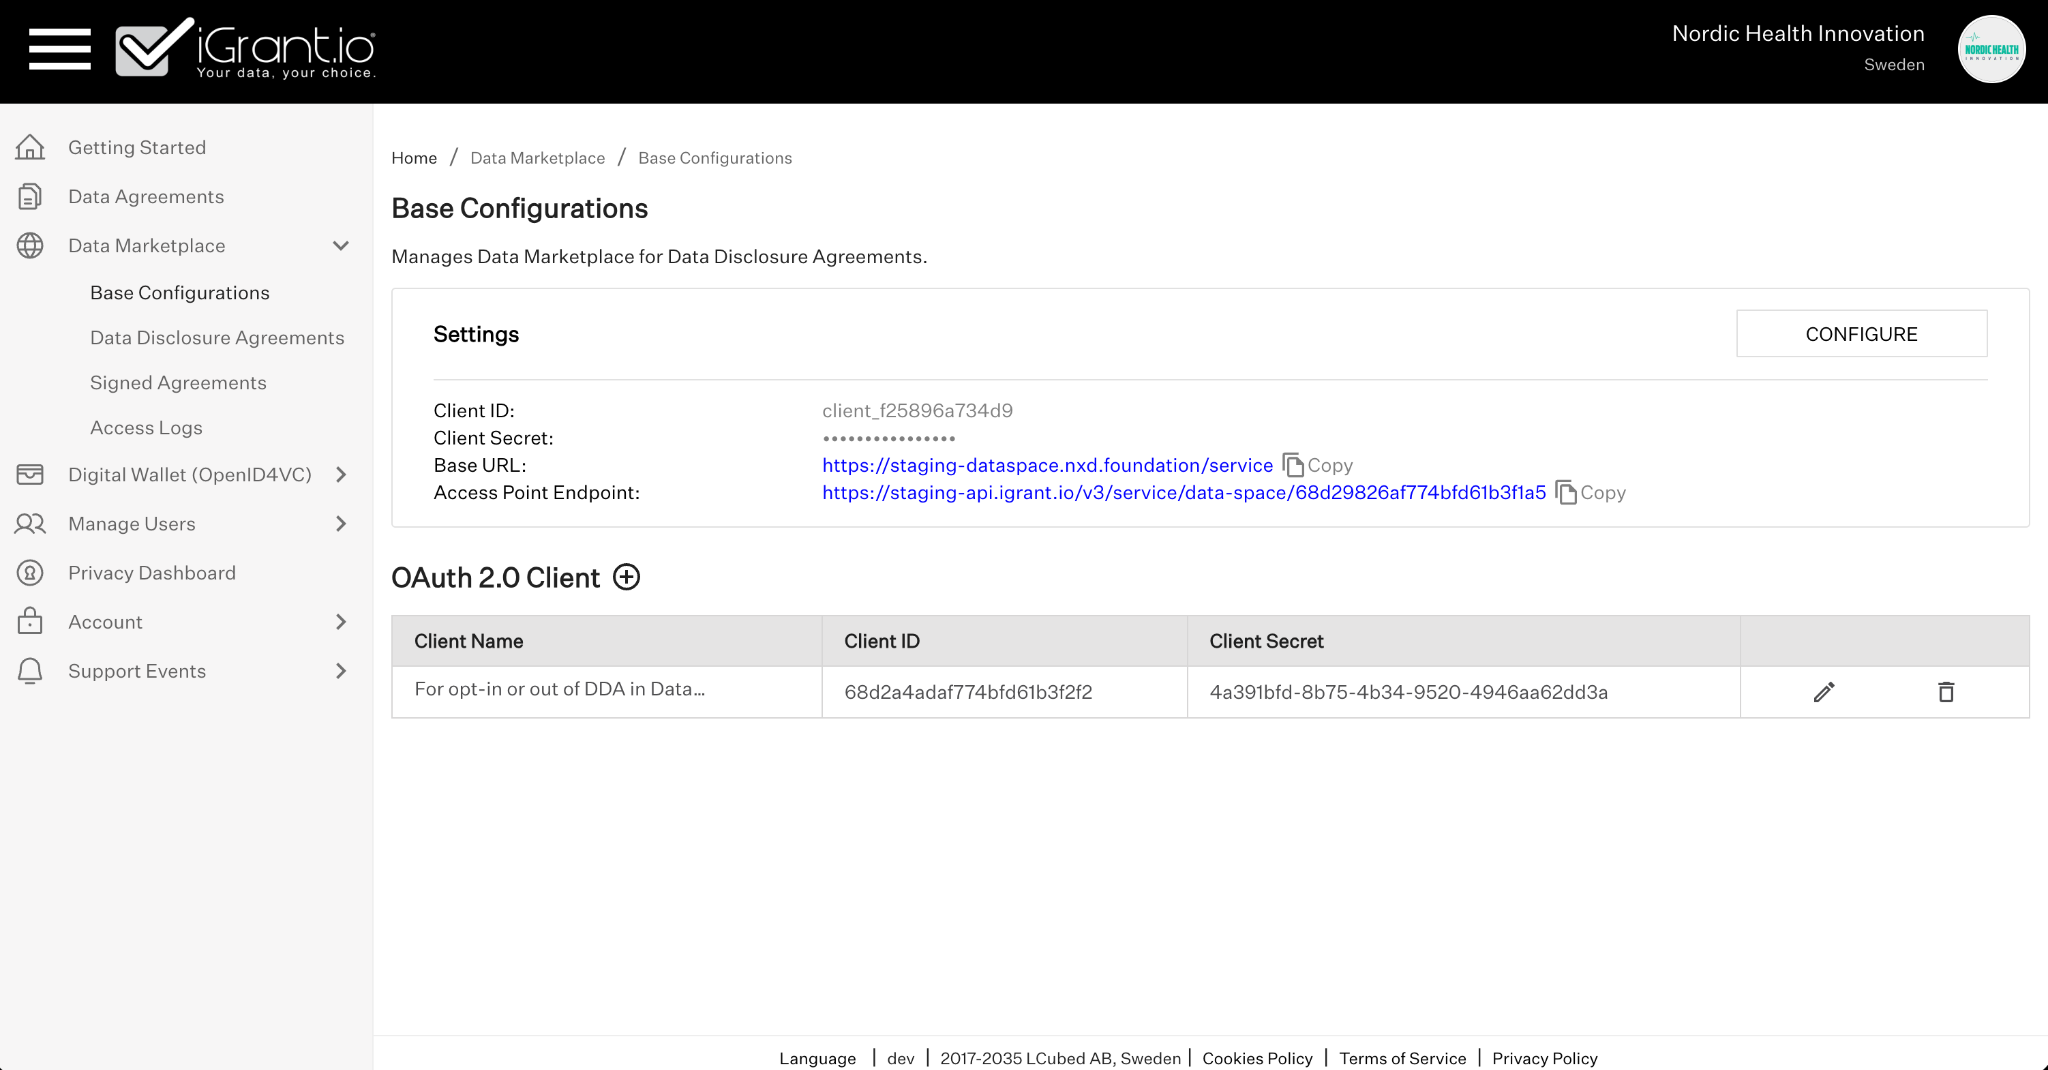
Fig 12: Access Point Endpoint
7.3 Request a Software Statement
Once both endpoints are configured, click Request Credential to initiate the issuance of a Software Statement to your connected business wallet.
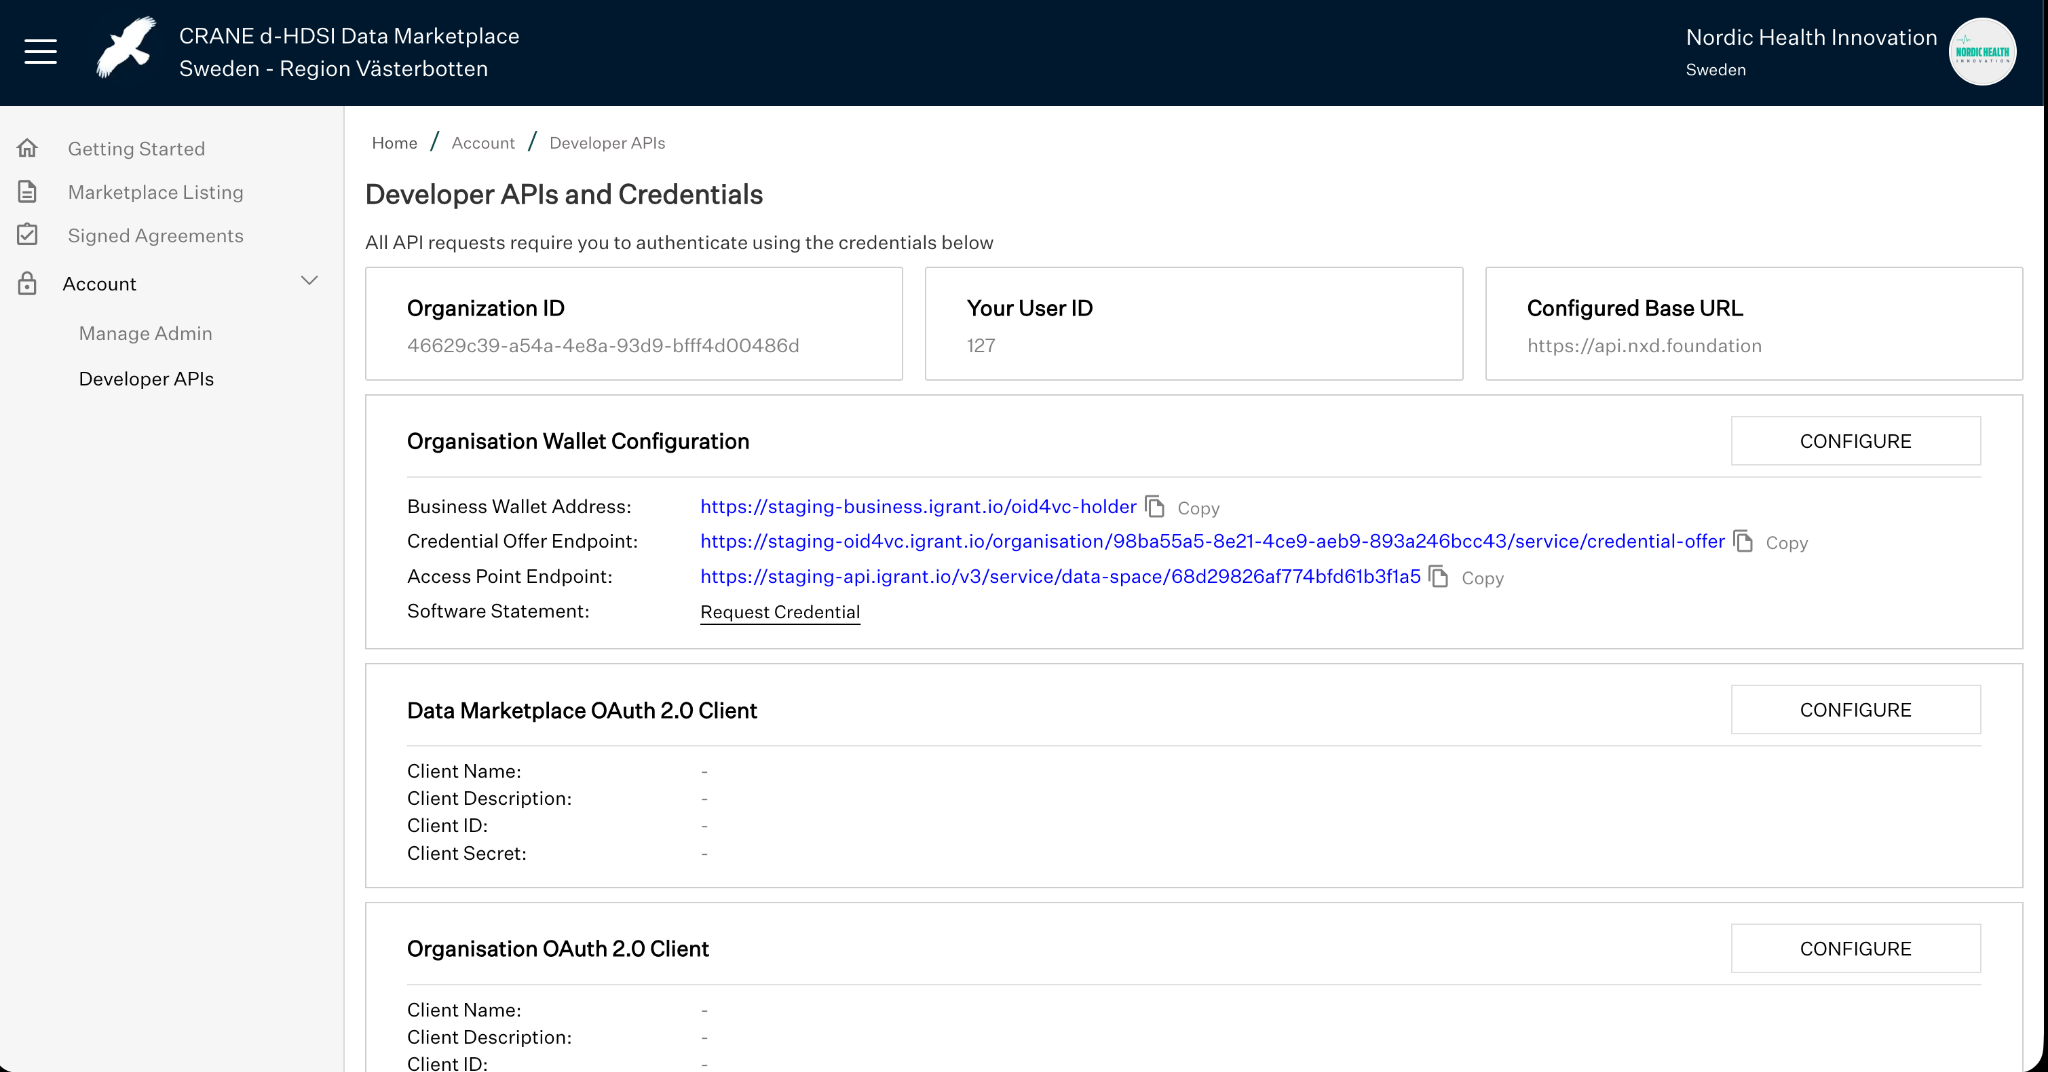
Fig 13: Request Credential
The Software Statement can be reviewed and accepted in the DISP portal under Digital Wallet (OpenID4VC) → Wallet Unit (Holder).
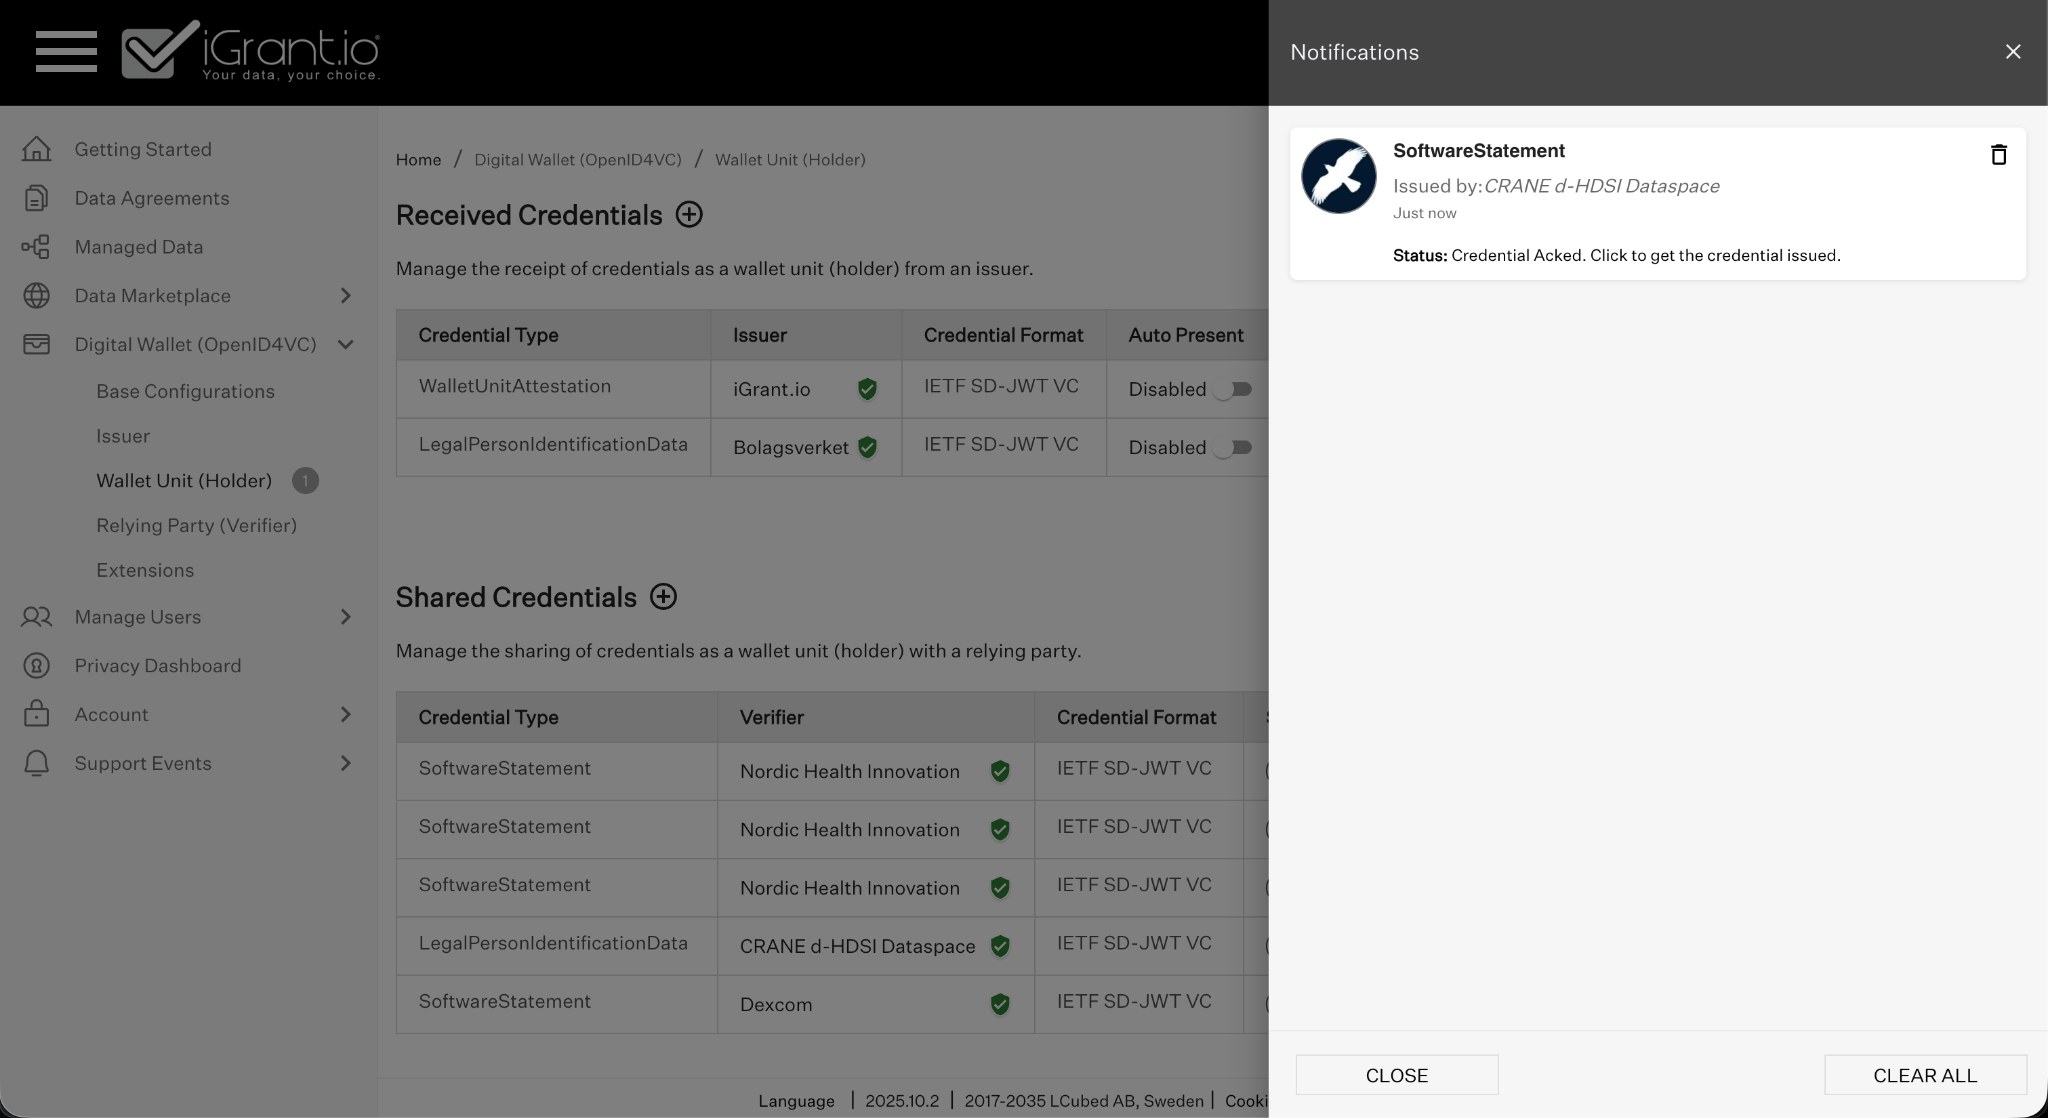
Fig 14: Software Statement notification
7.4 Configure OAuth 2.0 Client (Data Marketplace → DISP)
Click CONFIGURE next to the Data Marketplace OAuth 2.0 client. Provide a name and optional description, then click CREATE.
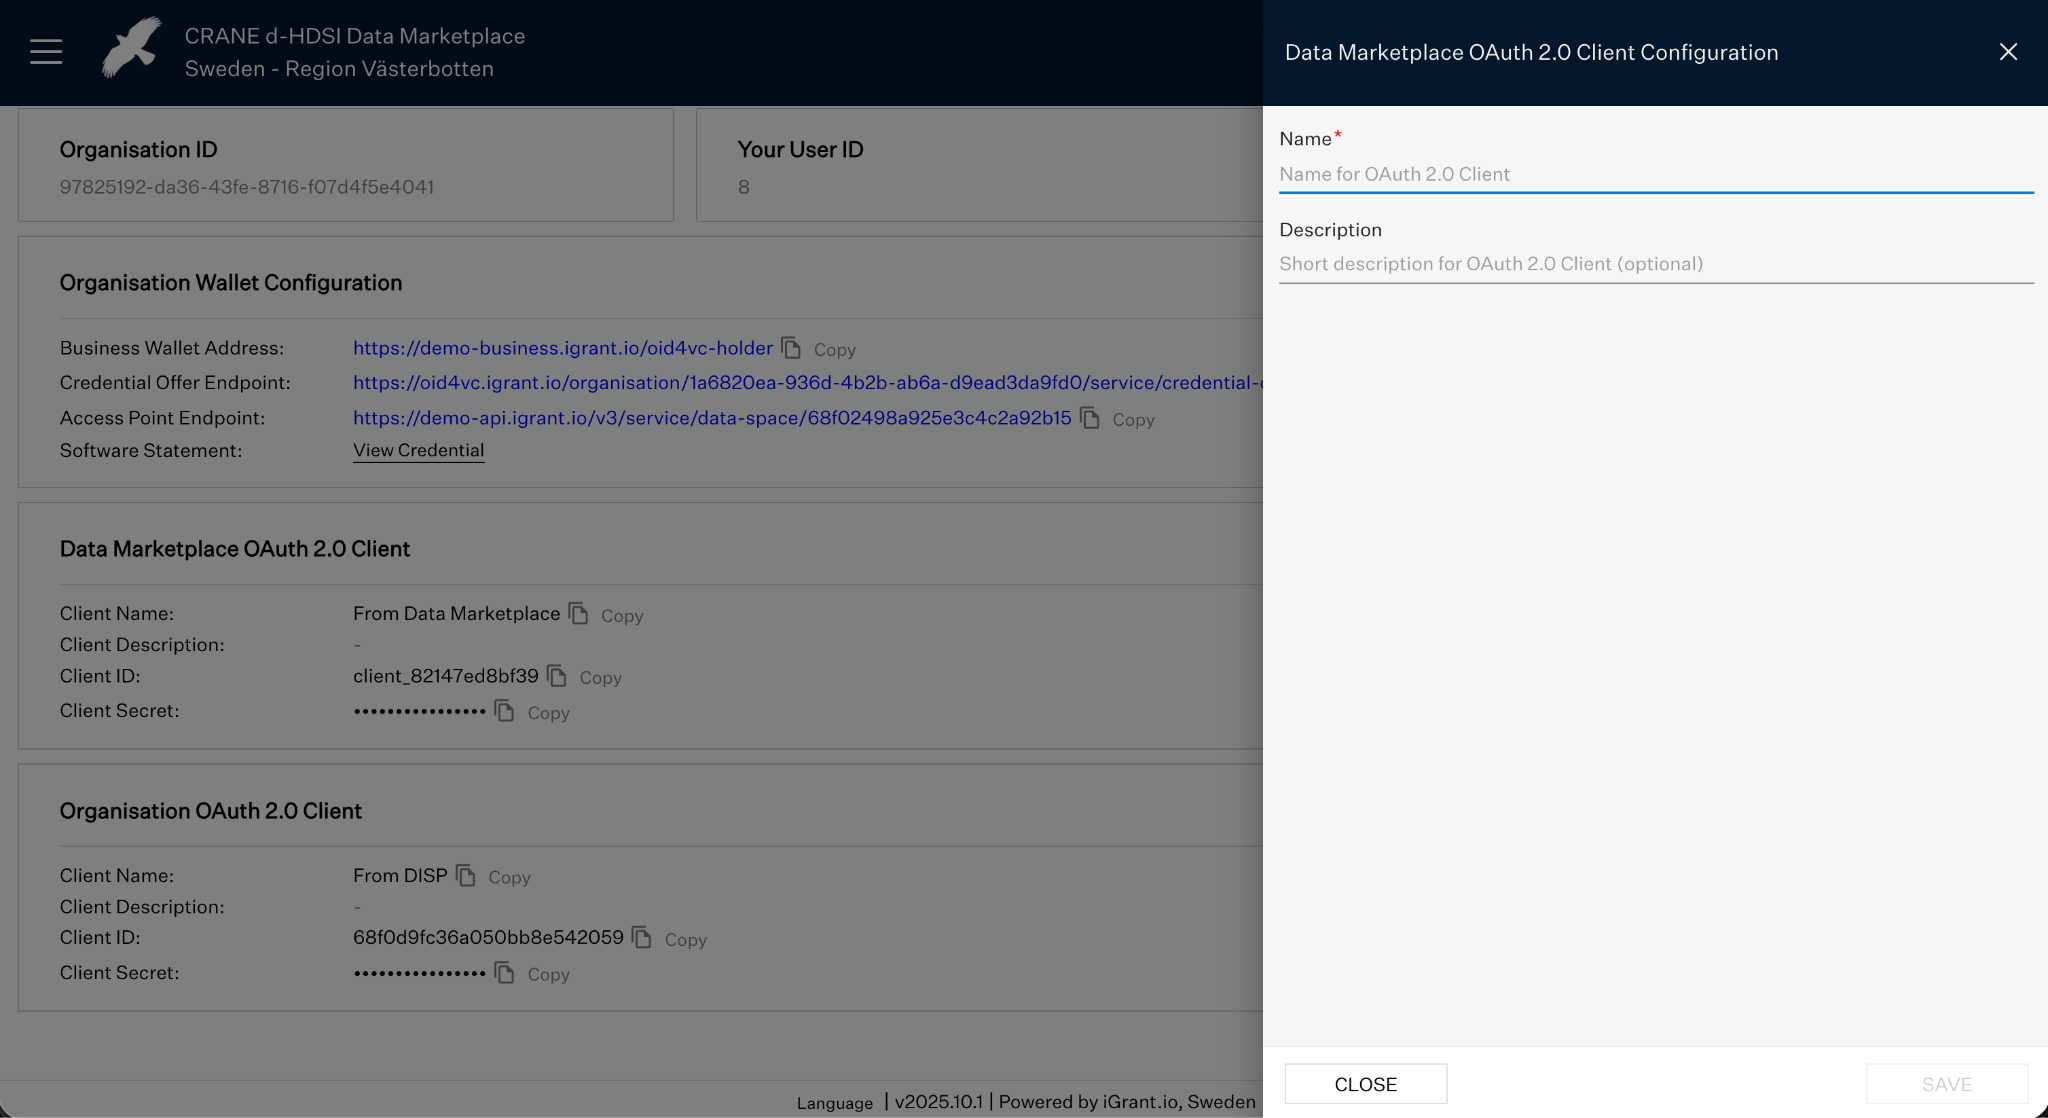
Fig 15: Configure OAuth 2.0 client
Copy the generated Client ID and Client Secret.
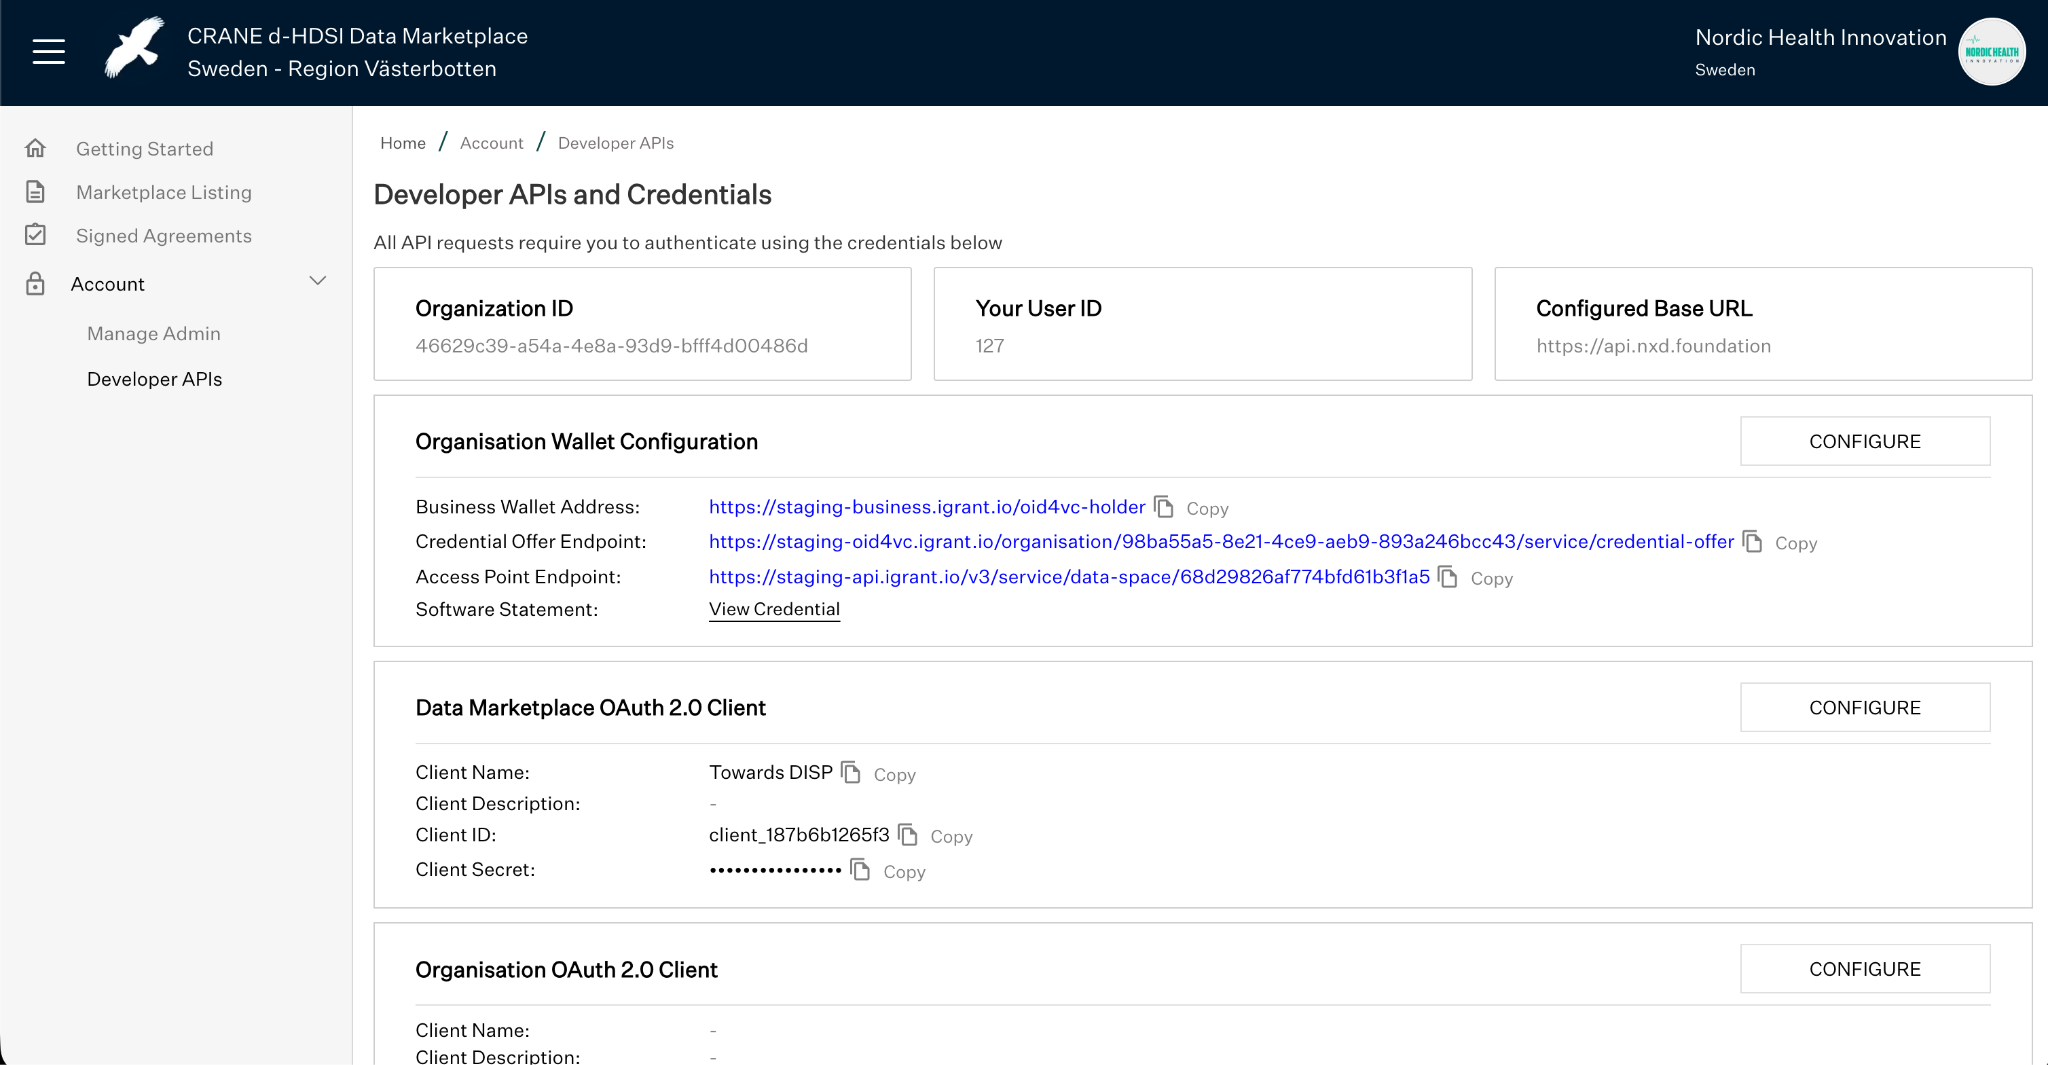
Fig 16: OAuth 2.0 Client credentials
In the DISP portal, navigate to Data Marketplace → Base Configurations, click CONFIGURE and paste these values.
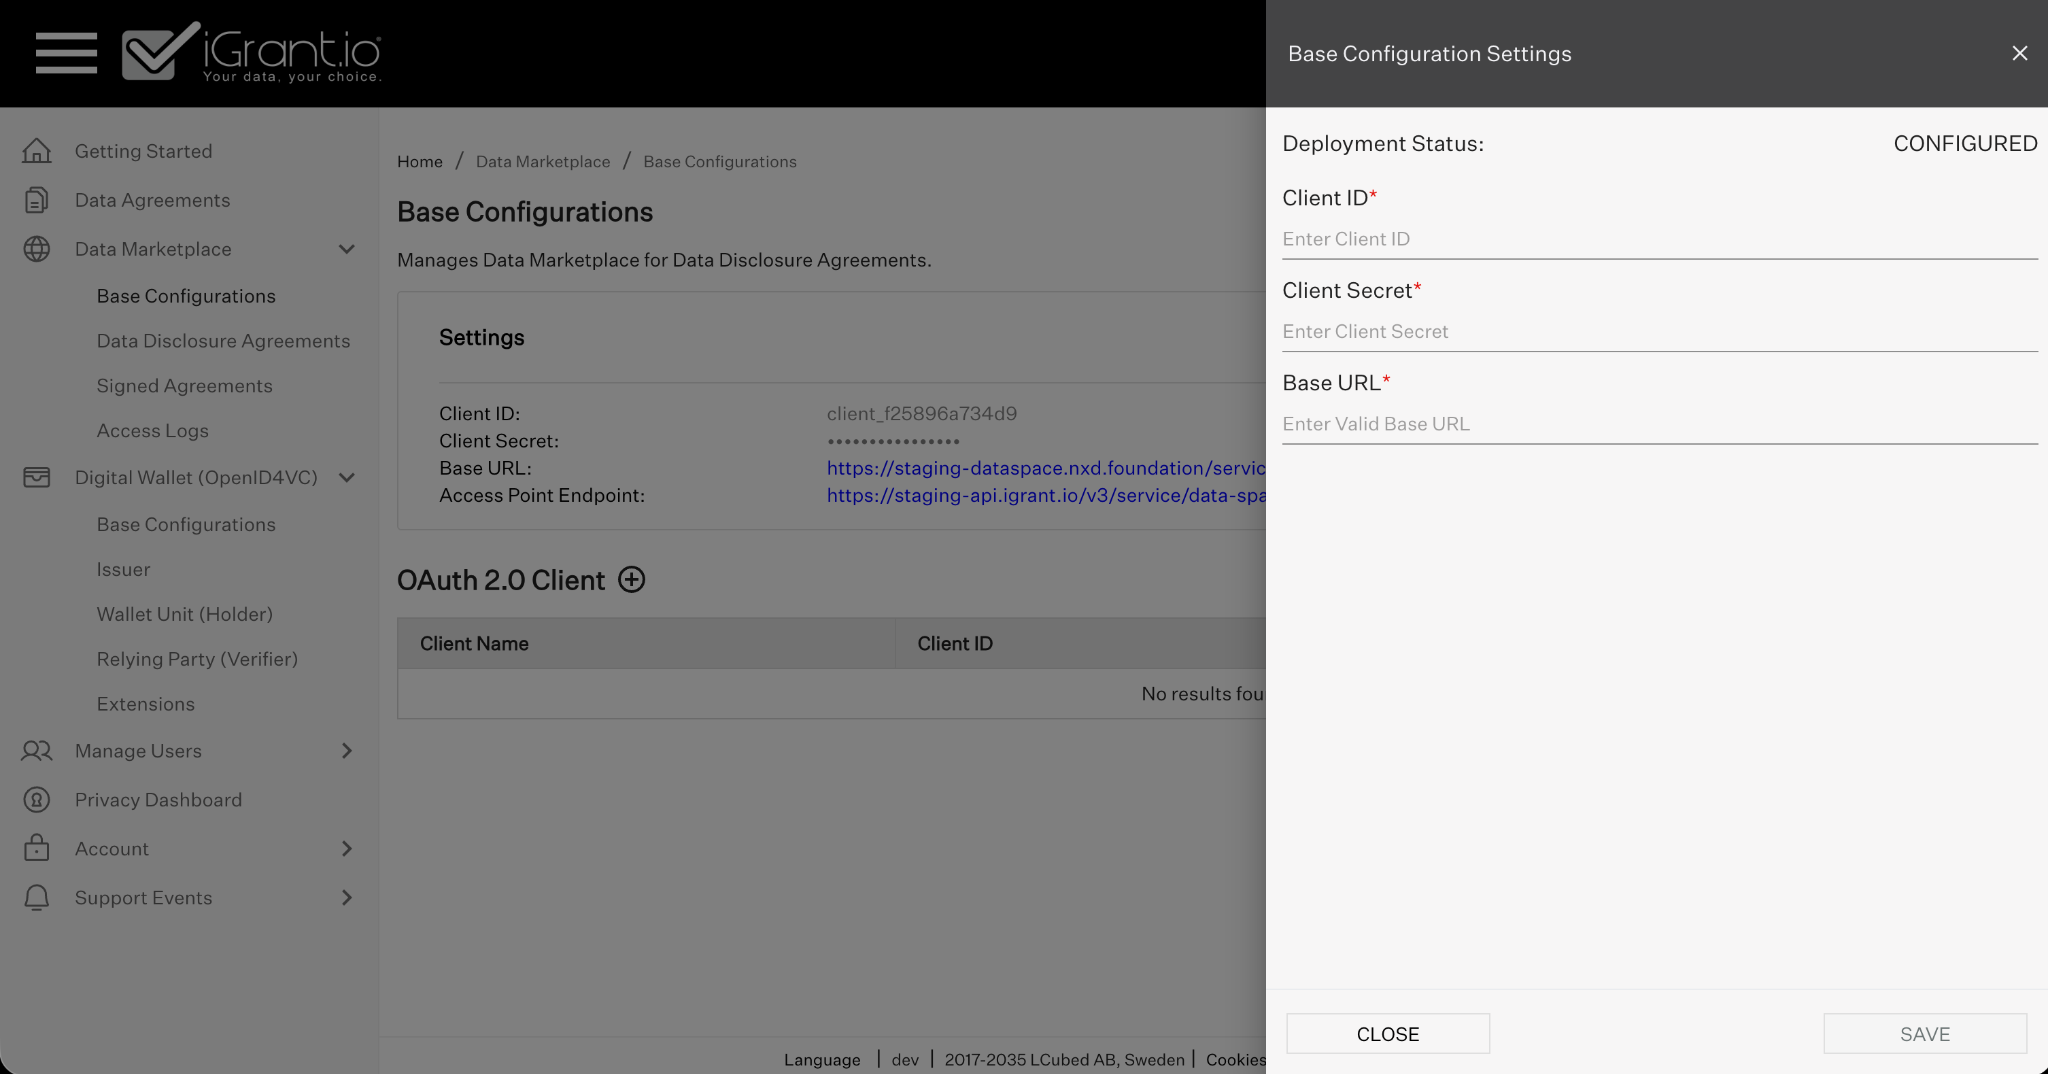
Fig 17: Configure OAuth 2.0 from Data Marketplace
7.5 Configure OAuth 2.0 Client (DISP → Data Marketplace)
Within your DISP account, create a new OAuth 2.0 client for the Data Marketplace.
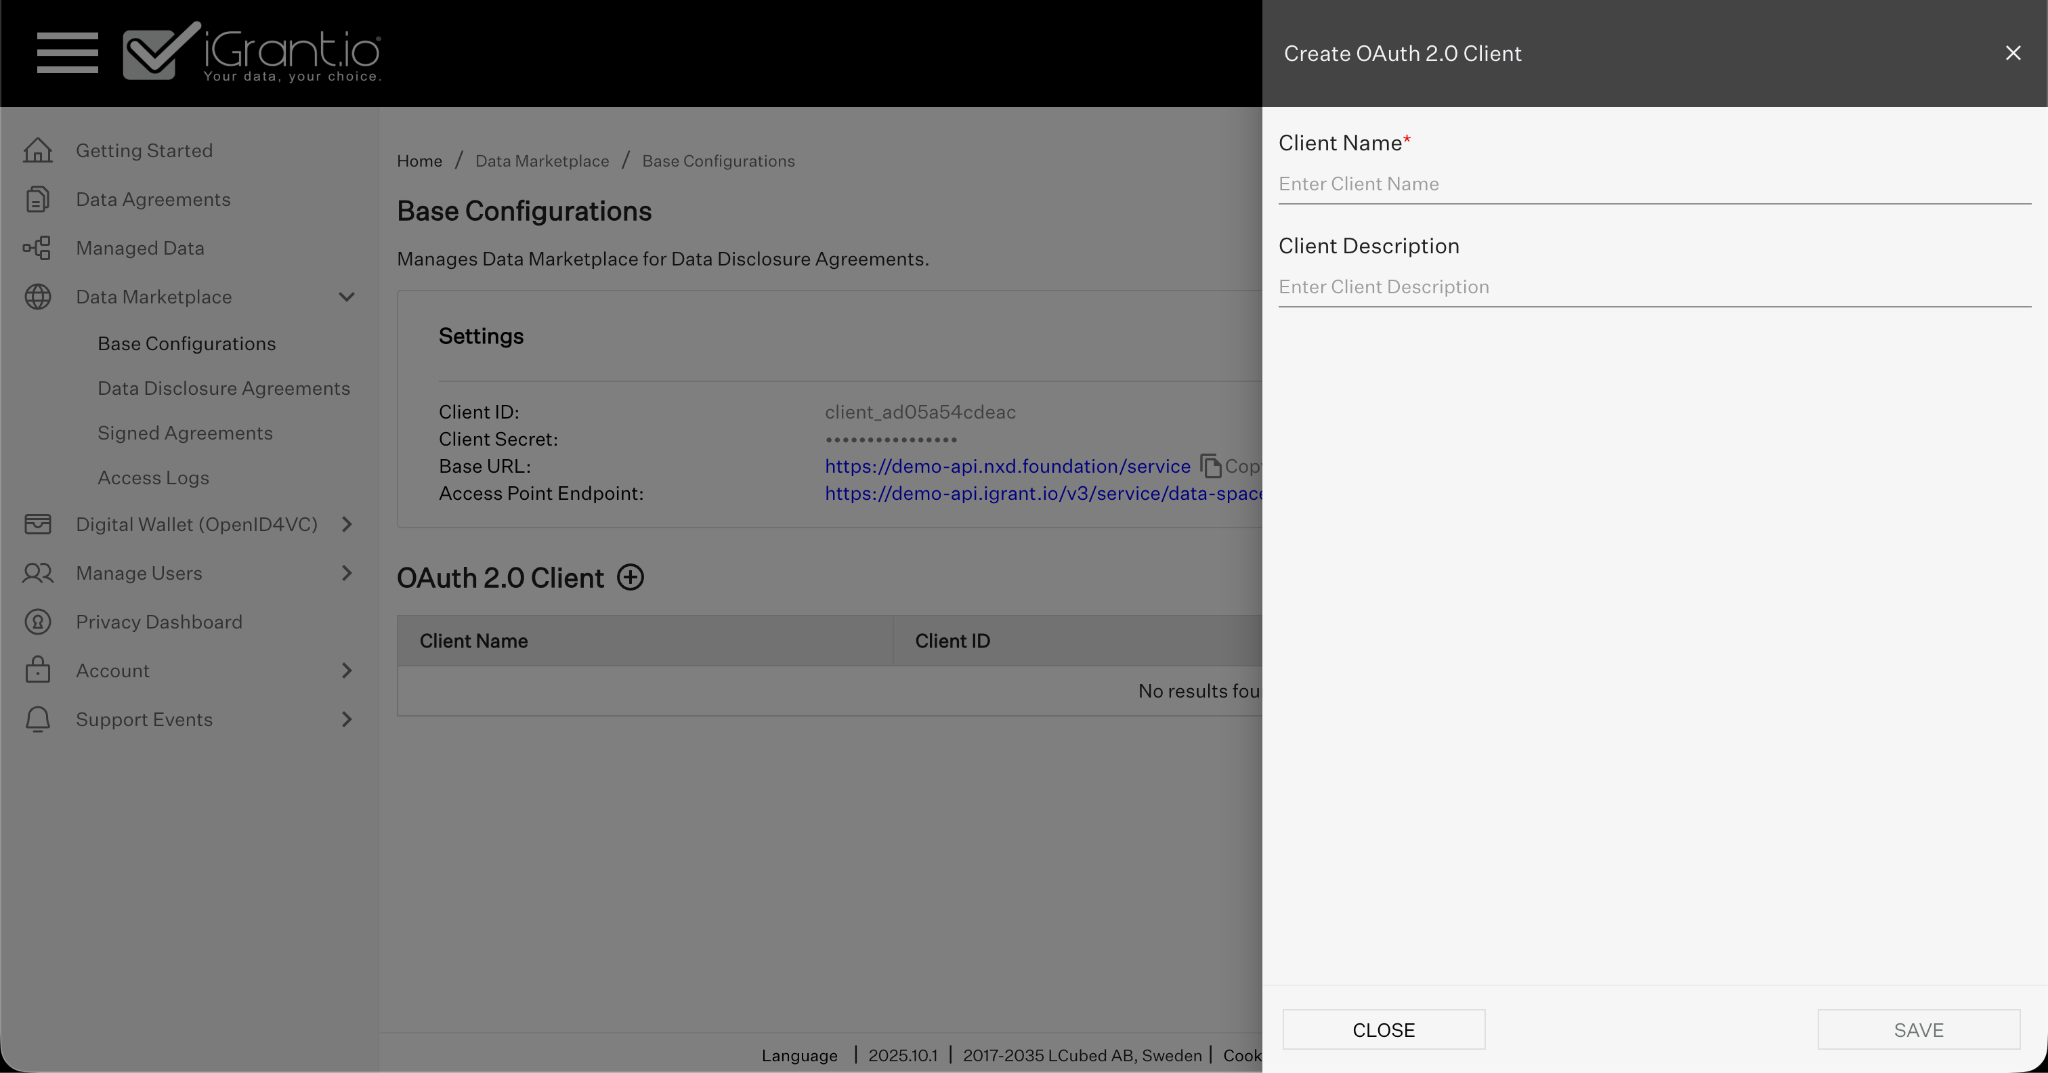
Fig 18: Configure OAuth 2.0 towards Data Marketplace
Copy the generated Client ID and Client Secret.
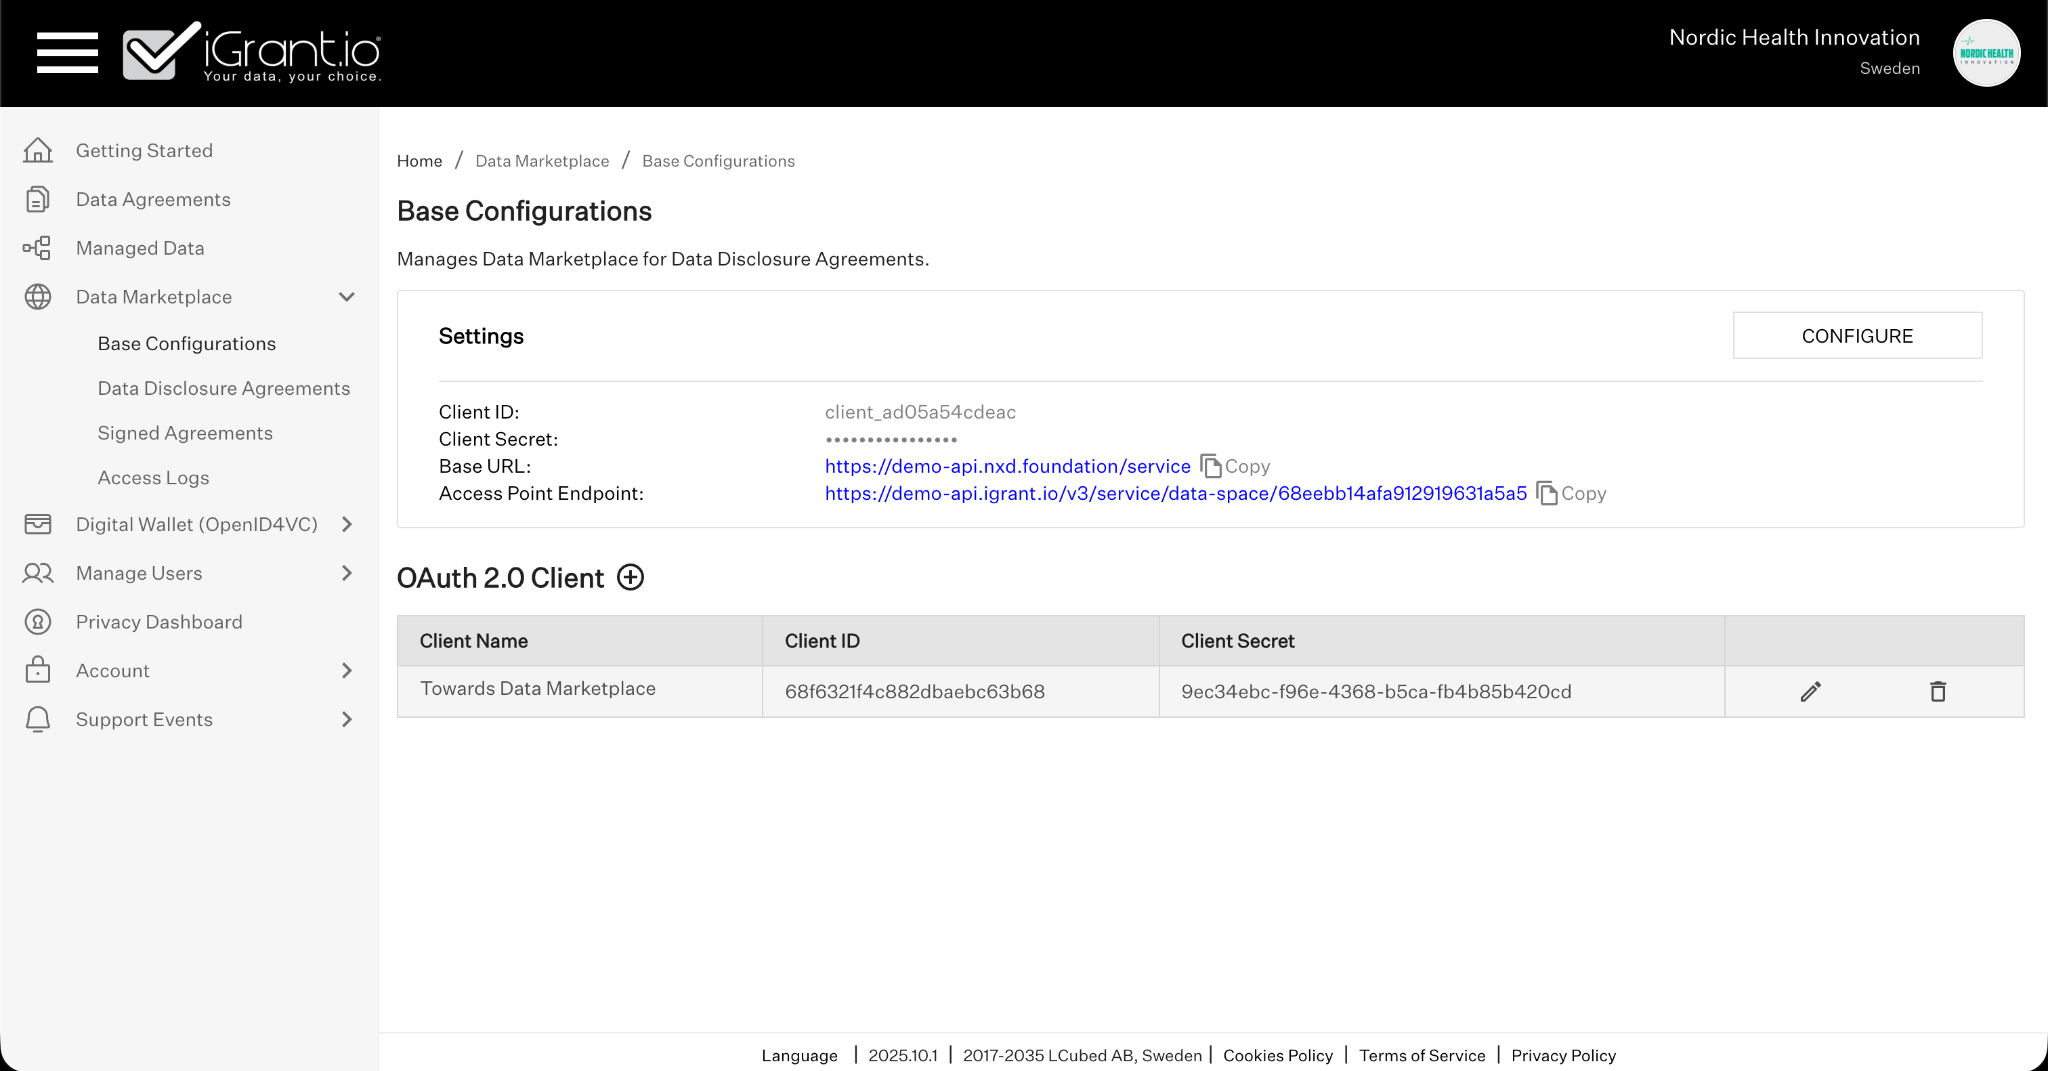
Fig 19: DISP OAuth 2.0 Client
Return to the Data Marketplace and configure these under Organisation OAuth 2.0 Client.
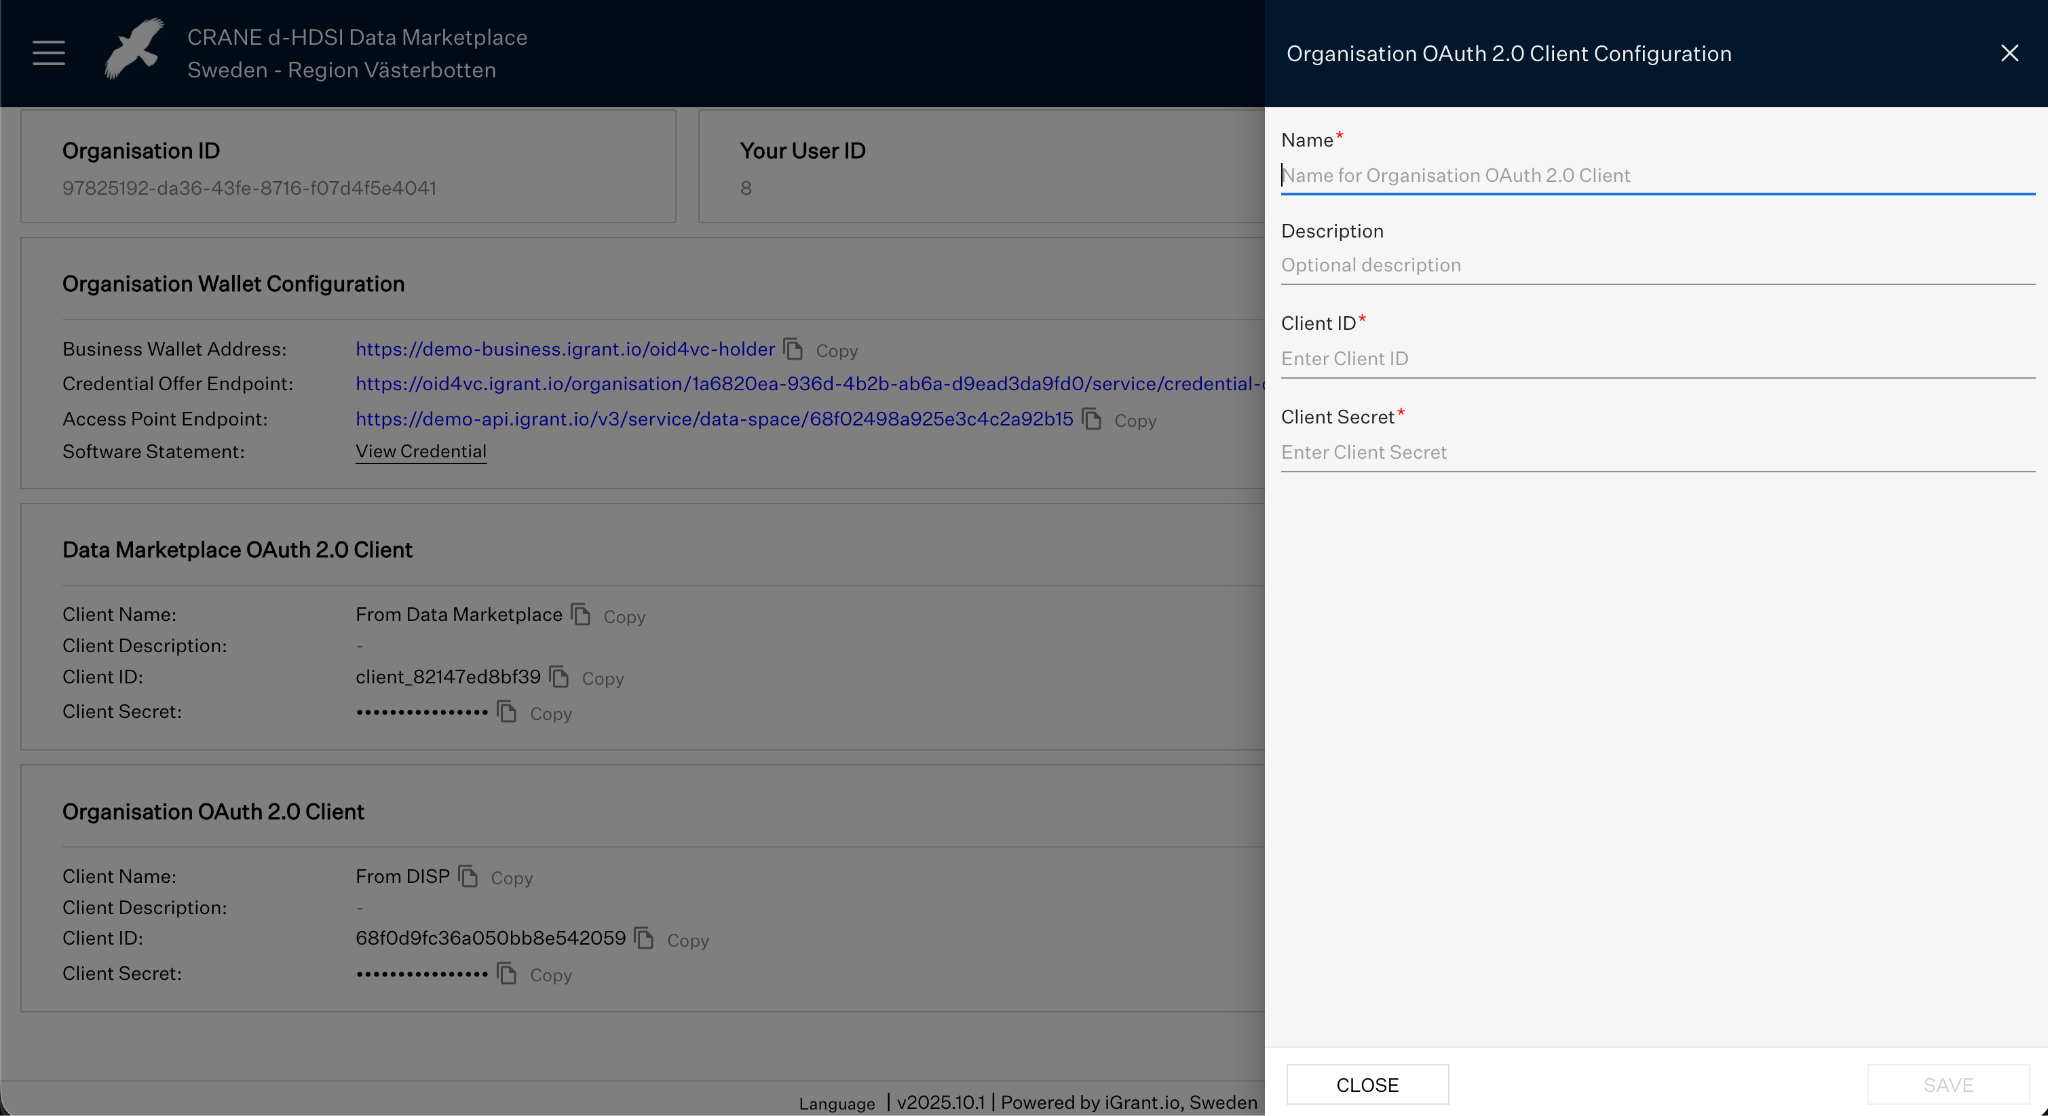
Fig 20: Configure OAuth 2.0 from DISP
7.6 Final Verification
Once both clients have been configured, bi-directional communication between the DISP and the Data Marketplace is successfully established.
8. Publishing & Governance of DDAs
The Data Source organisation administrator can create DDAs by linking existing Data Agreements within the DISP platform. Upon publication, each DDA appears on the Data Marketplace in an unlisted state.
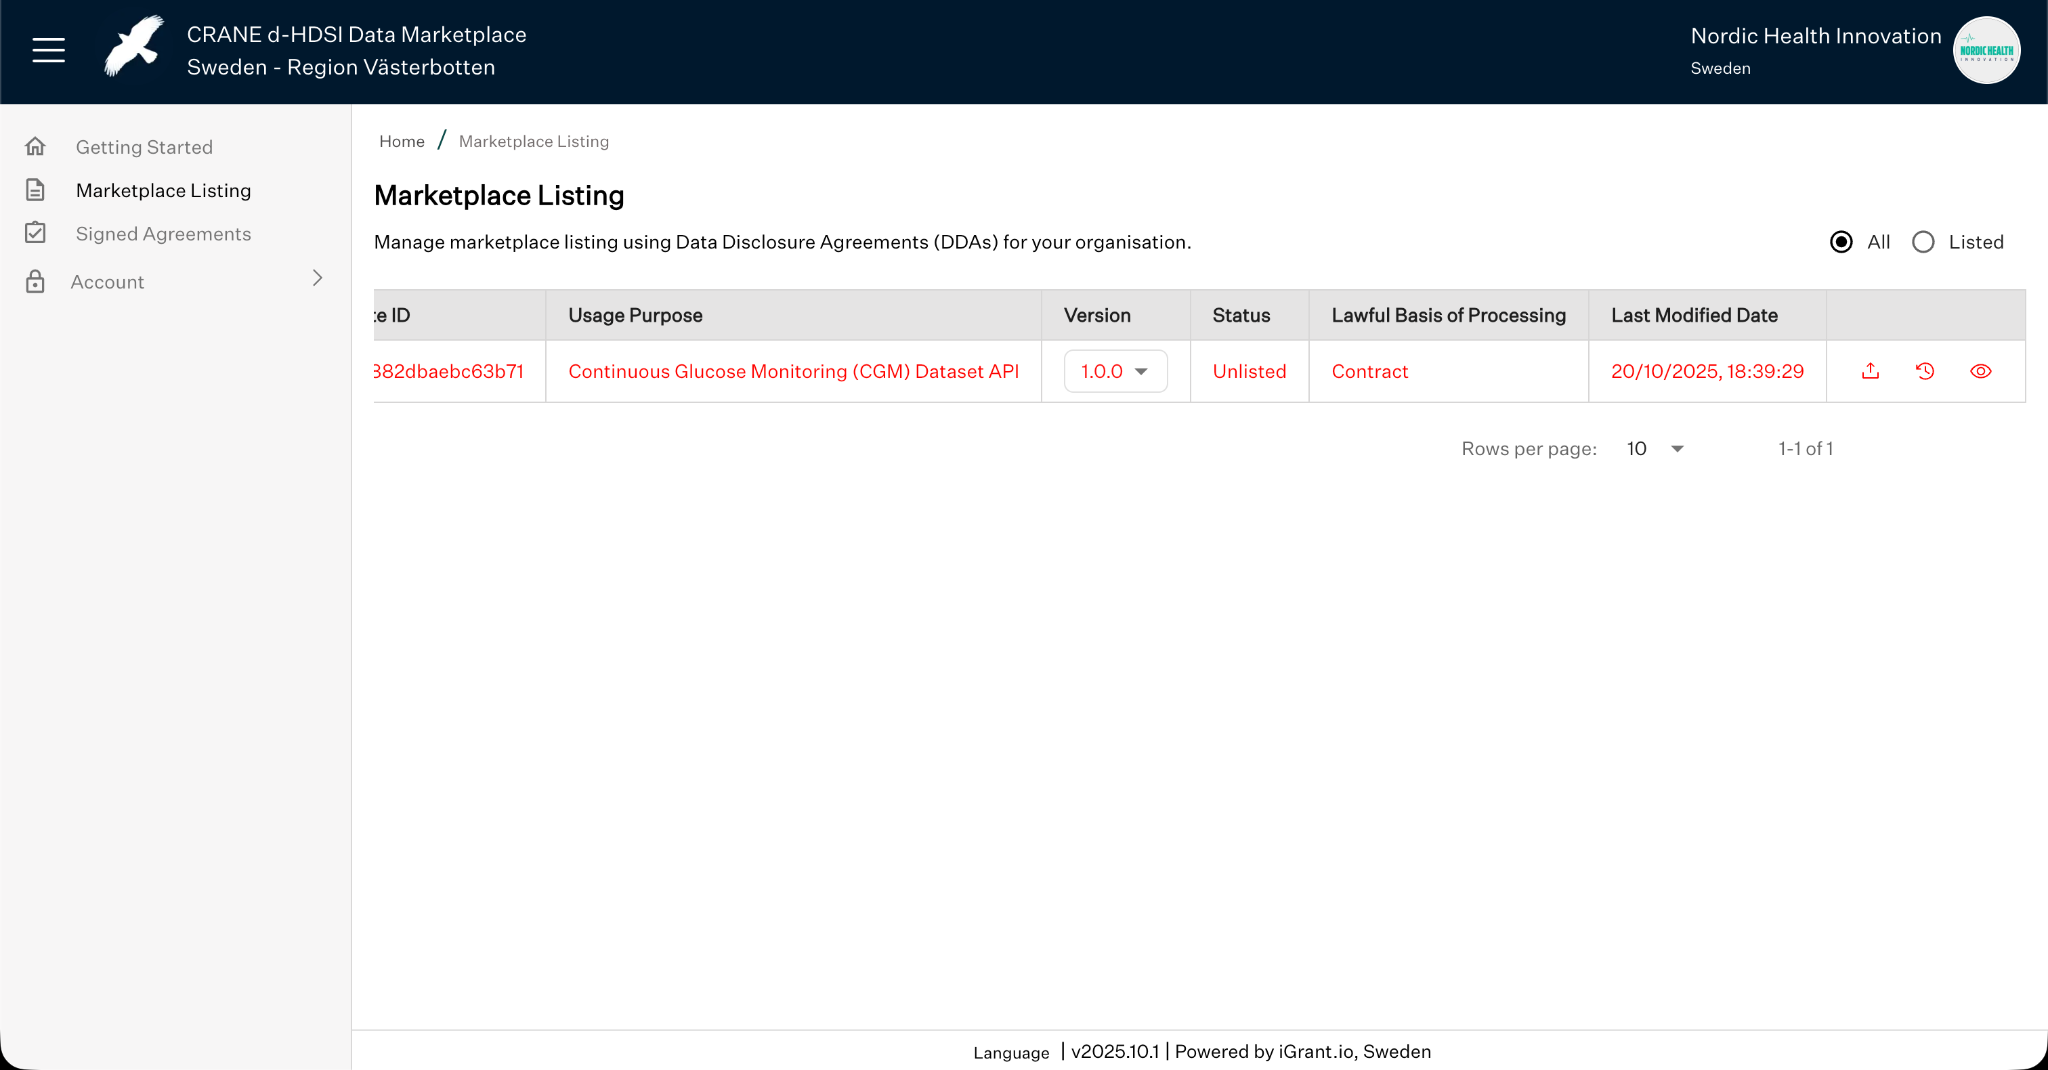
Fig 21: Unlisted DDAs on the Dashboard
The administrator may then request a review to make it available for discovery.
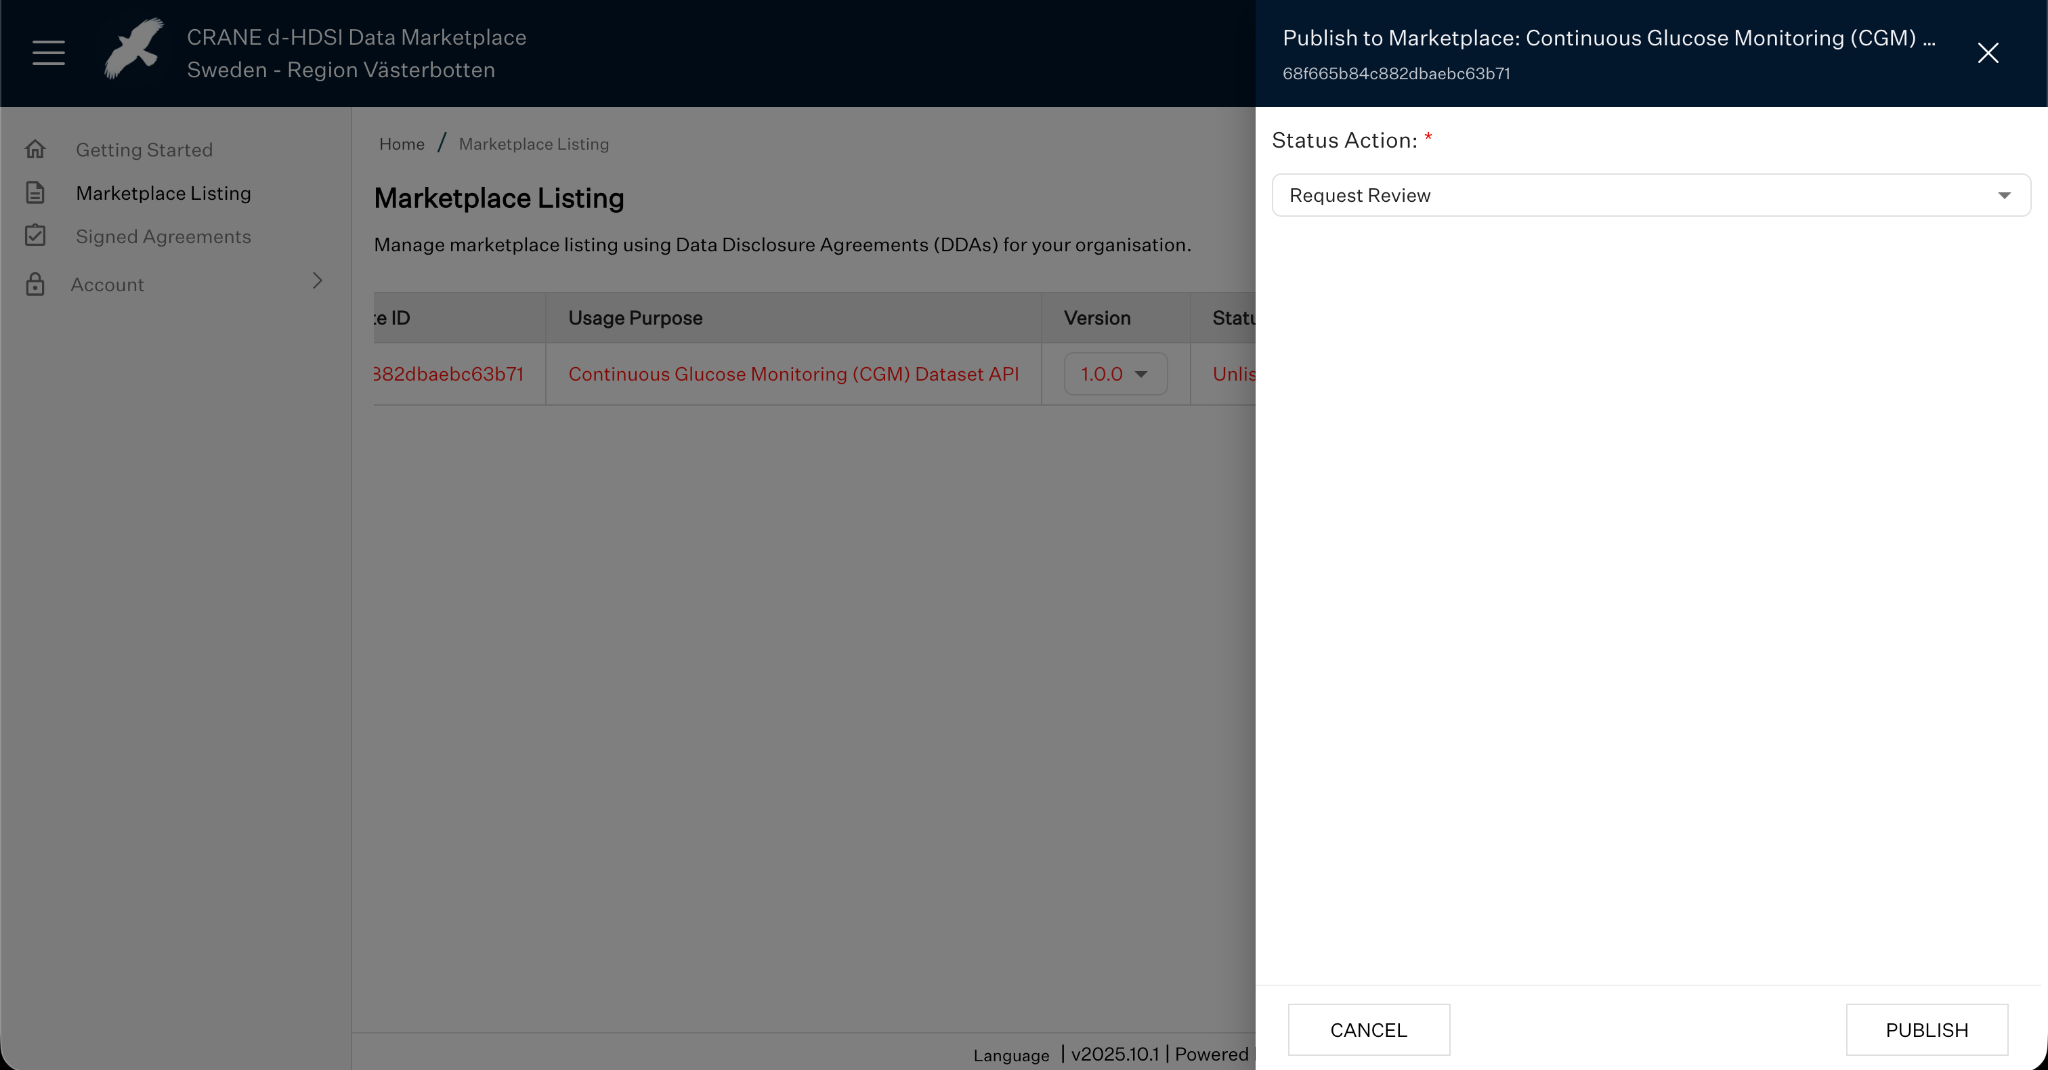
Fig 22: Requesting a Review
A designated Review Committee assesses the DDA for completeness, accuracy, and compliance. The committee may approve or reject the agreement.
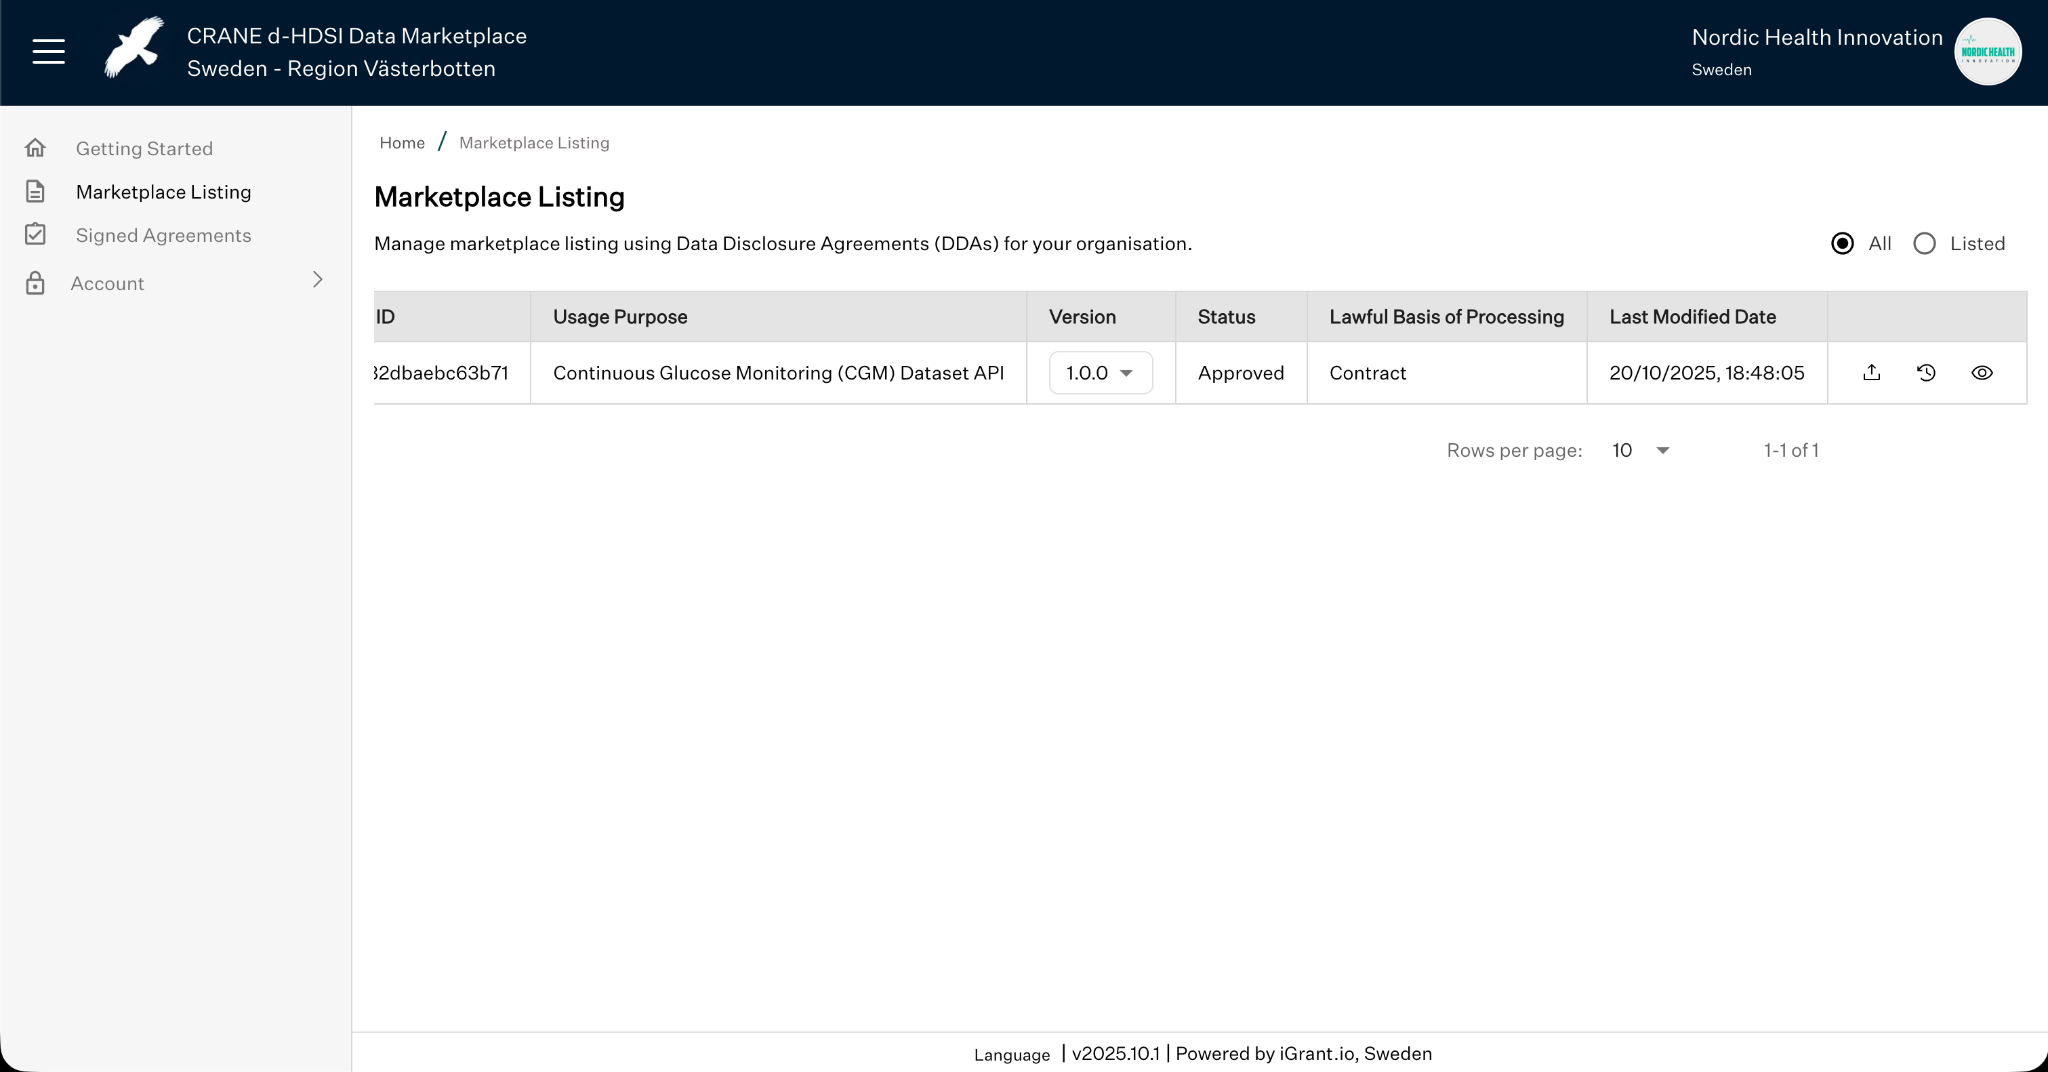
Fig 23: Approved DDA
Following approval, the administrator can list the agreement, making it discoverable.
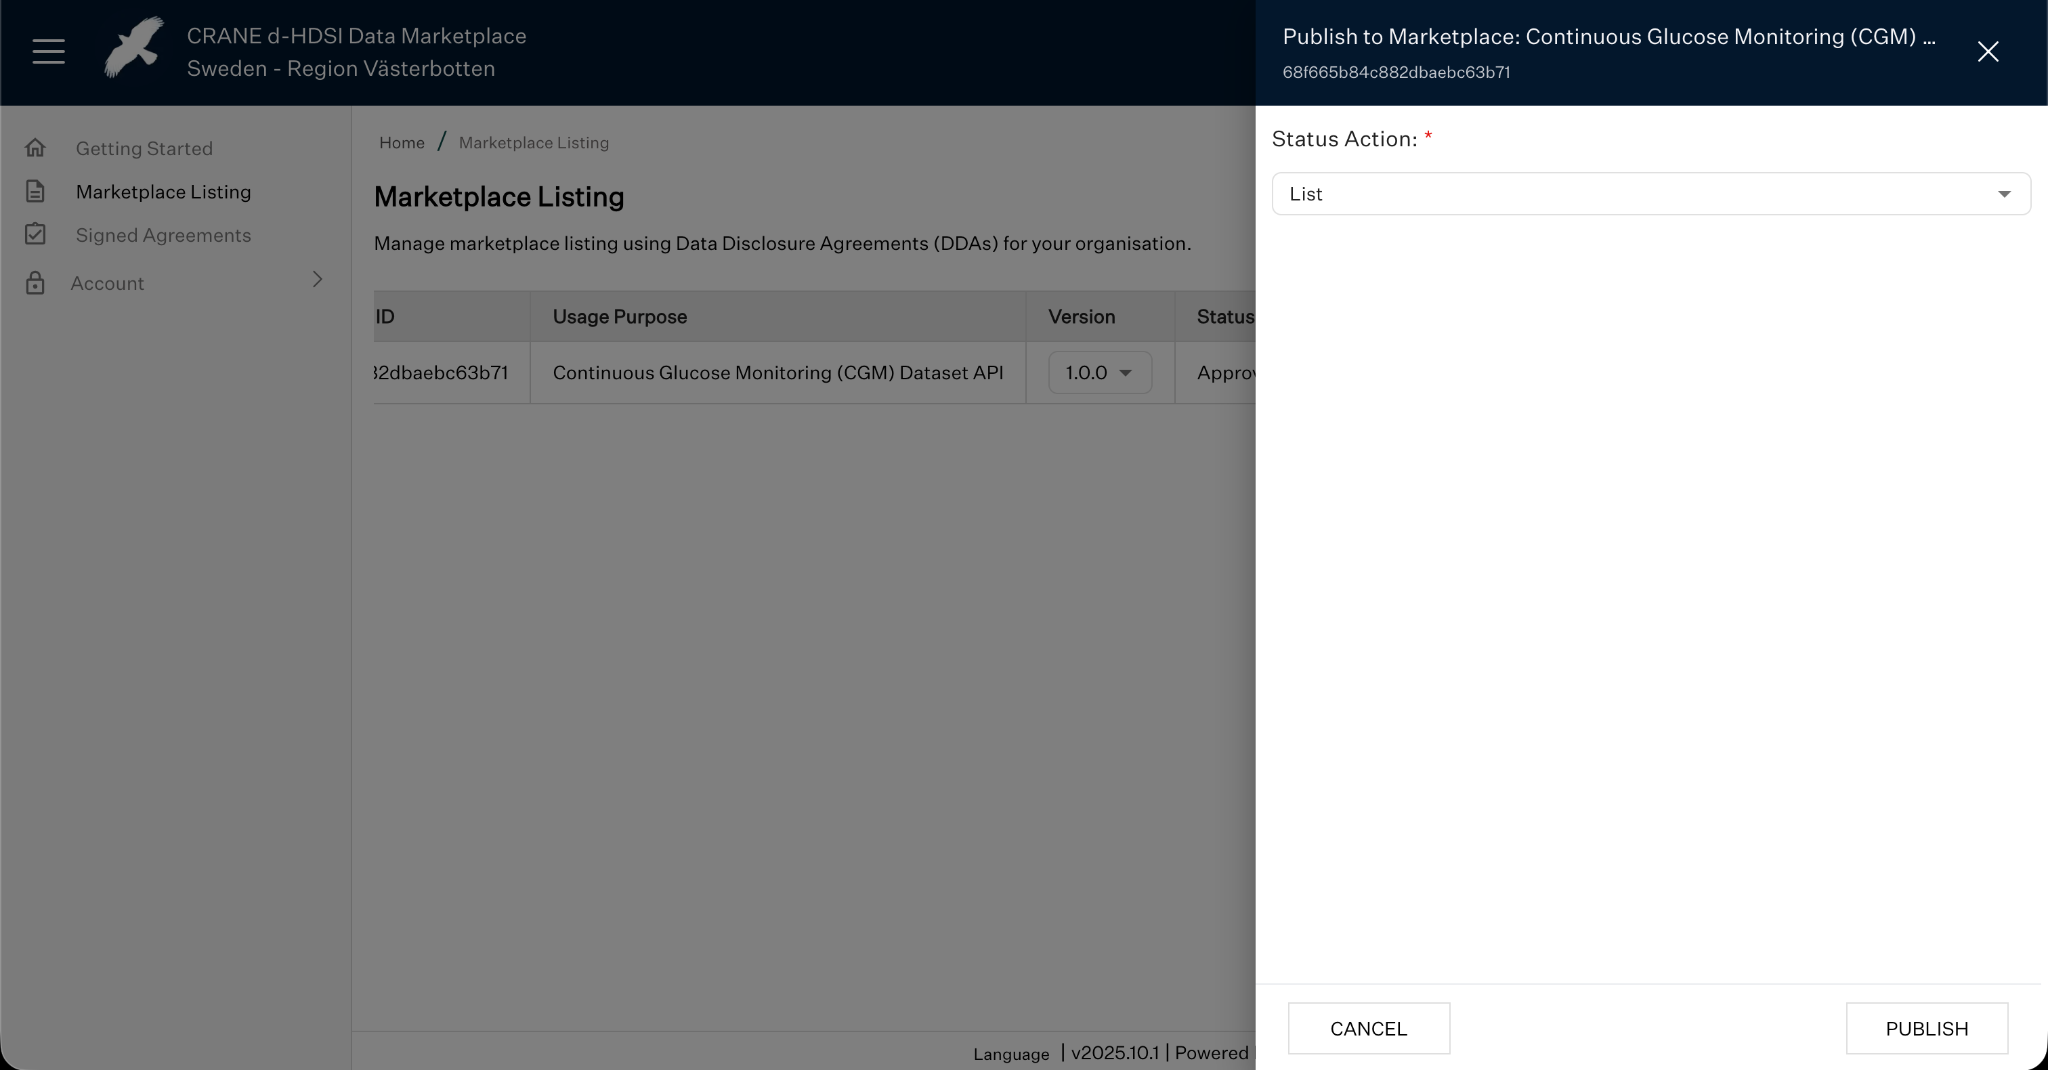
Fig 24: Listing a DDA
Once listed, the DDA becomes visible on the public discovery page.
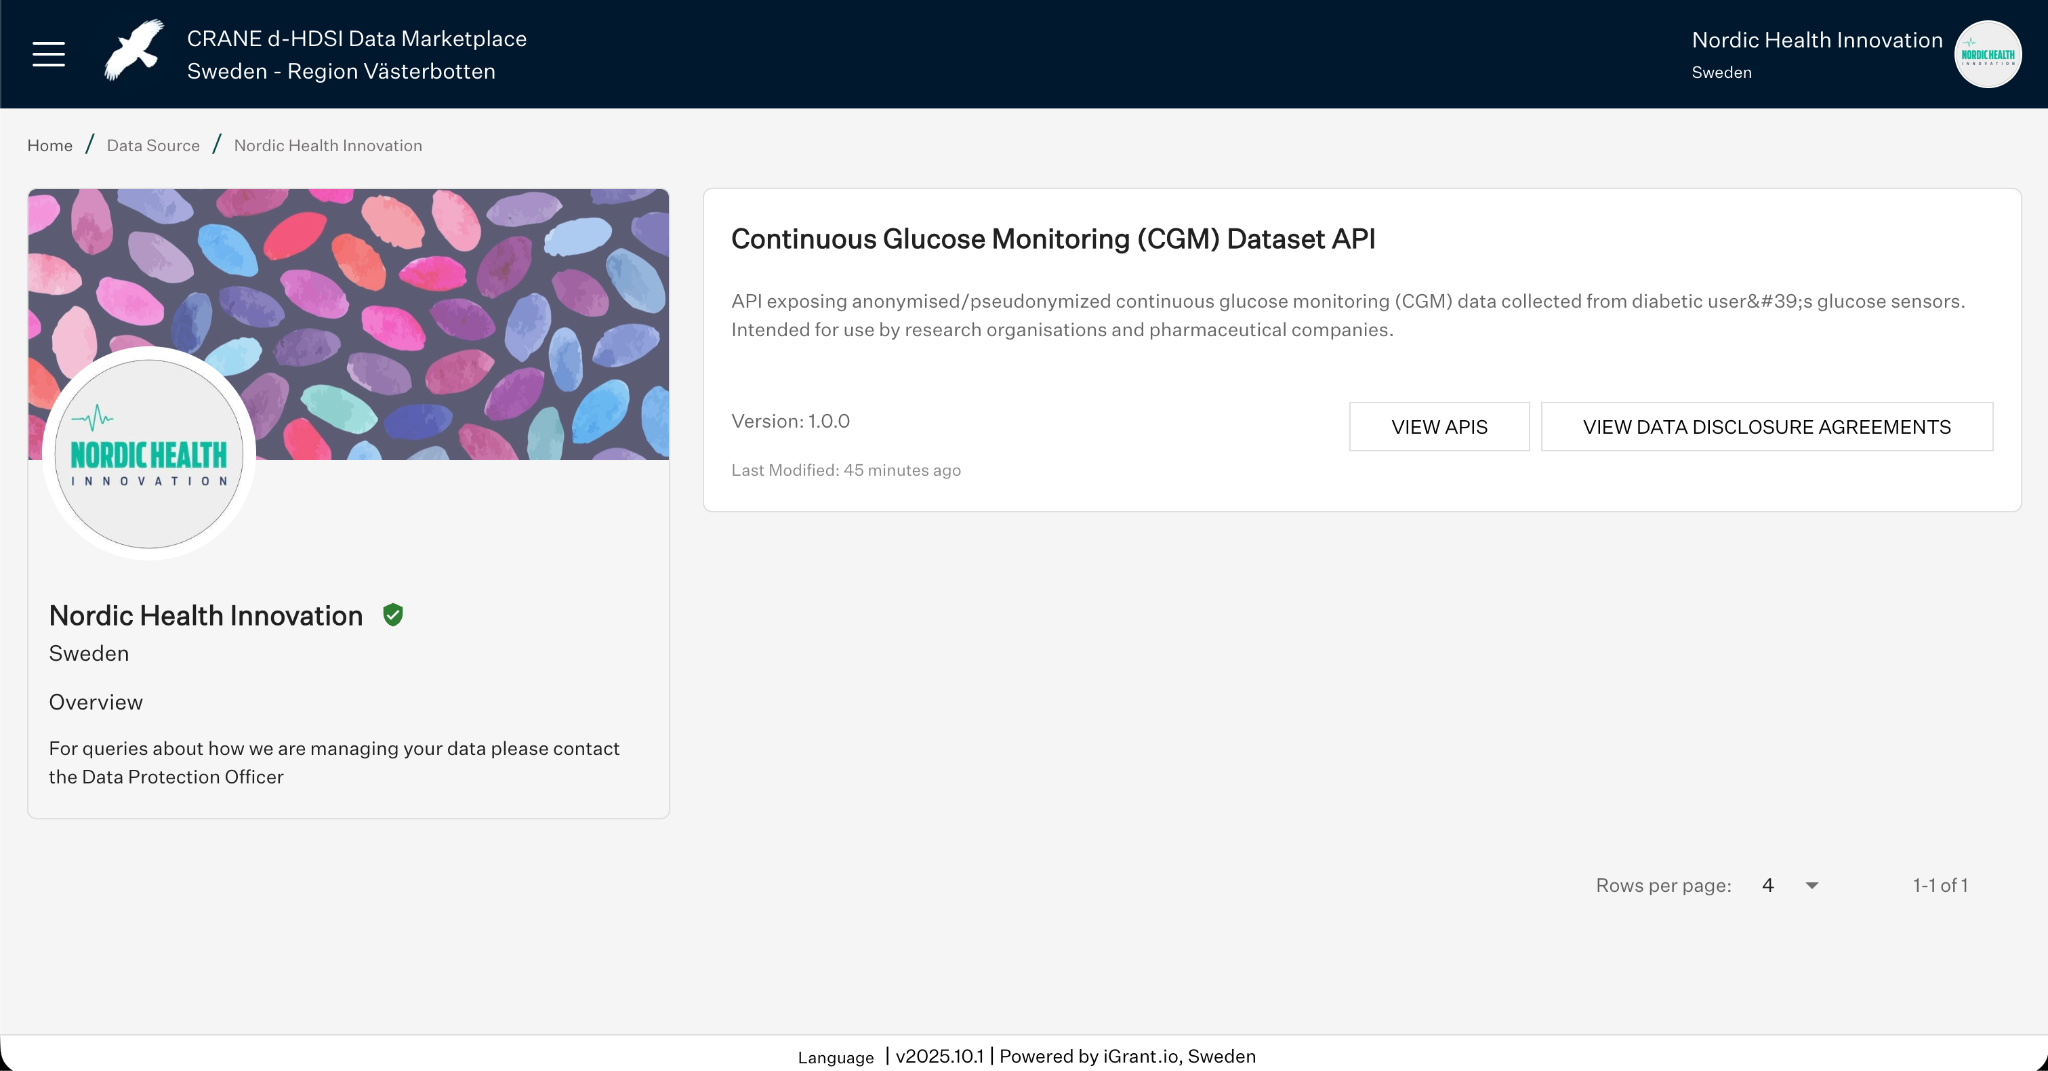
Fig 25: DDA on Public Discovery Page
9. Reviewing & Signing DDAs
The Data Using Service administrator can explore all available data sources on the public discovery page.
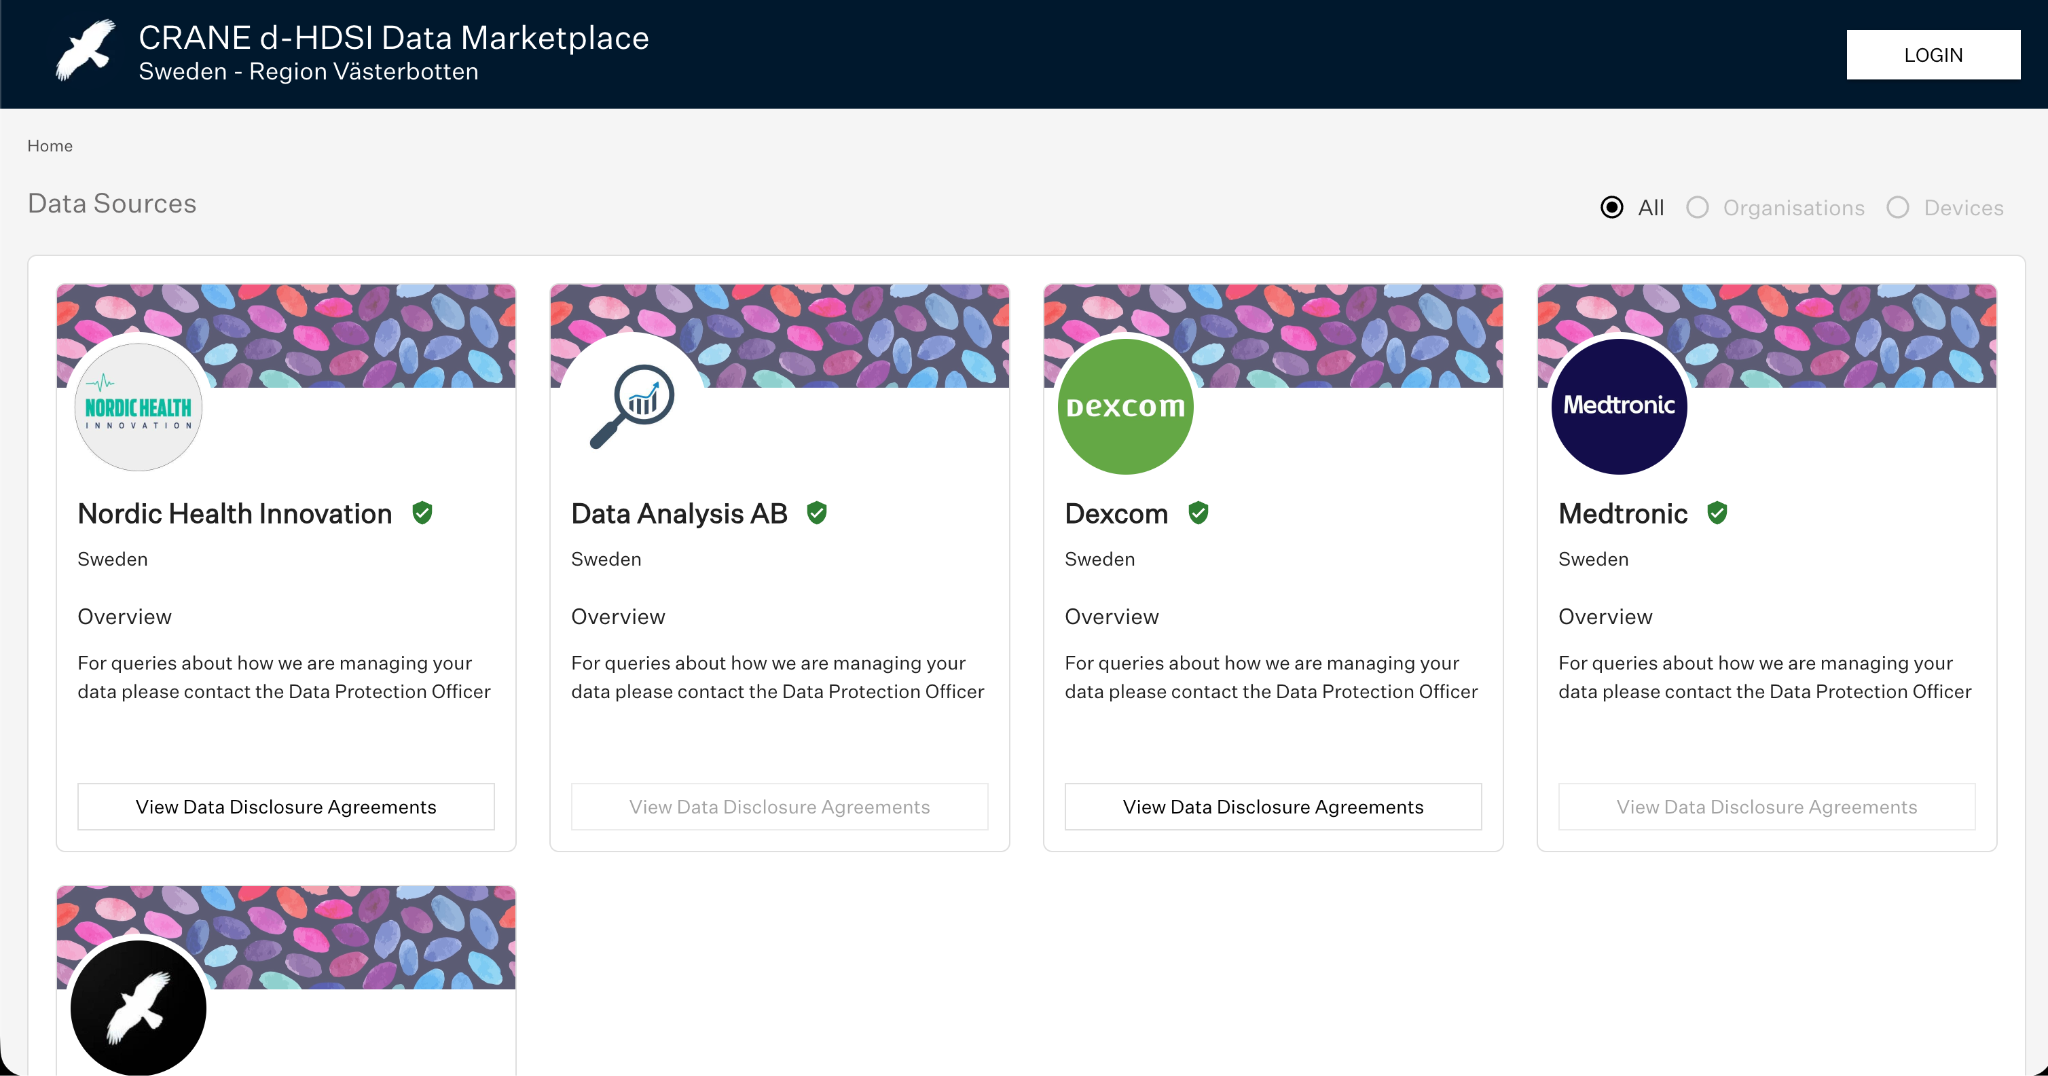
Fig 26: Public Discovery Page
To review a published DDA, select View Data Disclosure Agreement.
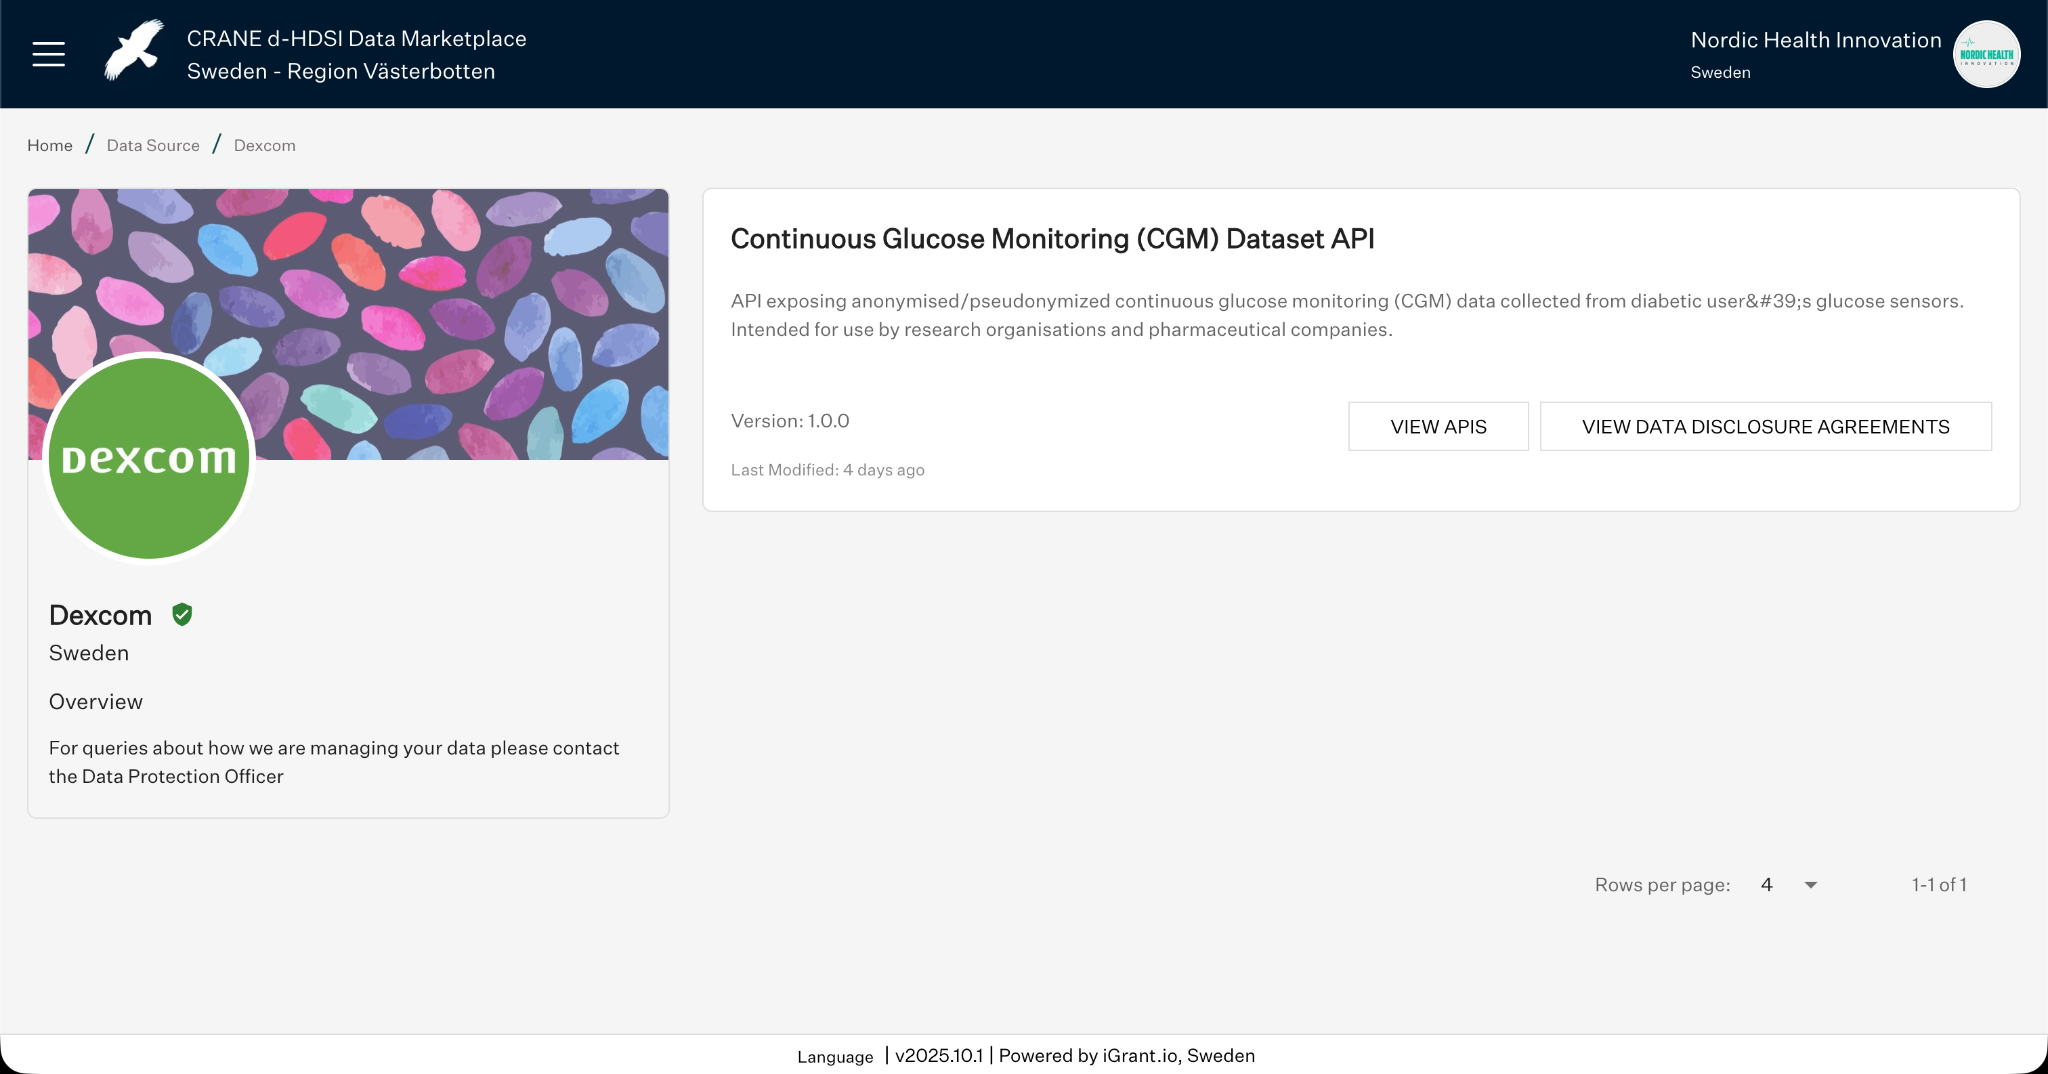
Fig 27: Viewing a DDA
Access individual DDAs by clicking View Data Disclosure Agreements.
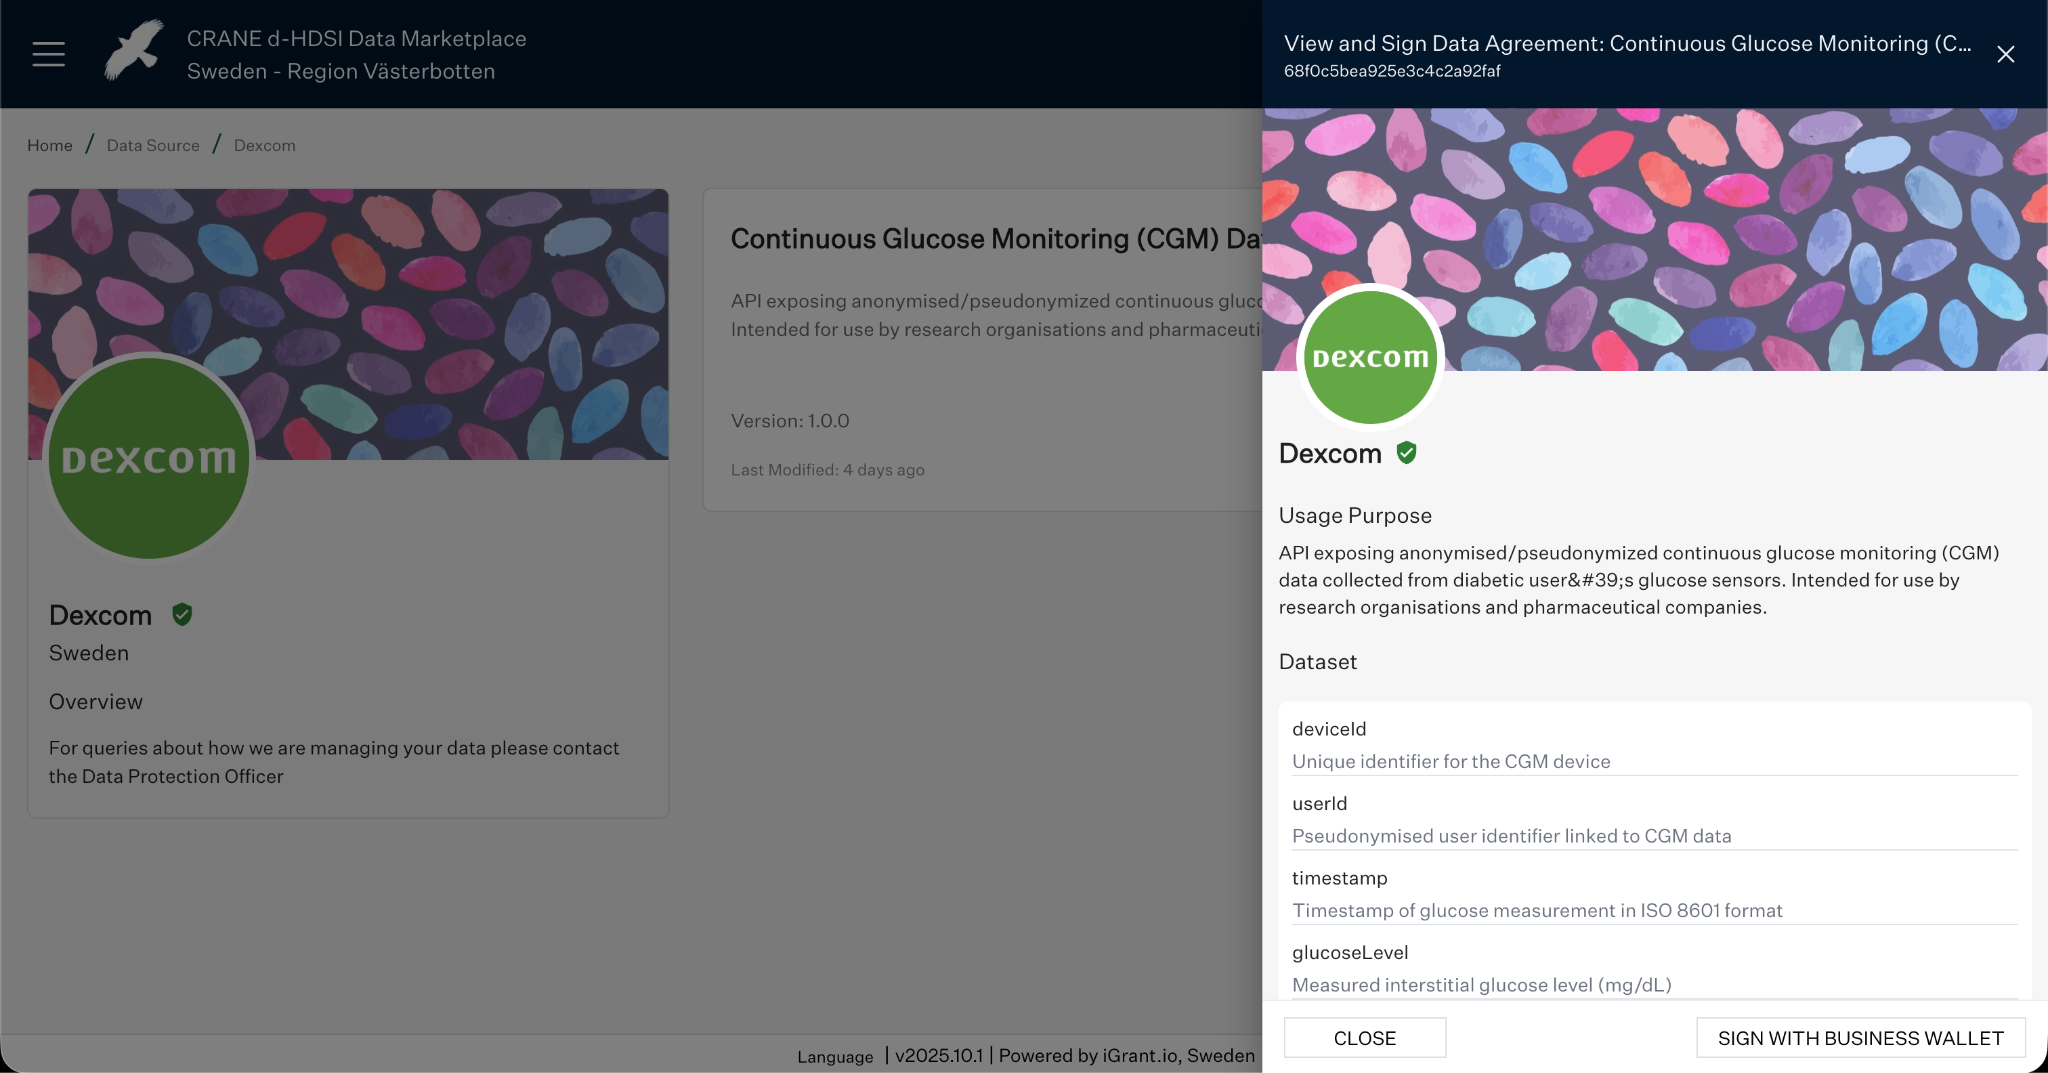
Fig 28: Single DDA view
Examine the APIs available under each DDA by selecting View APIs.
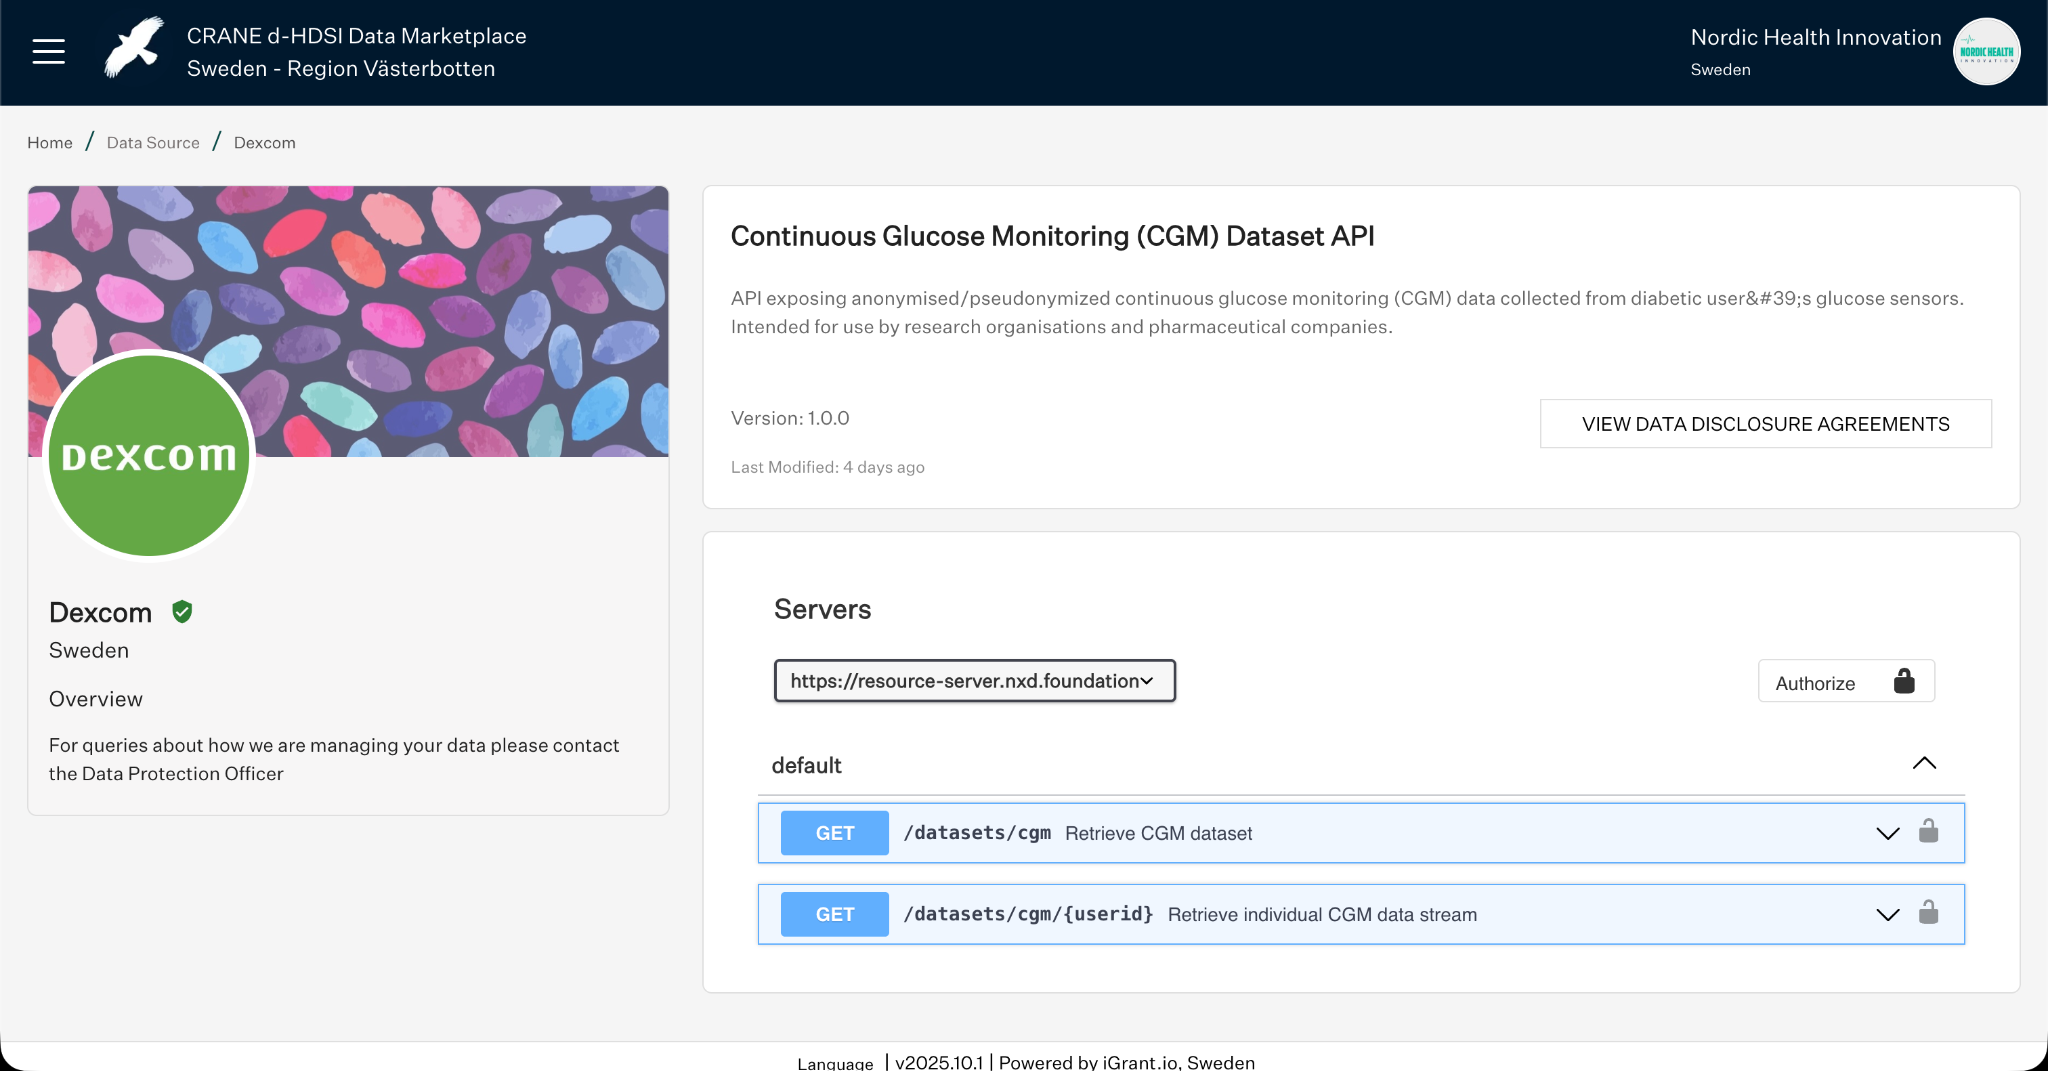
Fig 29: APIs Associated with a DDA
To sign, click Sign with Business Wallet. This redirects to the Business Wallet for signing using a Software Statement issued by the Data Marketplace.
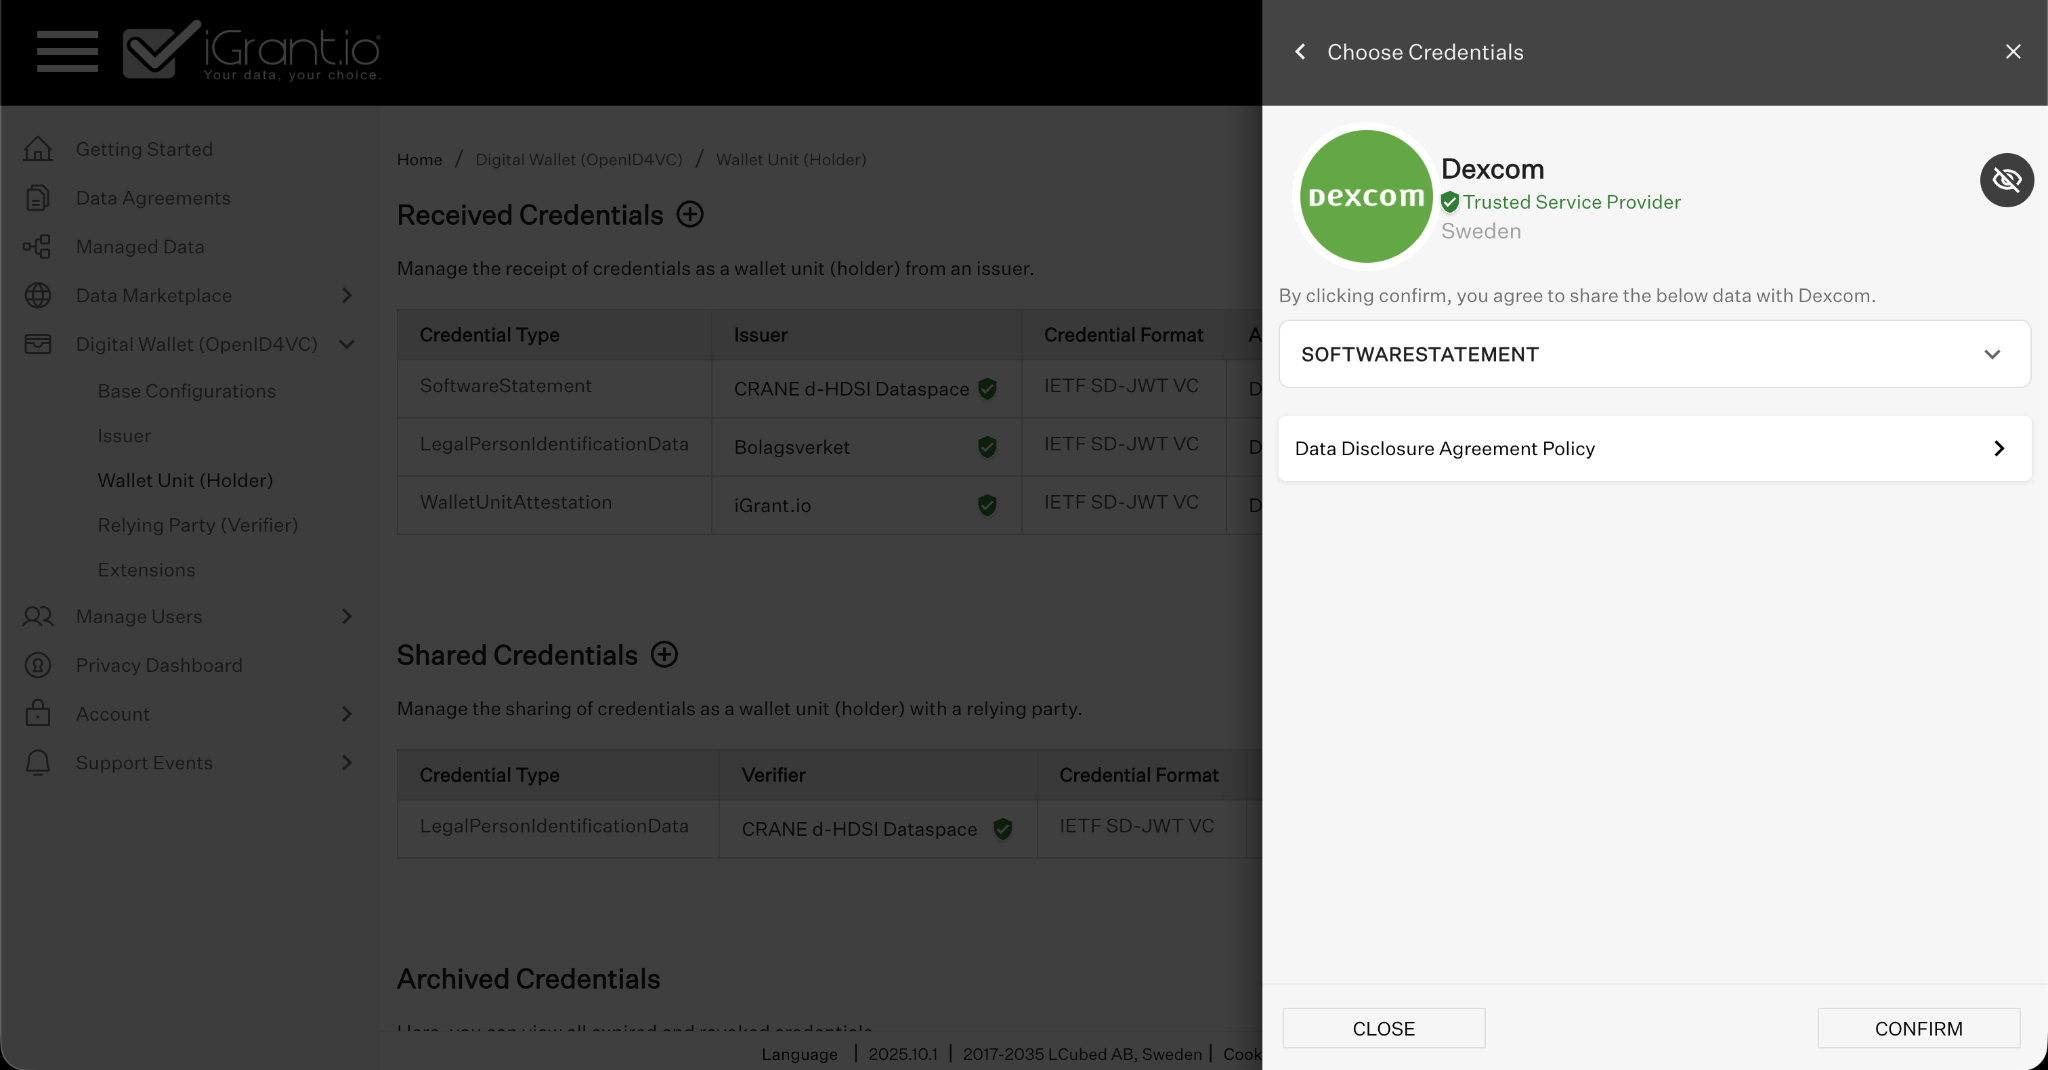
Fig 30: Signing a DDA
The Signed Agreements page provides a complete audit trail of all signed agreements.
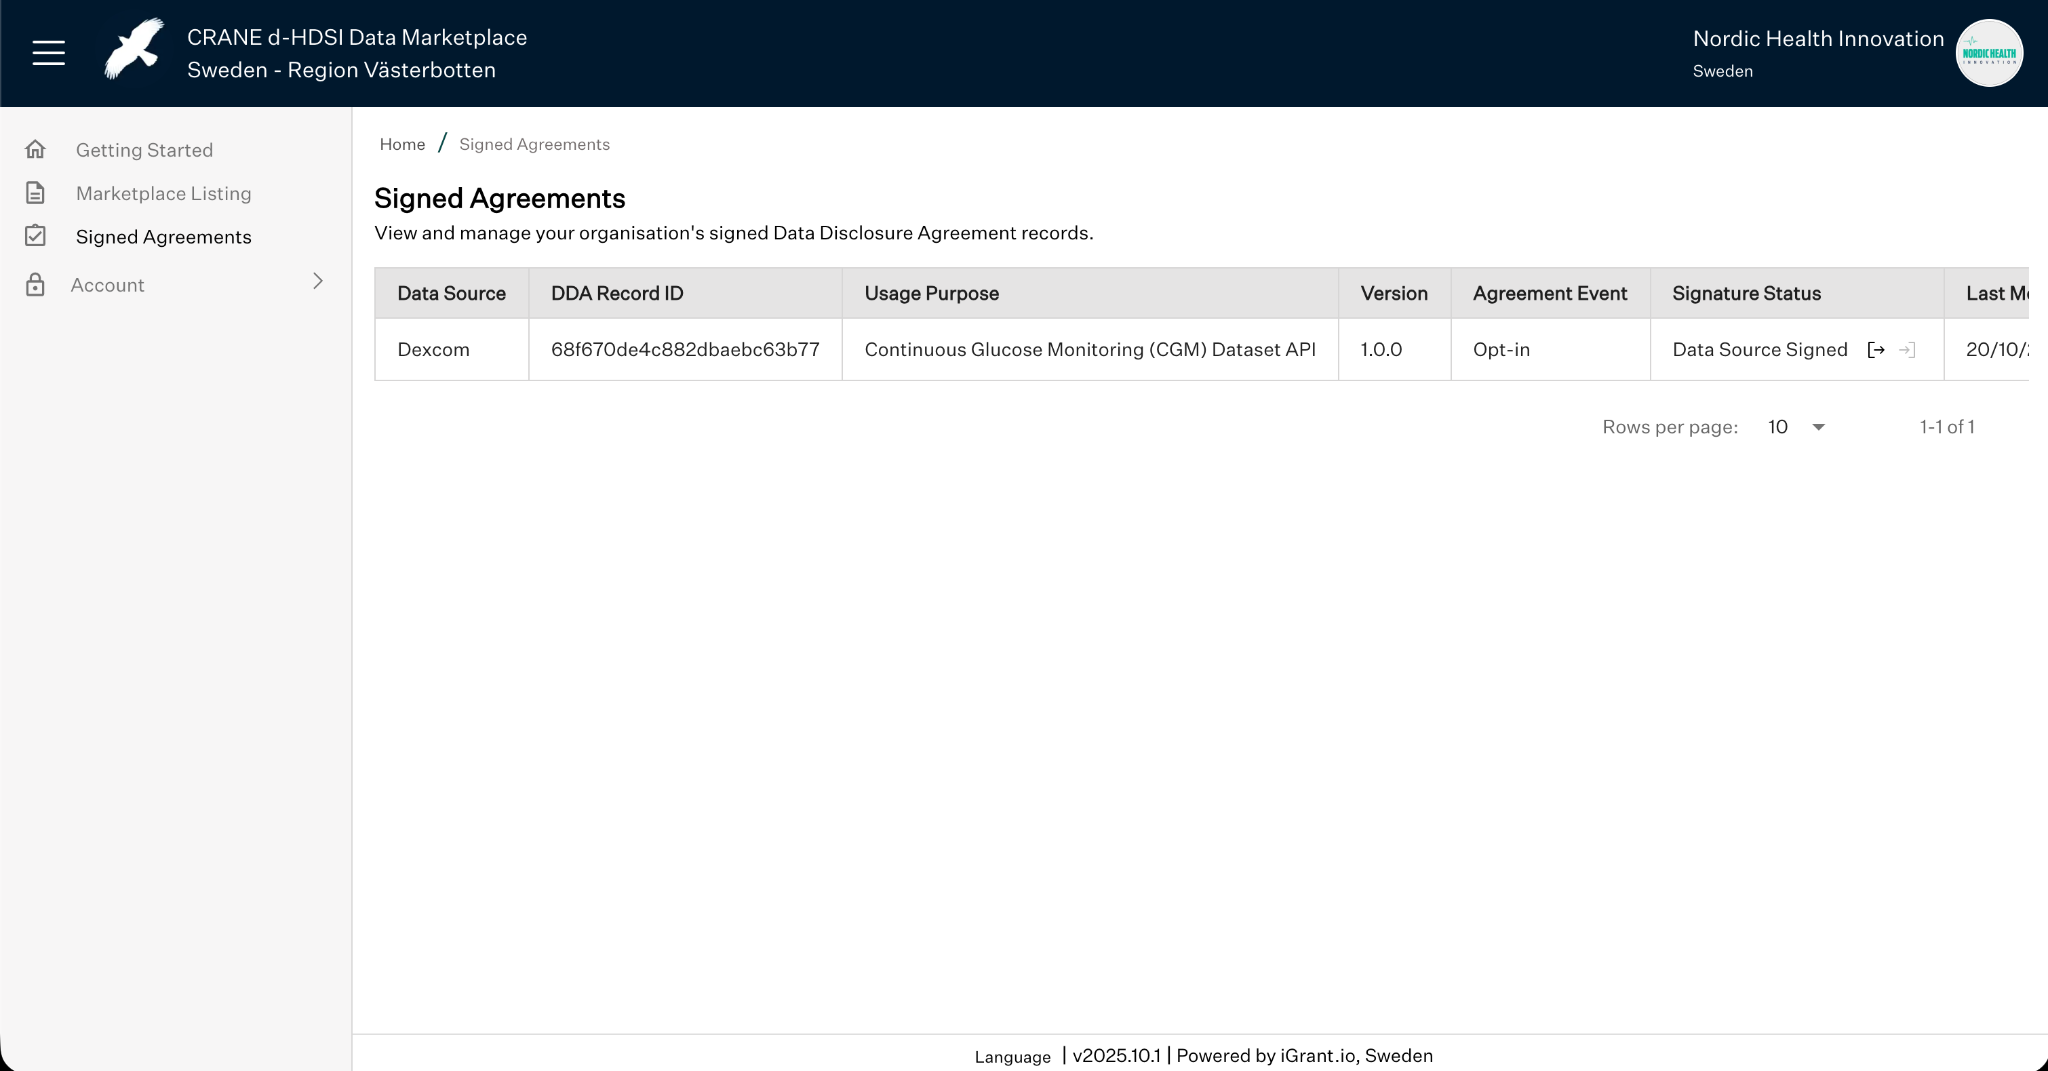
Fig 31: Signed Agreements
Appendix A: Creating Data Exchange Agreements
A.1 Creating a Data Agreement in the DISP
To publish a DDA, a Data Agreement (DA) must be created first, defining the data-sharing relationship between an individual and an organisation.
A.1.1 Define Usage Purpose and Data Exchange Type
Navigate to Data Agreements and click Add (+). Provide the Usage Purpose, Description, and set Data Exchange to Data Source.
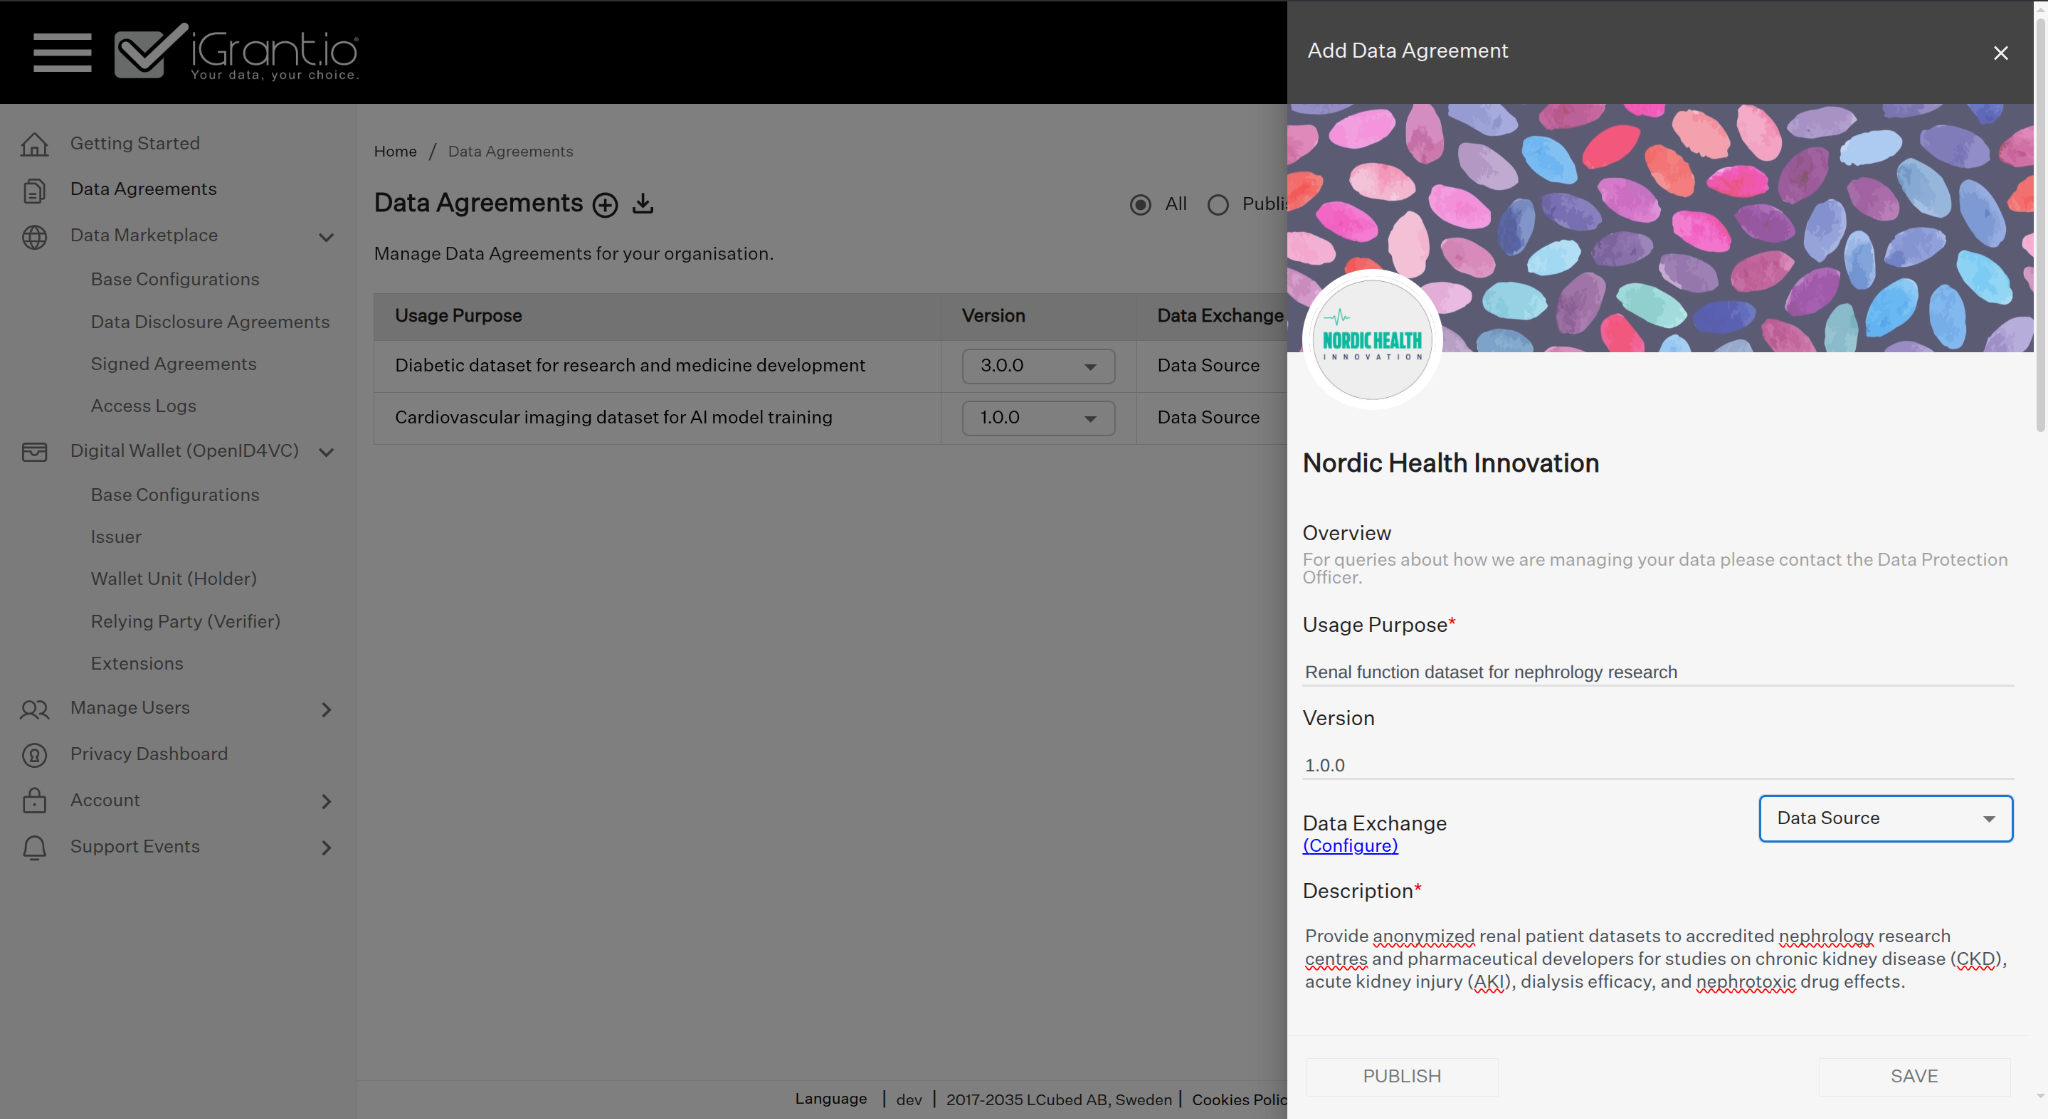
Fig A1: Creating a new Data Agreement
A.1.2 Specify Lawful Basis and Data Policy
Select the Lawful Basis. Set Third-party Data Sharing to True to enable DDA creation.
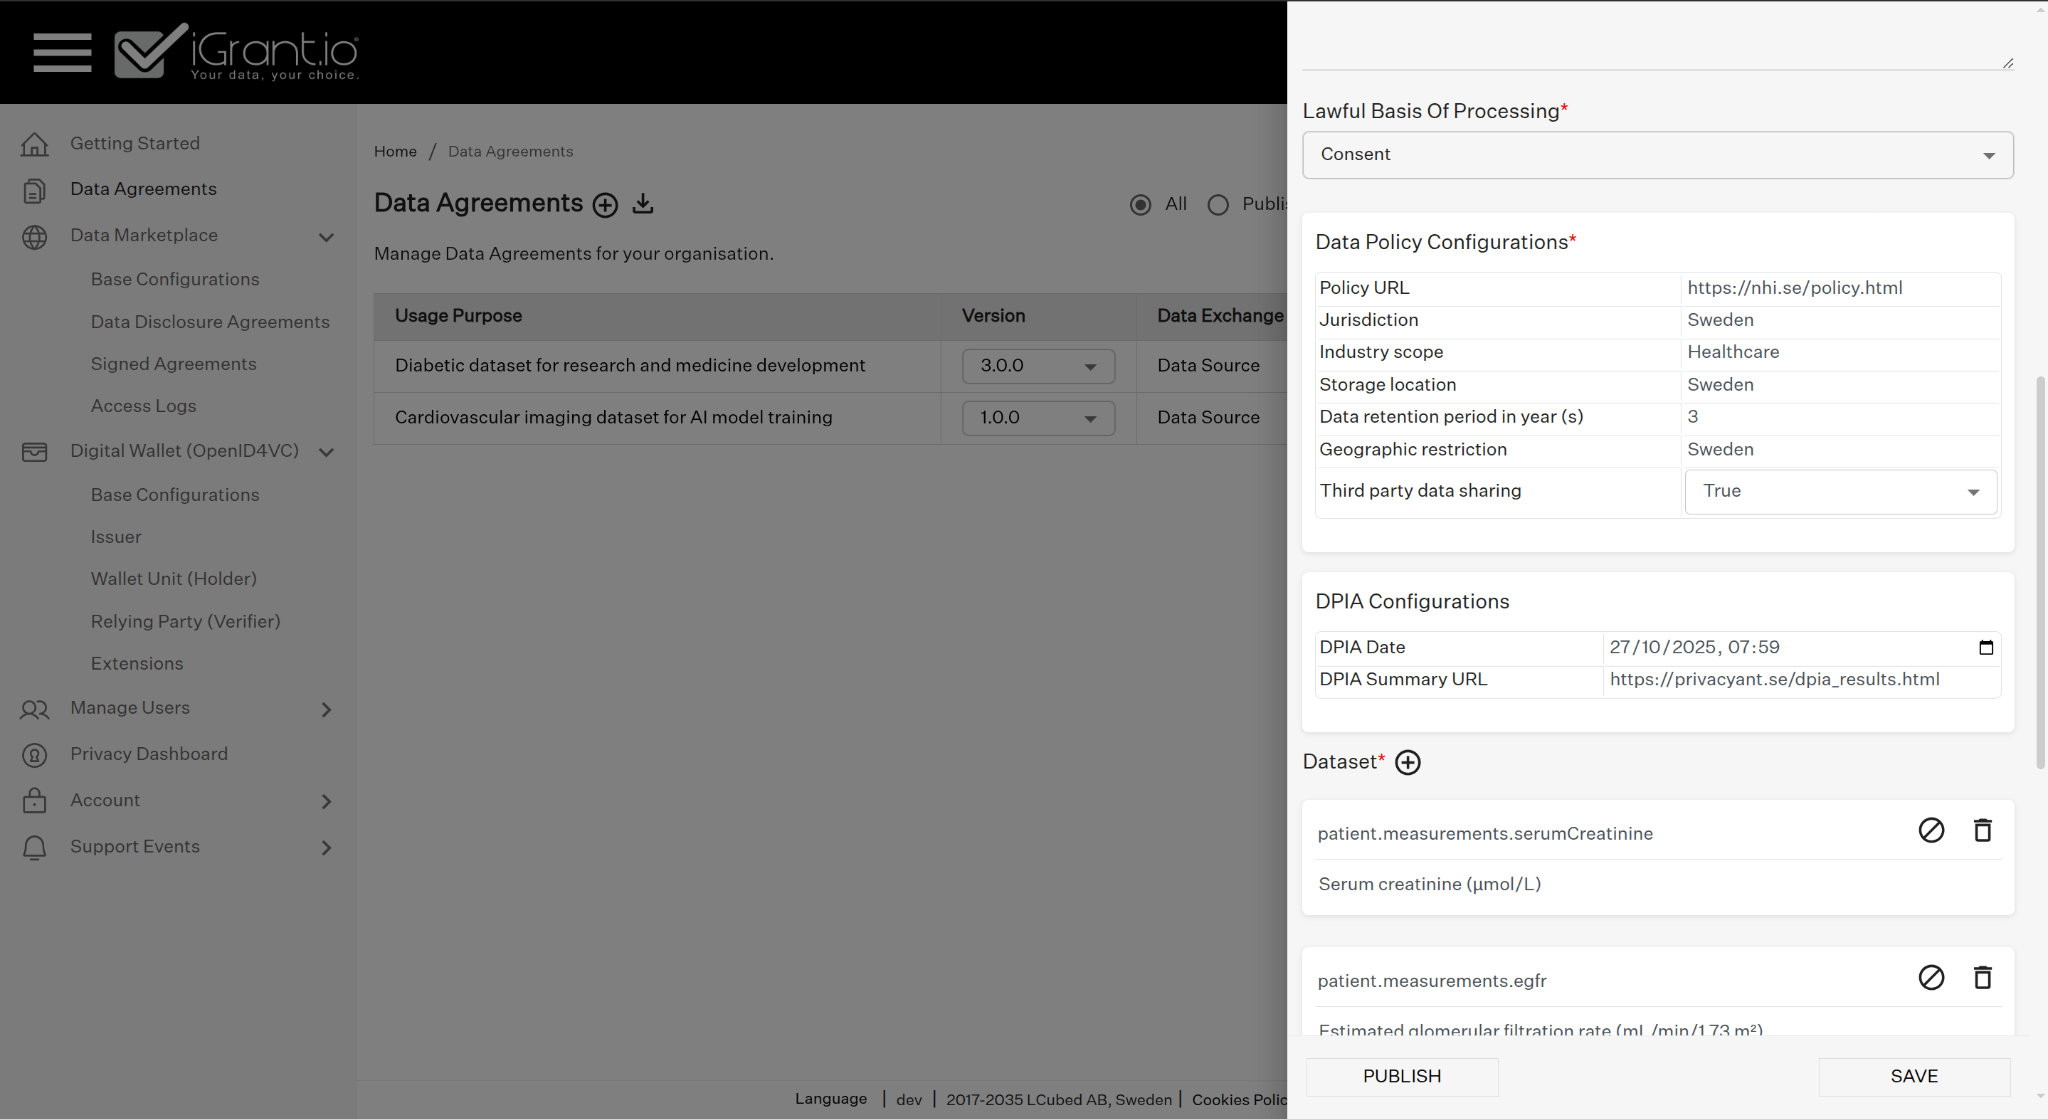
Fig A2: Configuring lawful basis and data policy
A.1.3 Add Dataset and OpenAPI Specification
Define the dataset elements and provide an OpenAPI Specification outlining the APIs that Data Using Services can access.
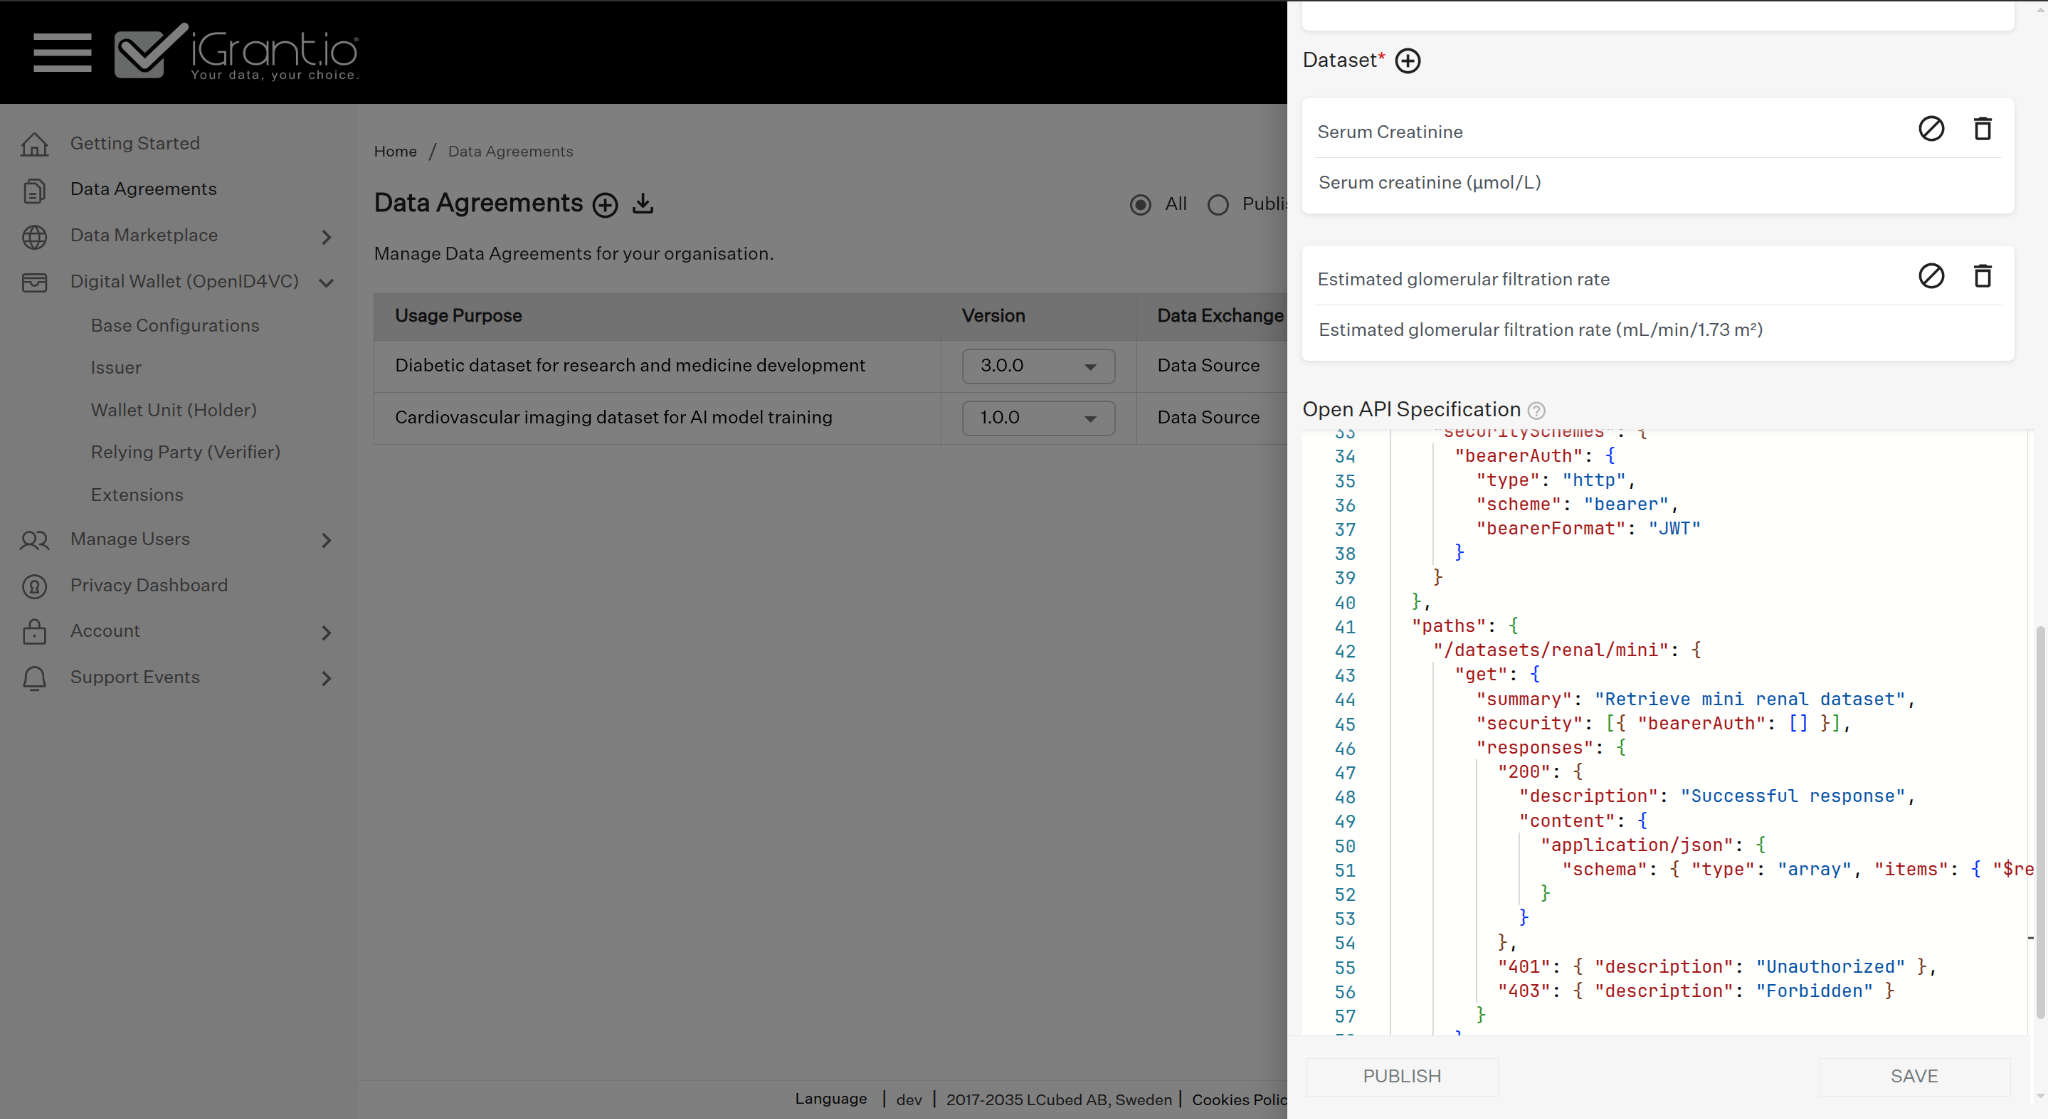
Fig A3: Dataset fields and OpenAPI specification
A.1.4 Save and Publish
Save the draft, then Publish to make it available.
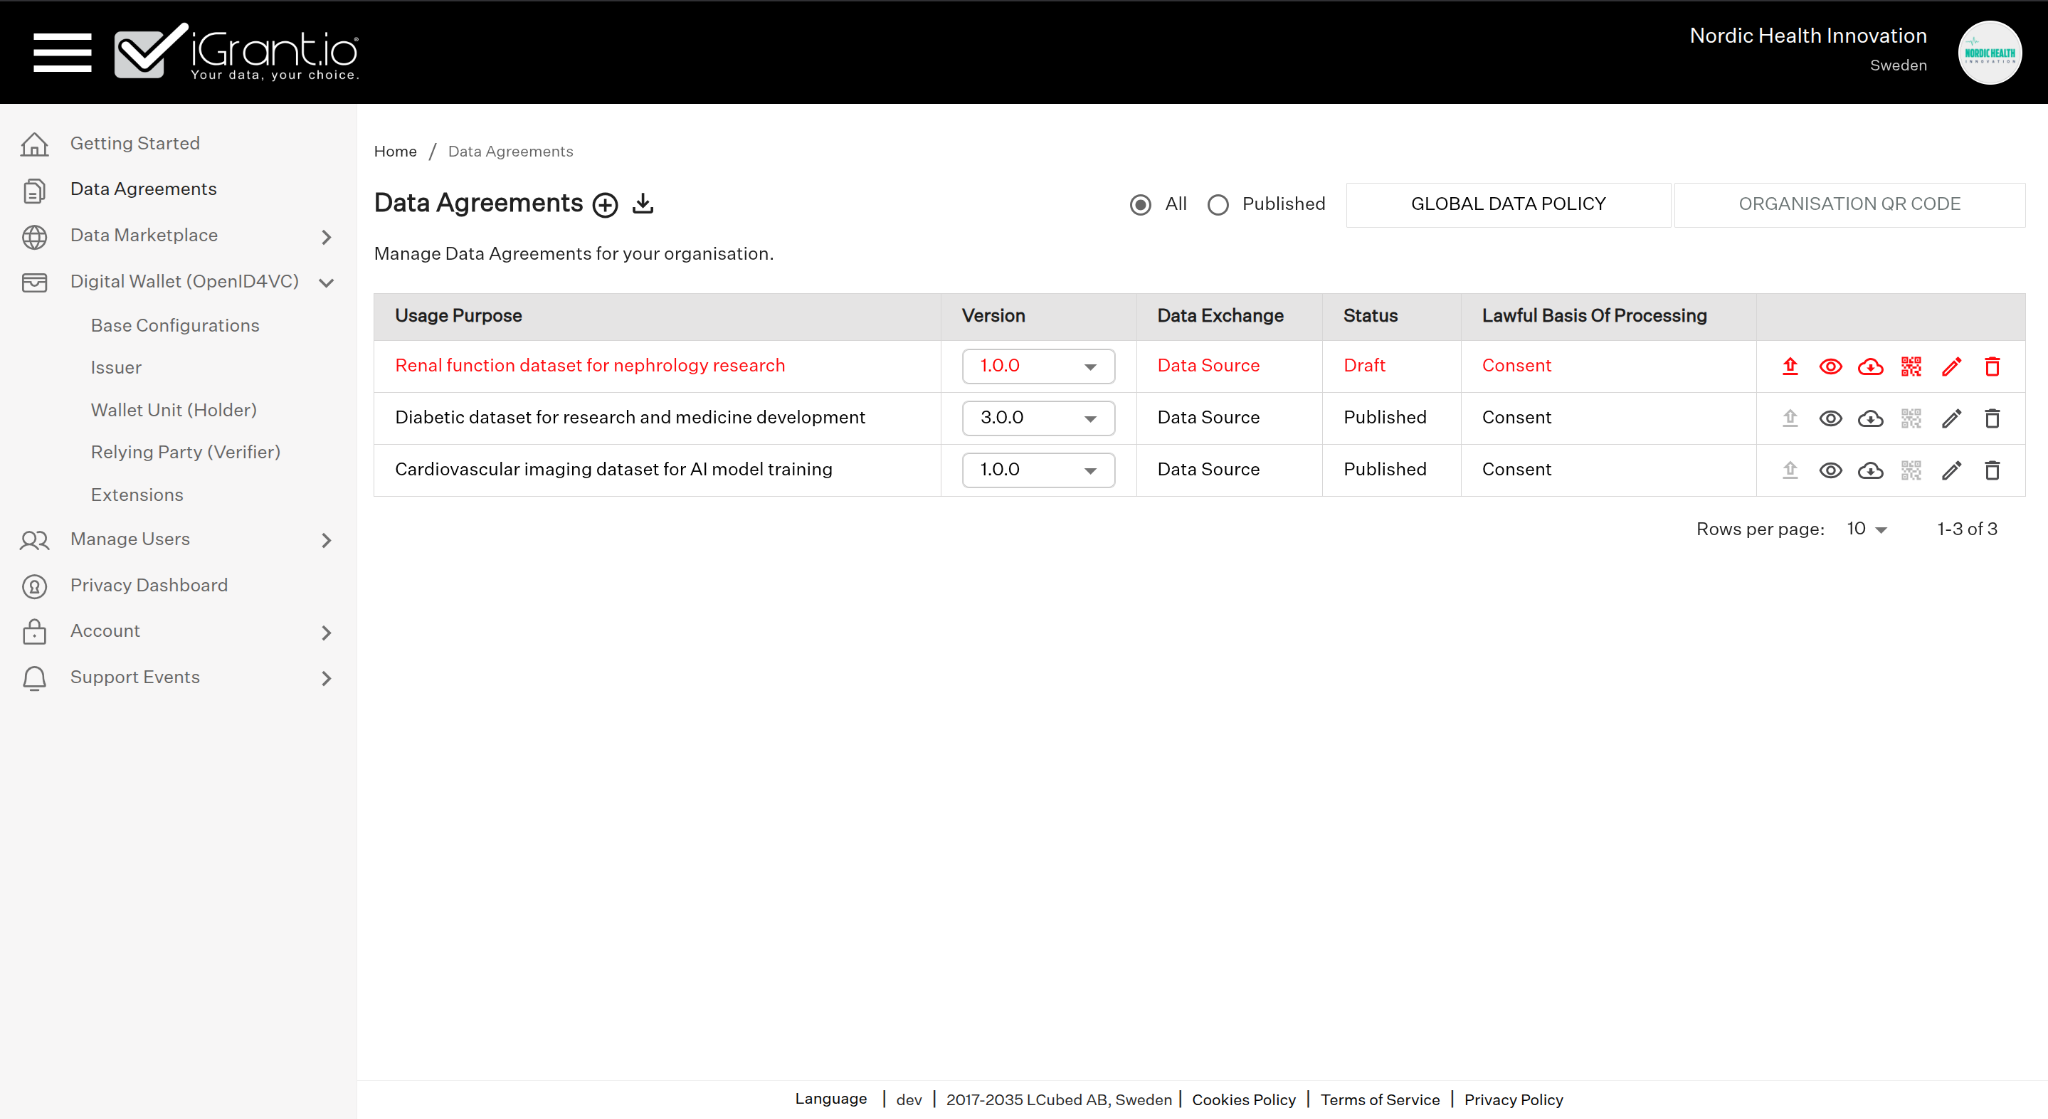
Fig A4: Draft Data Agreement
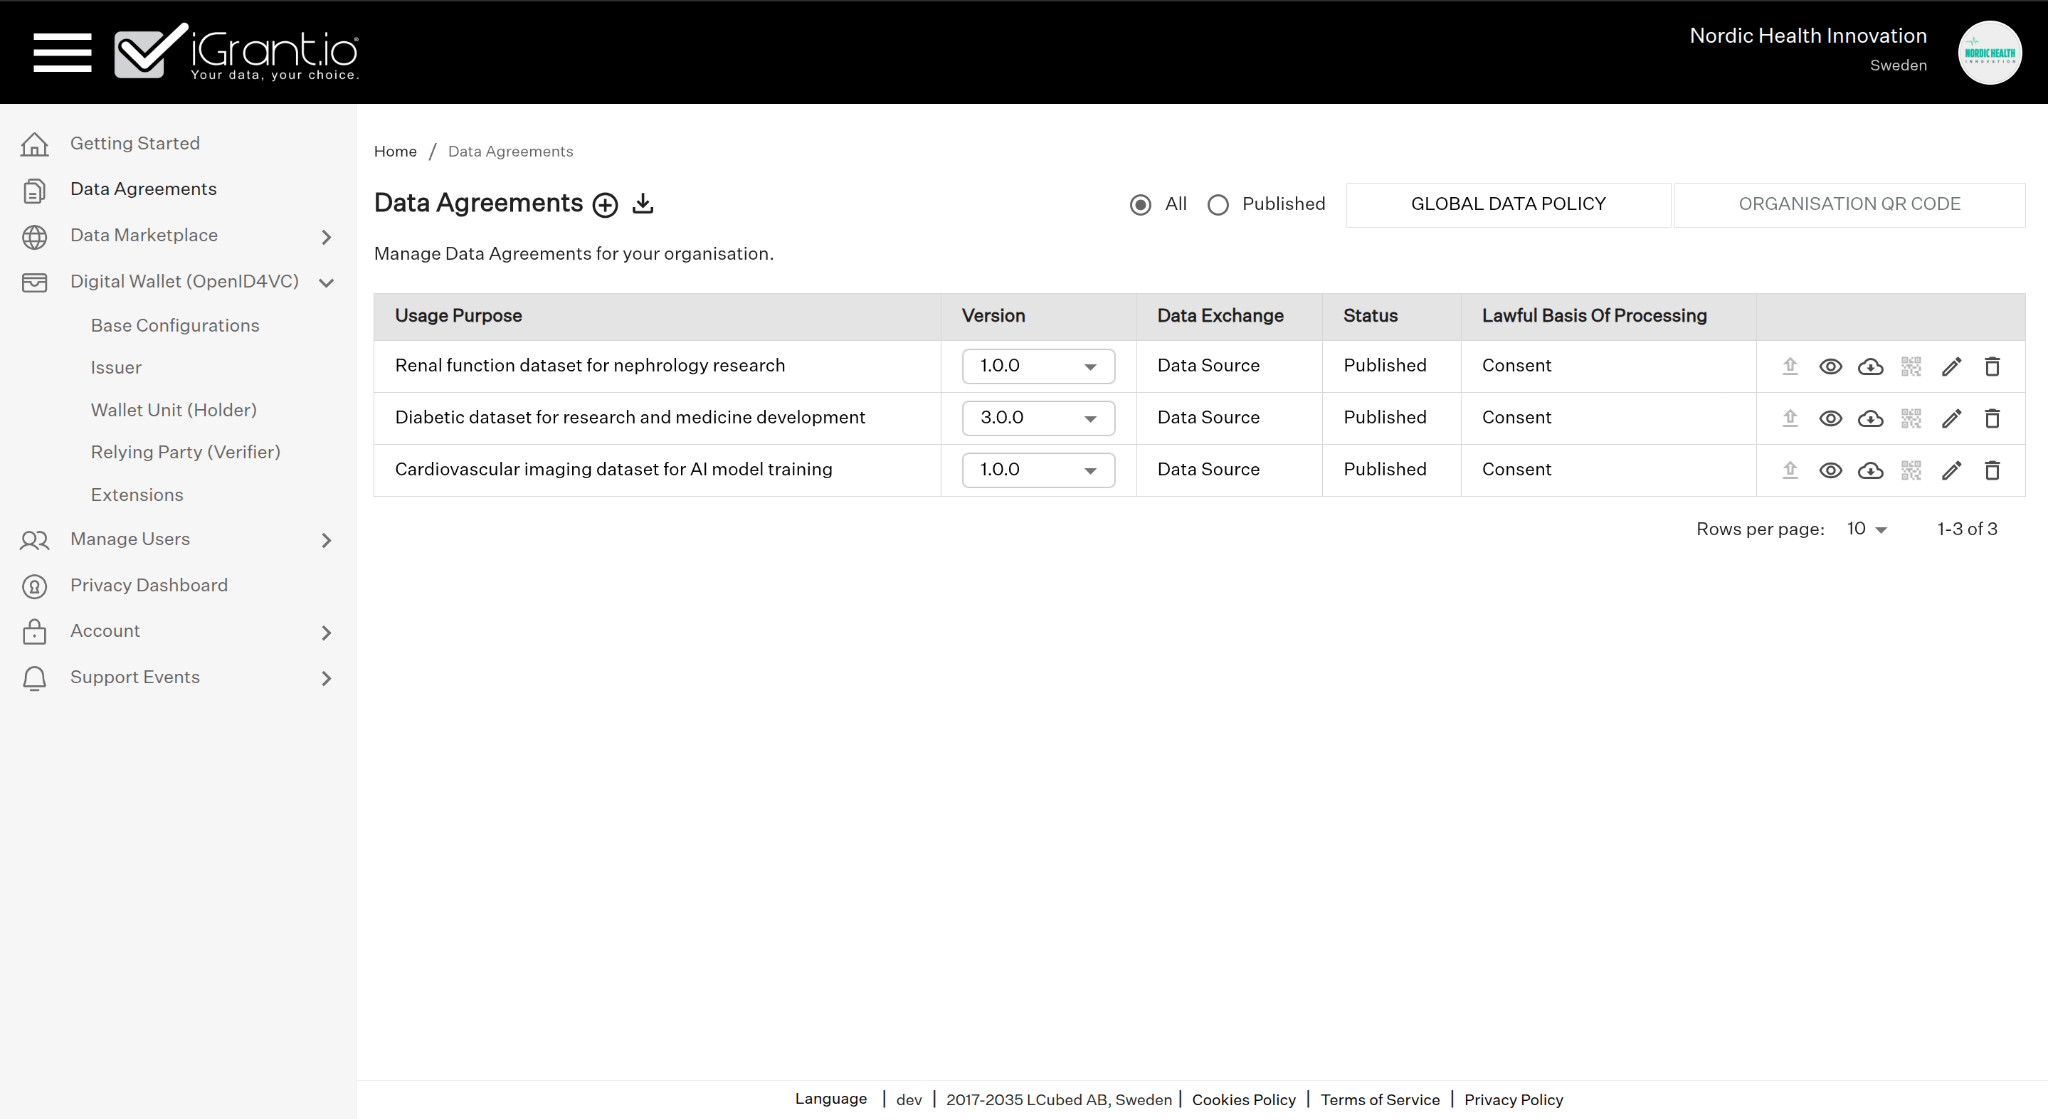
Fig A5: Published Data Agreement
A.2 Creating a DDA from a Data Agreement
Once a DA is published, a DDA can be created to govern data exchange between organisations.
A.2.1 Connect a Data Agreement
Navigate to Data Disclosure Agreements, click Add (+), and select the previously created DA.
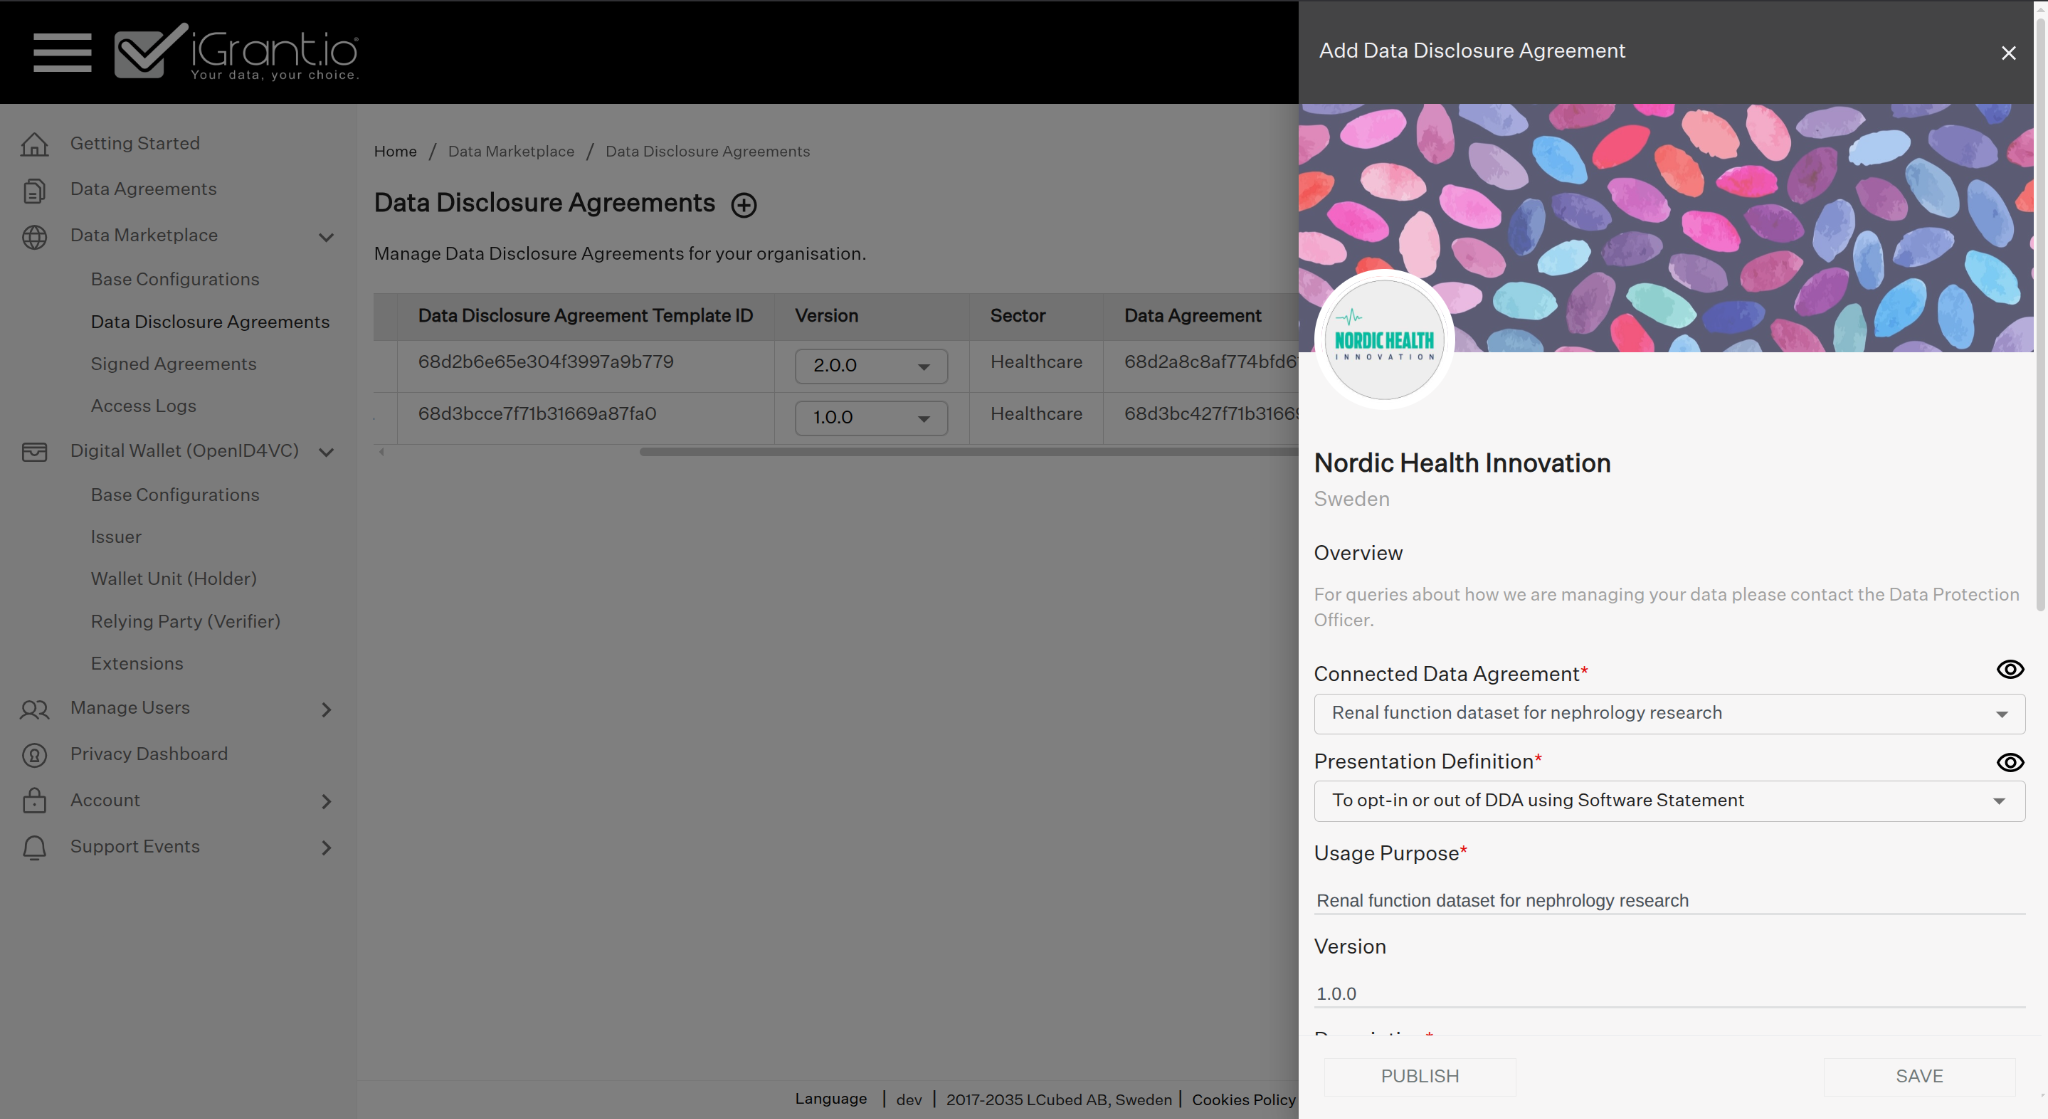
Fig A6: Connecting a Data Agreement
A.2.2 Configure the DDA
Enter the Policy URL and adjust configurations as necessary.
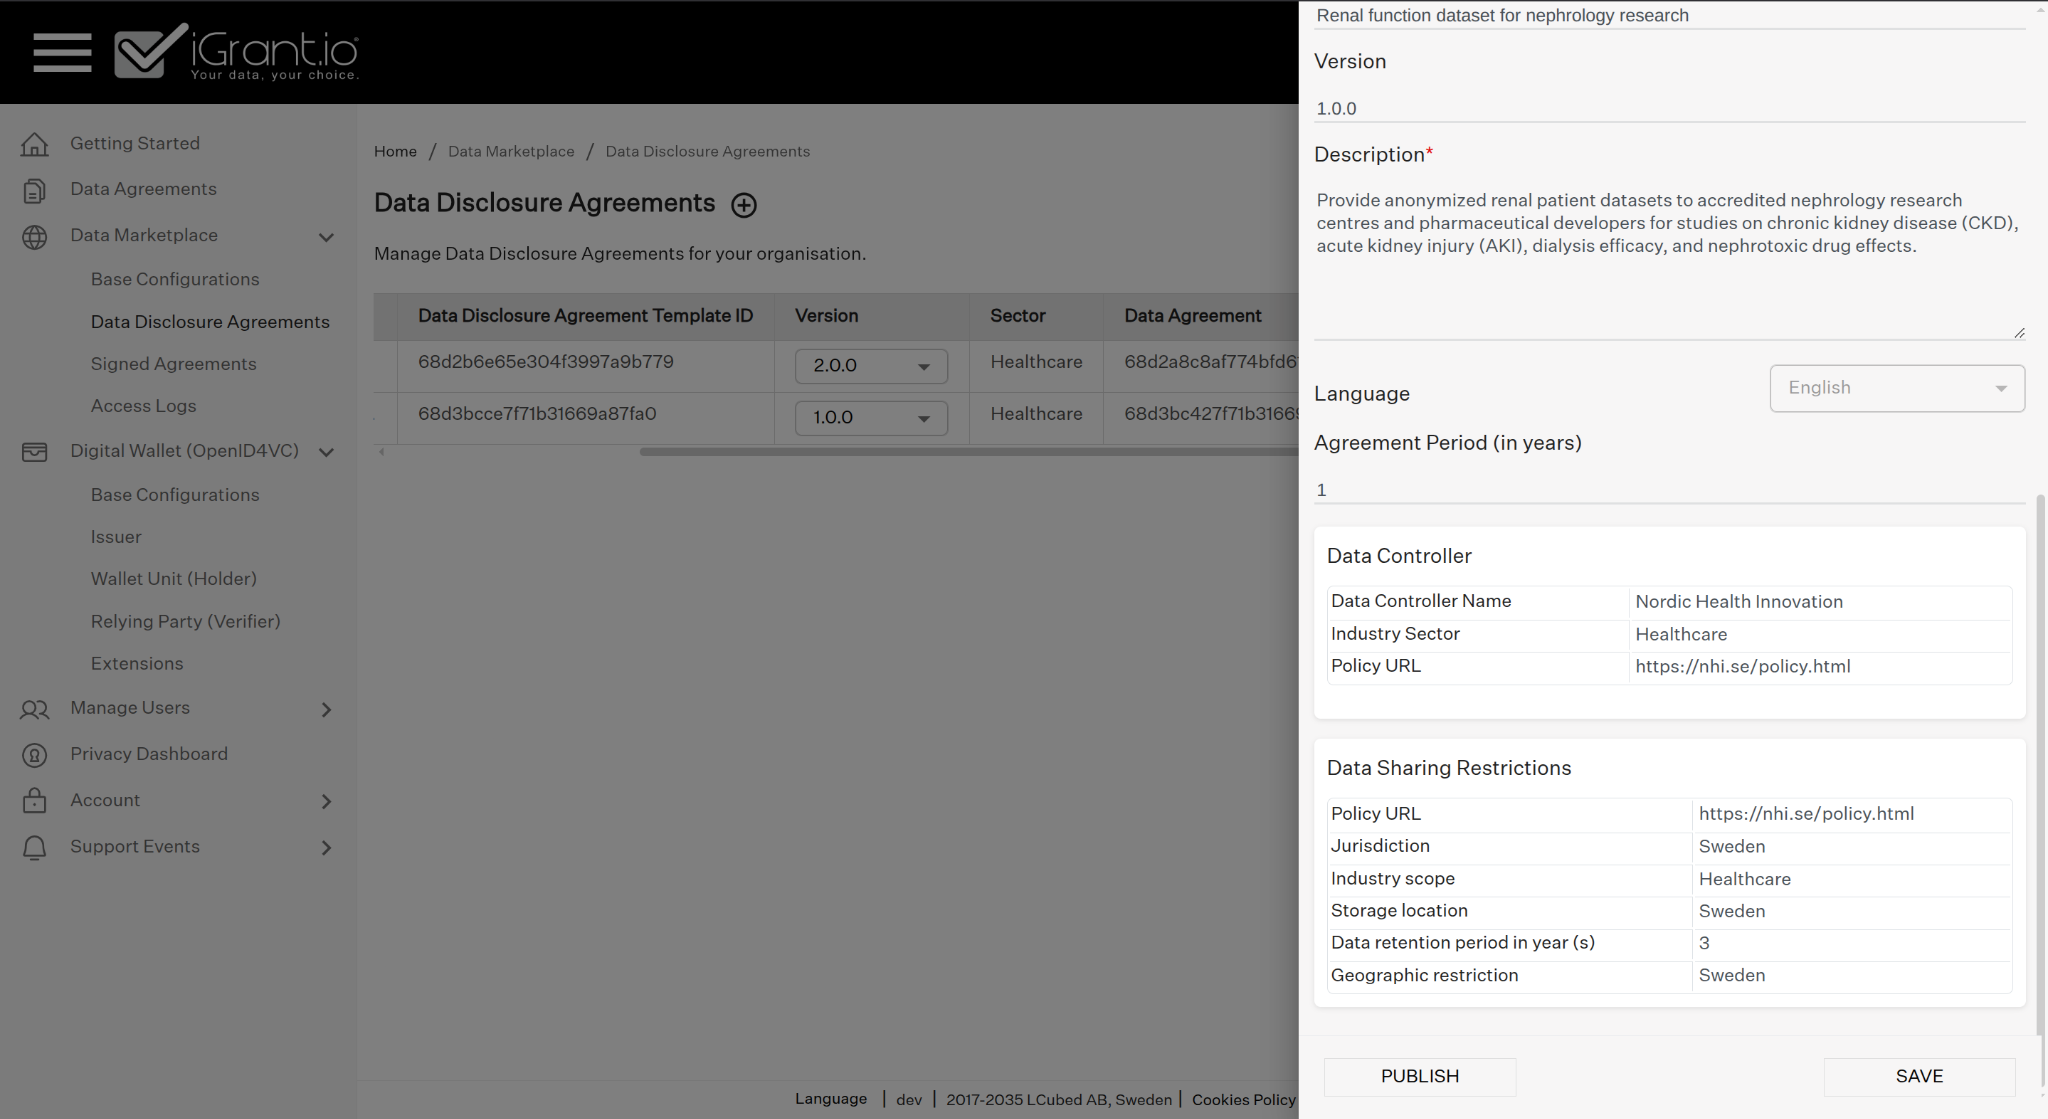
Fig A7: Configuring the DDA
A.2.3 Save and Publish
Save the draft, then Publish to make it available to the Data Marketplace.
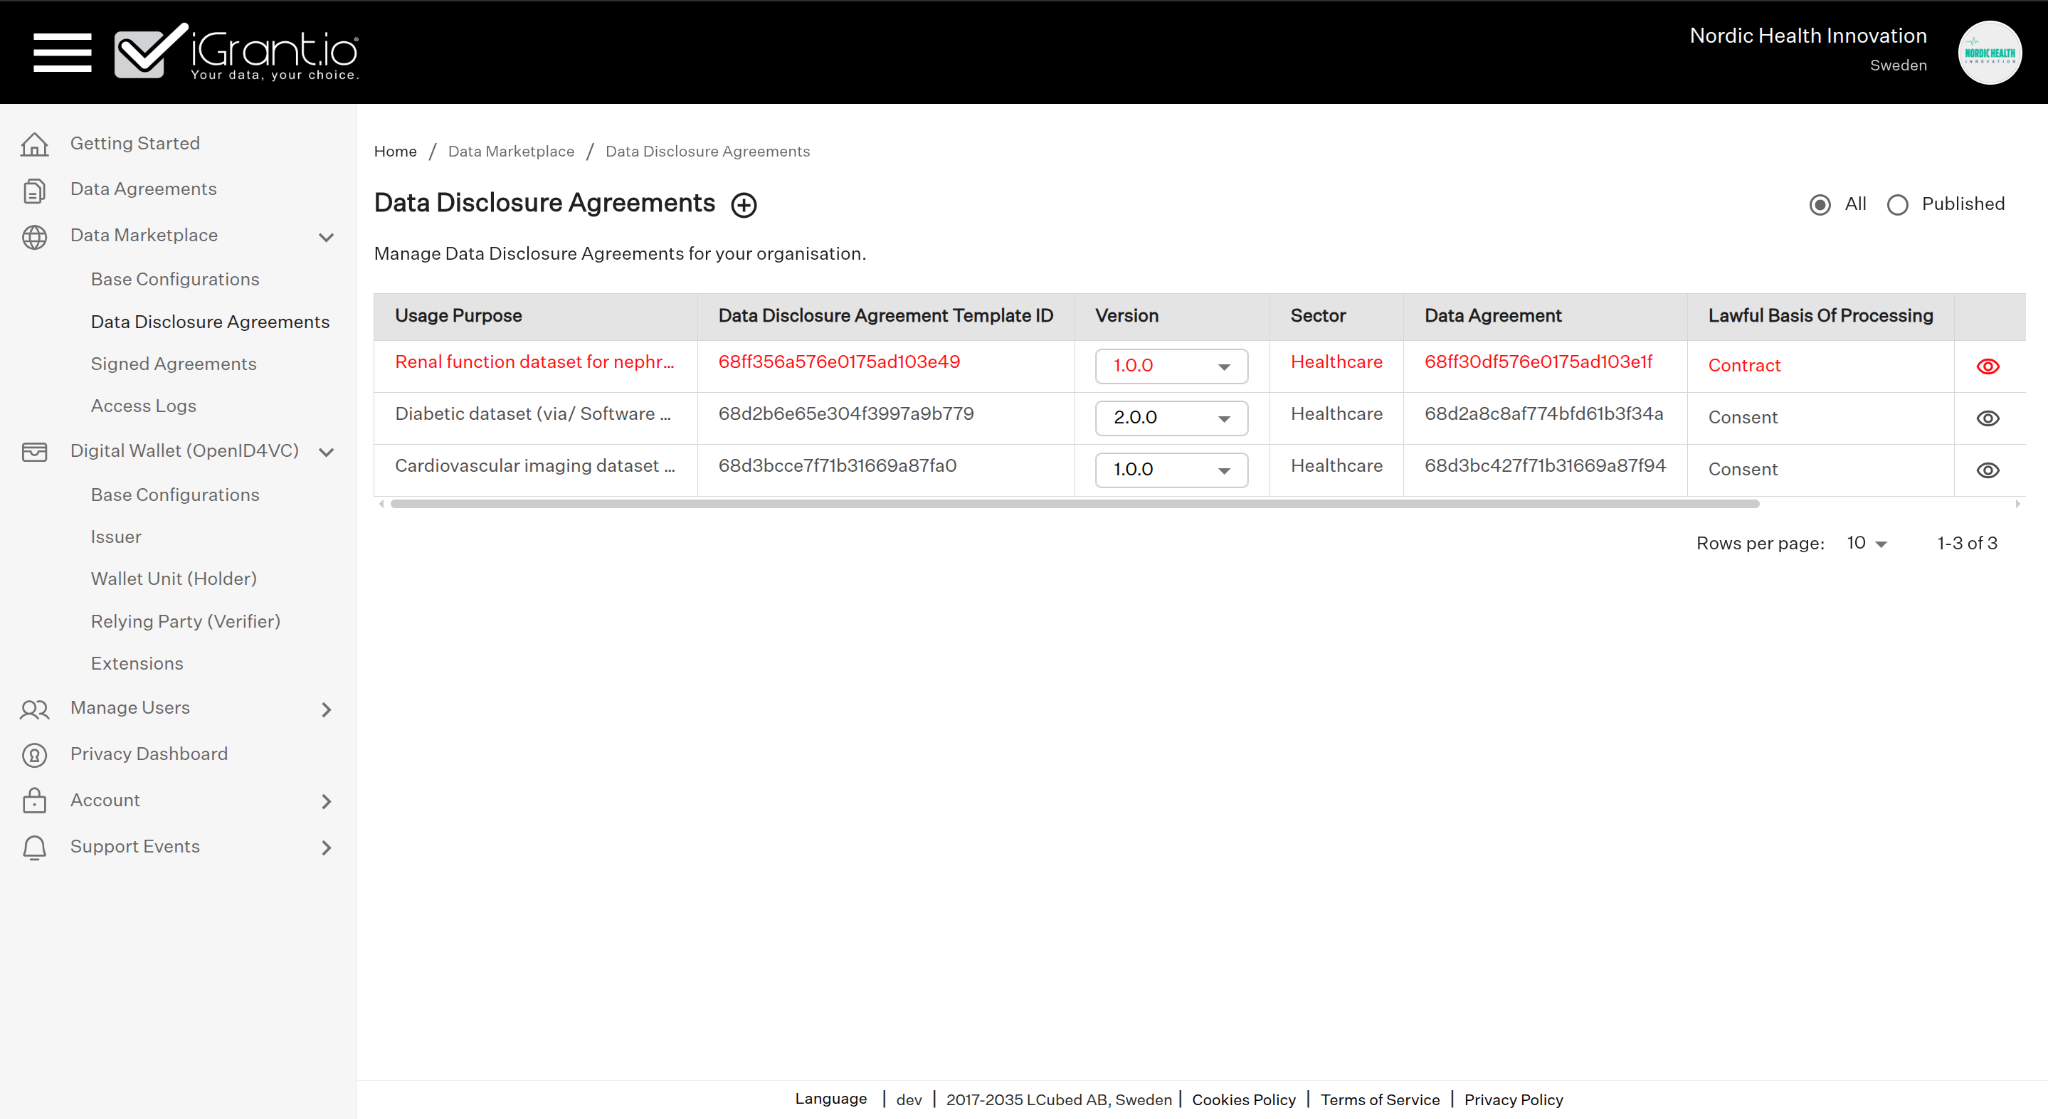
Fig A8: Unpublished DDA
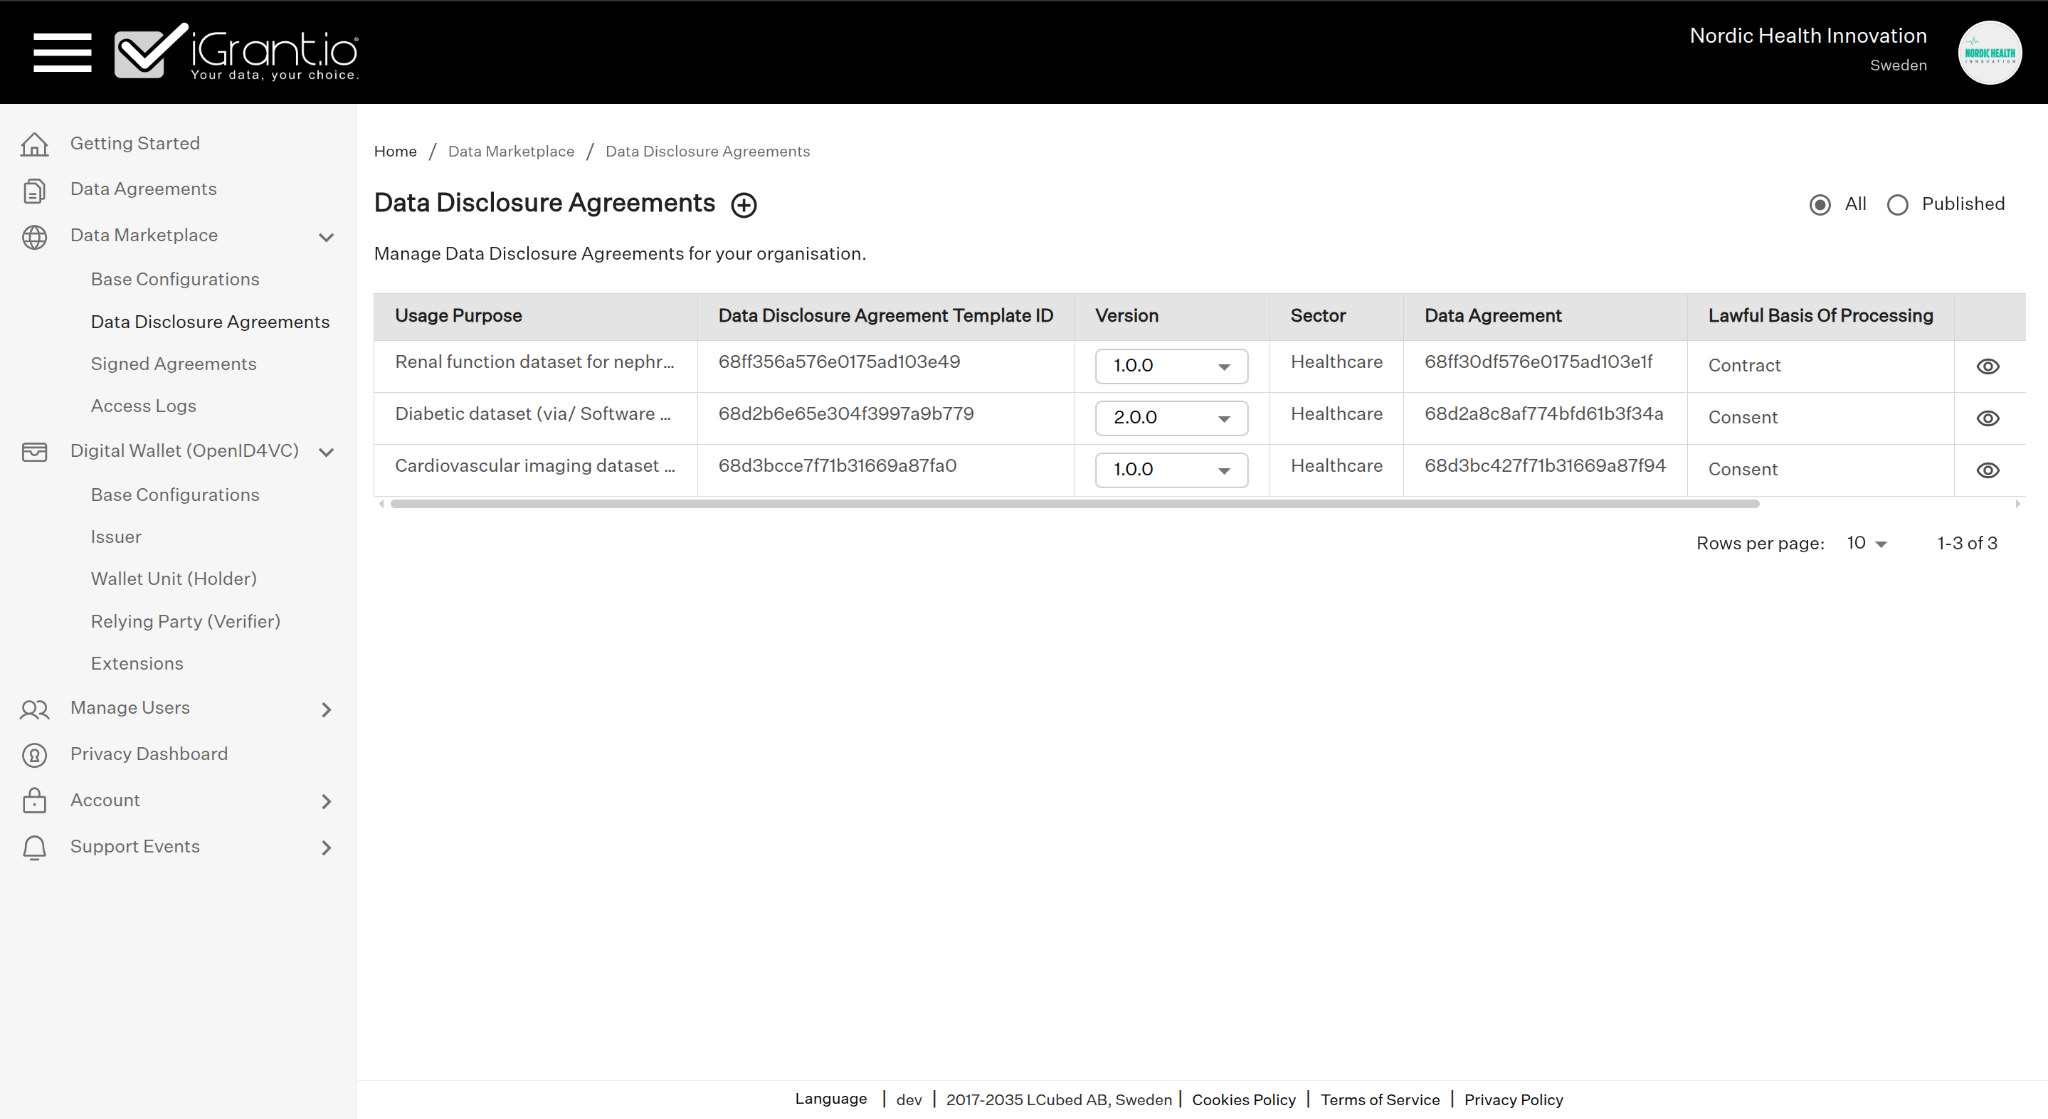
Fig A9: Published DDA
Appendix B: Citizen Data Governance & Privacy
The CRANE d-HDSI dataspace follows a strict governance framework that gives citizens full control over their personal data. This appendix explains how data agreements, consent, digital identity, and privacy work from the citizen's perspective — helping organisations understand the end-user experience of the governance model.
Managing Your Data Agreements
The Privacy Dashboard is available from within the MyHealthEnabler app settings. It shows you all the data agreements linked to your account.
Each agreement represents a specific type of data that an organisation collects or handles on your behalf. For example:
- Continuous Glucose Monitoring (CGM) Dataset: Health readings from your glucose monitoring device
- User Registration Data: Your basic account information
- Insulin Usage Dataset: Records of your insulin dosage and usage
- Research Use of Data: Information shared for approved medical research
- Contractual Purpose: Data needed to provide you with healthcare services
Each agreement has a simple toggle switch: Allow (green) means the organisation can use that data, and Disallow (grey) means you have opted out. You can change your choice at any time by tapping the toggle. Tap on any agreement to see its full details, including why the data is being used, how long it is kept, and which organisation is responsible for it.
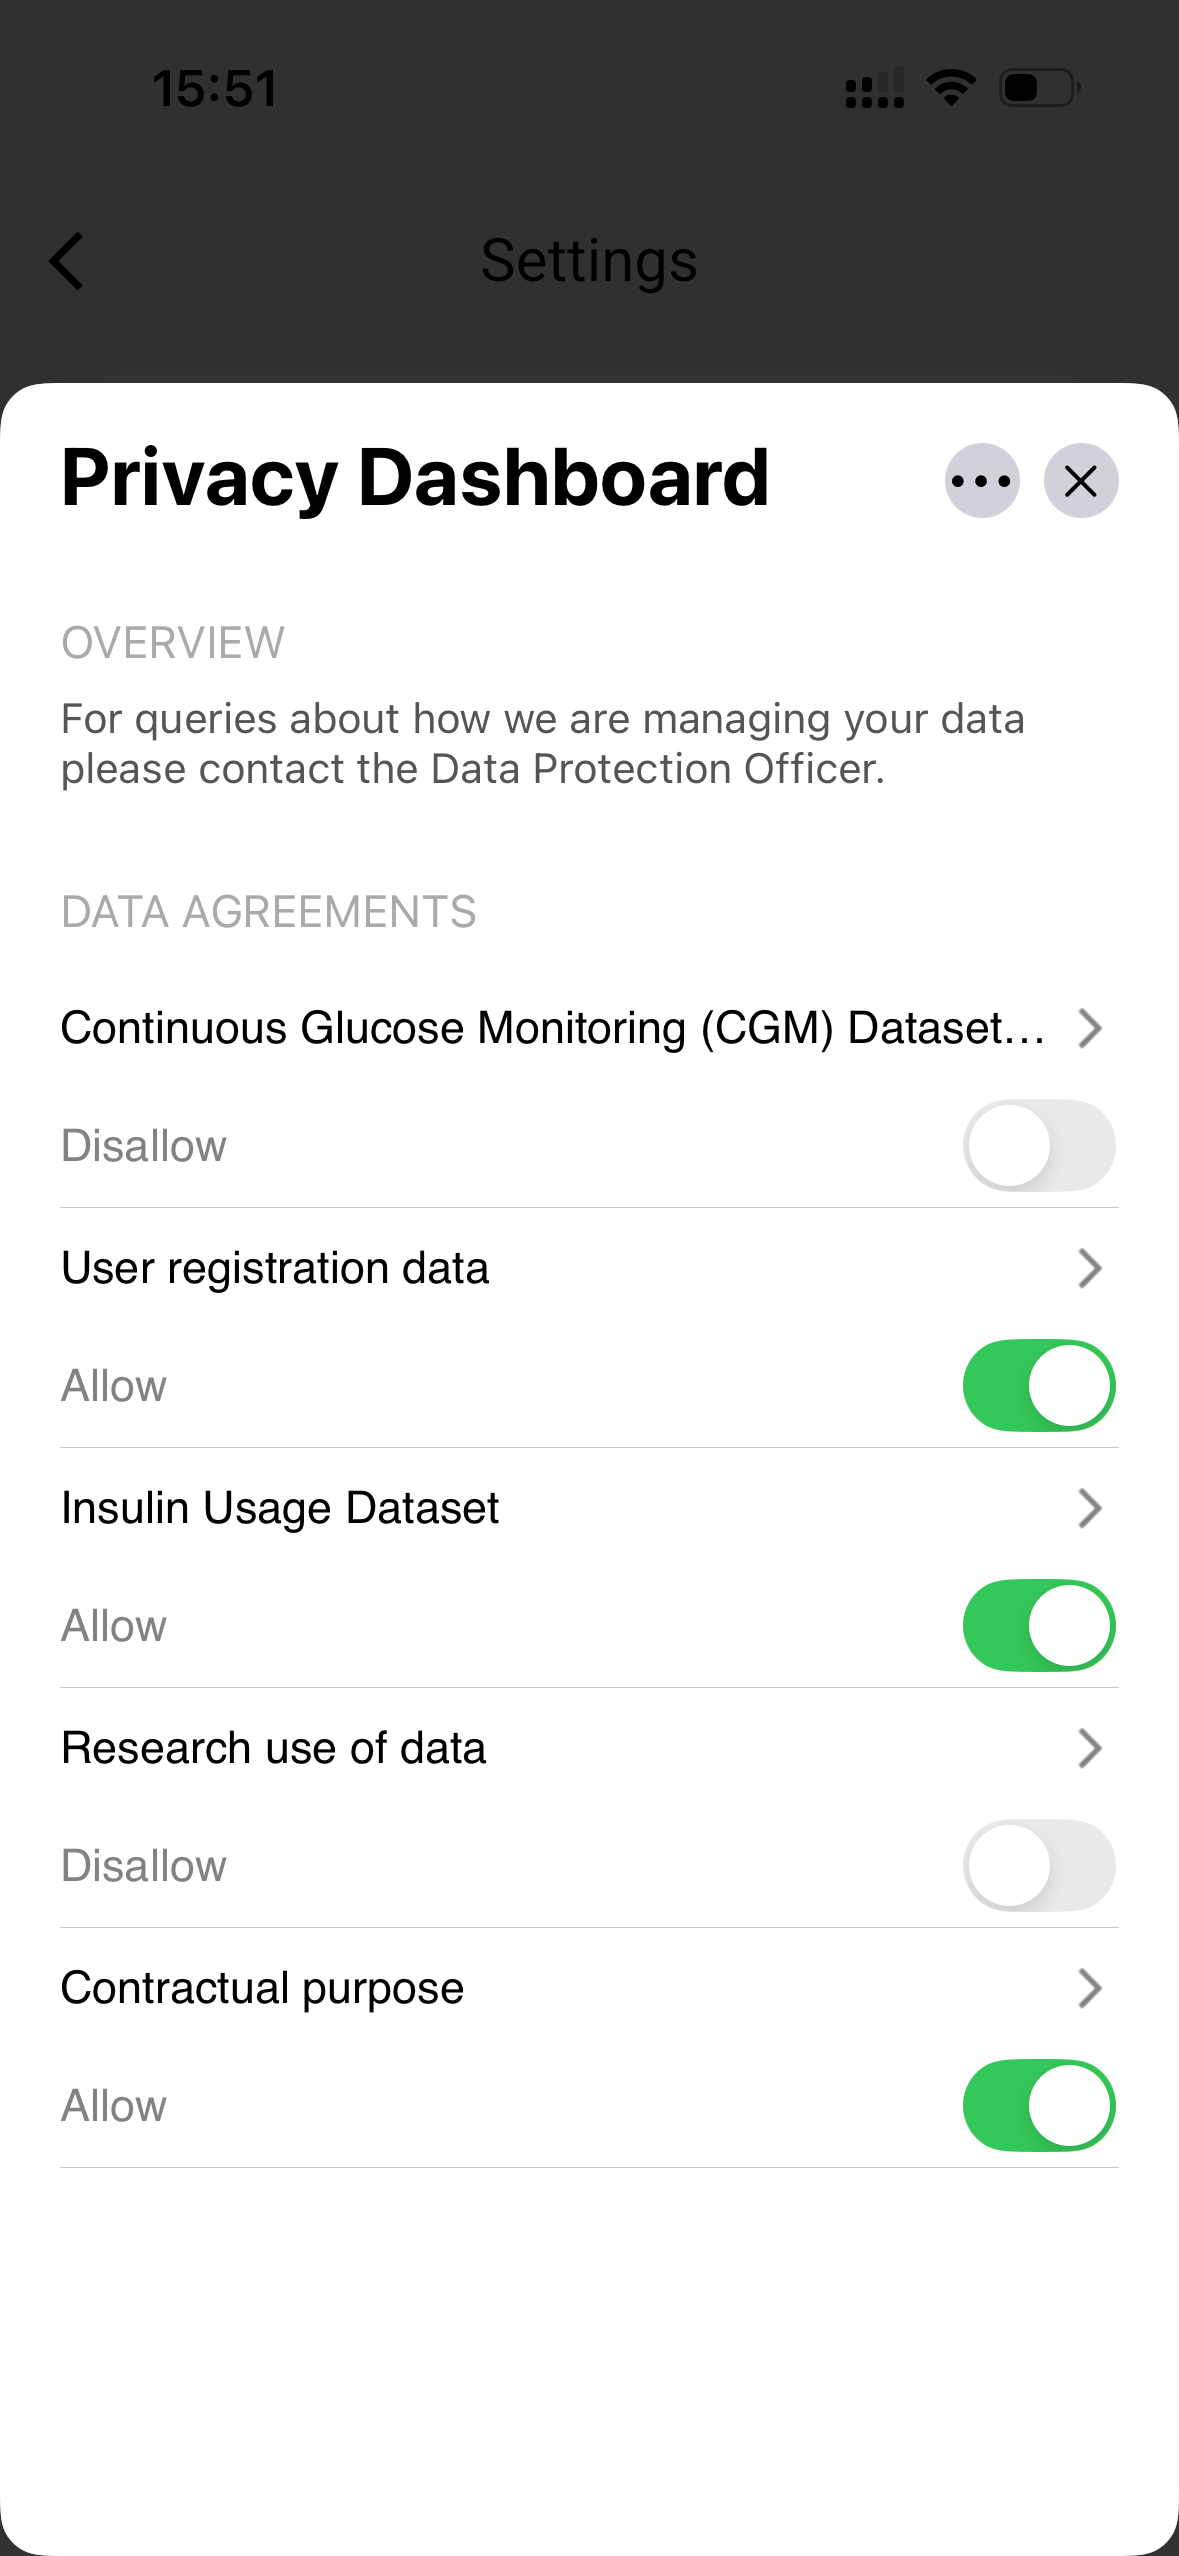
Privacy Dashboard in MyHealthEnabler: view and control all data agreements
Giving and Withdrawing Your Permission
When an organisation asks to access your data for the first time, MyHealthEnabler shows you the full details before anything is shared. You can review:
- What specific information will be collected or shared
- Why it is being used
- How long it will be stored
- Which organisation is responsible for looking after it
- Where the data will be kept
You can choose to Authorise or Cancel the request. If you authorise, your permission is recorded and the data sharing begins. You can change your mind at any time by going back to the Privacy Dashboard and switching the agreement to Disallow.
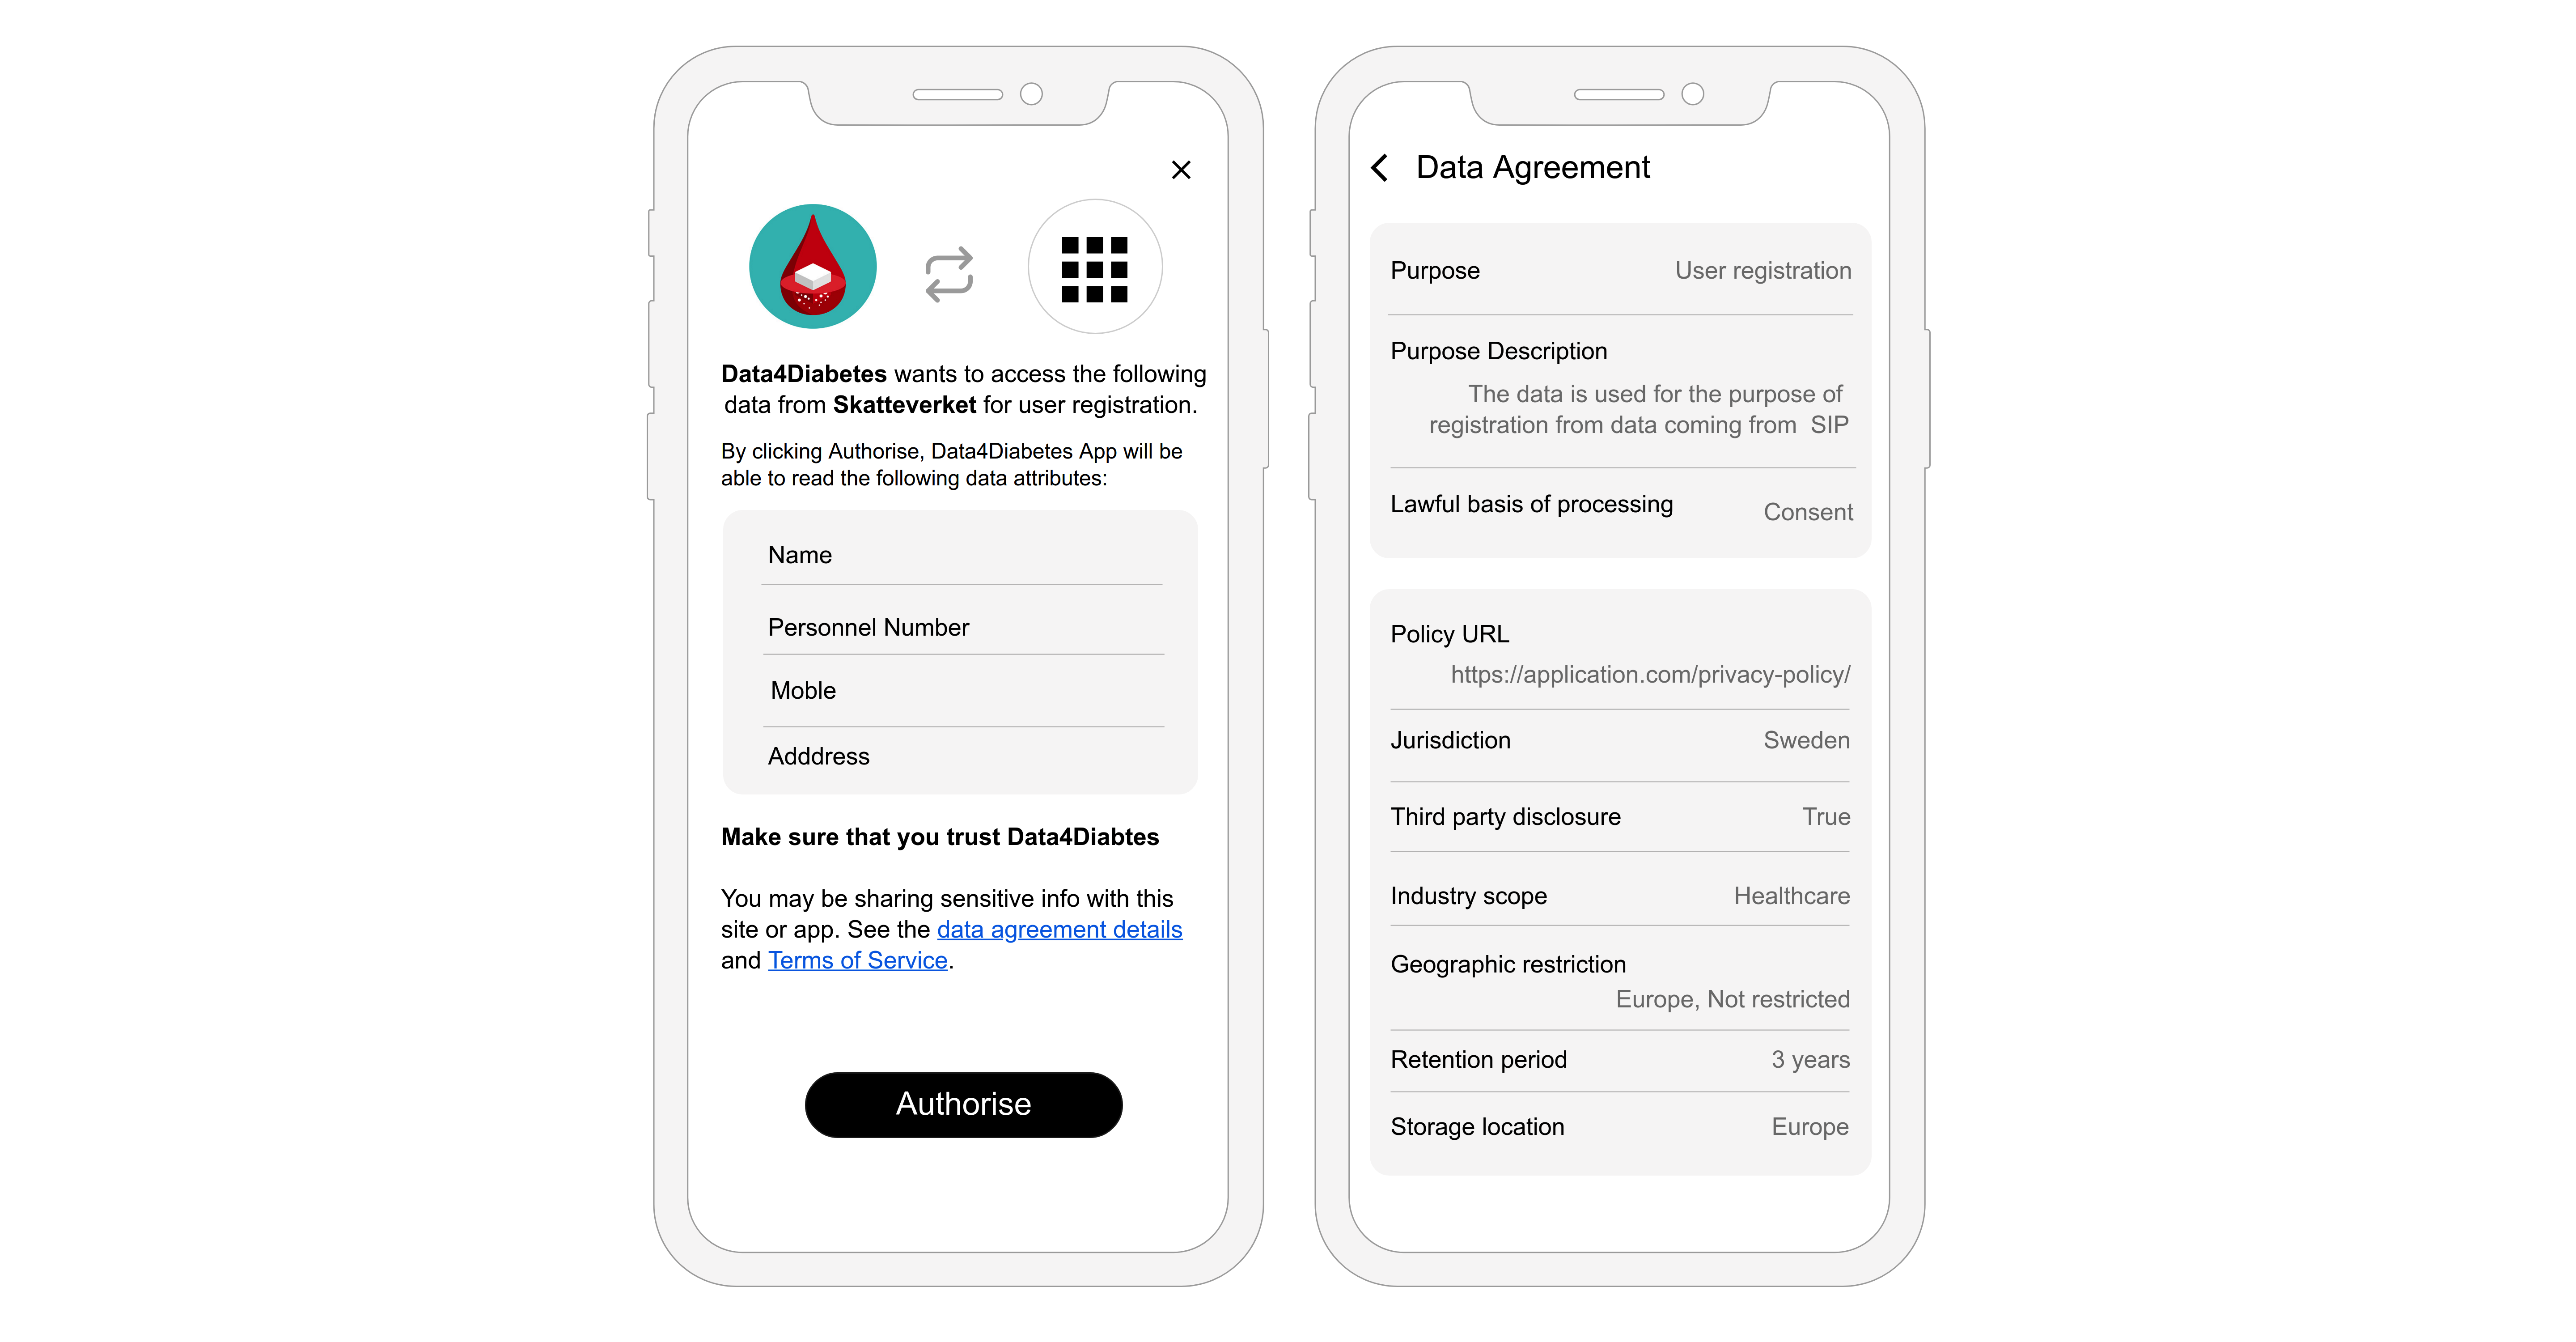
Consent Module: review data agreement details before authorising data sharing
Your Digital Identity Wallet
MyHealthEnabler includes a built-in digital identity wallet that keeps your personal credentials safe on your device. The wallet allows you to:
- Receive official documents from trusted organisations, such as proof of identity or health-related certificates
- Share only what is needed when a service asks to verify your identity, without revealing unnecessary personal details
- Stay connected with healthcare providers and other organisations you interact with
- Respond to requests through notifications when an organisation needs to check your identity
- Back up and restore your wallet data securely
Your identity wallet ensures that your personal information stays under your control and is shared only when you choose to share it.
How Your Data is Shared
When you use MyHealthEnabler, your data is only ever shared in a way that you can see and control:
- Your health data (for example, from glucose monitors or other devices) is collected by the app
- Before any data is shared with an organisation, the app asks for your clear permission
- Once you give permission, data is shared securely with the organisations you have approved
- You can check all your active agreements and their status through the Privacy Dashboard at any time
- Every action is recorded, so there is always a clear trail of what was shared and when
Need Help with Your Data?
The Privacy Dashboard includes contact details for the Data Protection Officer (DPO) of each organisation. If you have any questions about how your data is being looked after, used, or shared, you can get in touch with the DPO directly using the contact information in the app.